YOUR * “ READAND SAW THISBOOK Model JVM57 .,+: . 4( ,.. . . ‘.* >.- ,. -4. - . ----. >> ,. , . .
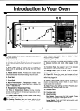
Before Using Your Microwave Oven Read This Use and Care Book Record Model and Serial Numbers it contains detailed information on the operation and recommended maintenance of your new Microwave Oven. Once YOU have read the book, keep it handy to answer any questions you may have. Your General Electric Microwave Oven has a nameplate on which is stamped the model number and serial number. (See page 9 for location.
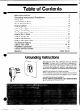
,’ \ * Table of Contents Before Microwaving . . . . . . . . . . . . . . . . . . . . . . . . . . . . . . . . . . . . . . . . . . . . . . . . . . . . . . . . . . . . . 2 Grounding Instructions&Precautions . . . . . . . . . . . . . . . . . . . . . . . . . . . . . . . . . . . ...3 Safety Tips . . . . . . . . . . . . . . . . . . . . . . . . . . . . . . . . . . . . . . . . . . . . . . . . . . . . . . . . . . . . . . . . . . . . . . . . 4 Introduction to Oven . . . . . . . . . . . . . . . . . . . . . . . . . . .
Safetv Tim to Follow 1. For personal safety the oven must be properly grounded. See grounding instructions on Page 3 of this book. for TV dinners. However, when using metal in the microwave oven, keep metai at least l-inch away from sides of microwave oven. 2. Cooking utensils may become hot because of heat transferred from the heated food. This is especially true if plastic wrap has been covering the top and handles of the utensil. Pot holders may be needed. 13.
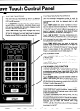
Introduction to Your Oven @@ .e@ 1-41 “,1 I .4- / 14 fl W --- d (. Door Handle. Oven doesn’t securely latched. operate TEMP COOK, DEFROST, HOLD or HOLD/TIMER. unless door is 2. Door Latch. Push in to open door. 15. Number Pads. Touch ature and Power Level. 5. Plastic Stirrer Cover. Protects the mode stirrer which distributes microwave energy into the oven. 6. Oven Vent. 18. Start. Press after setting controls. Prevents dental starting. Always press Start last. Probe. acci- 19.
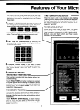
Features of Your Micr( The Touch Control Panel allows you to set the oven controls electronically with a press of the finger. It’s designed to be easy to understand and use. Follow these steps: 1. SELECT A MICROWAVING METHOD by touching one of these basic cooking function pads. (The functions and their uses are explained in this book.) Use the following special function pads for extra flexibility. (This book tells you when to use each pad.
ave Touch Control Panel 1 - THE TIME FUNCTIONS THE TEMPERATURE The oven lets you mic~owave by time in 2 different ways. Program Time Cook and Defrost with Hold for even greater flexibility. Use the automatic temperature probe to cook by temperature in 2 ways. Temperature Cook can be programmed with Hold for delayed start or with Defrost. Touch DEFROST and enter time for uniform defrosting with little or no attention. Automatic Power Level of 3 can be changed after time entry.
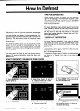
How to Defrost .” TIPS FOR DEFROSTING Foods frozen in paper or plastic can be defrosted right in the package. The Microwave Guide & Cookbook gives you special instructions for packaging and freezing foods which will be used in automatic 3step cooking programs. For even defrosting, many foods need to be turned over, rotated or broken up part way through the defrosting time. Let the oven remember for you. If you set the oven for the first time period, it will signal when food needs attention.
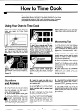
How to Time Cook Time Cooking, or cooking your food according to a predetermined amount of time, is probably familiar to you from conventional cooking. With your microwave oven, however, you preset the time and the oven turns off automatically. Using Your Oven to Time Cook Step 5: When time is up, oven signals. Oven, light, and fan shut off. Follow the cooking steps below to help you learn to Time Cook properly. Microwaving Tips Step 1: Fill a cup % full and 1 teaspoon of freeze fee.
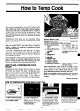
. How to Temp Cook For many foods, temperature cooking (Temp Cook) is the most accurate method. Use it for cooking meatloaf, roasts and other foods where internal temperature is the best test of doneness. Use it to heat or reheat foods to precise serving temperature. It takes the guesswork out of cooking, because the oven shuts off automatically when food reaches the preset temperature. Temperature Cook gives Level of 10. After entering change power level.
THE MICRO-THERMOMETERTM PROBE LETS YOU COOK TO ACCURATE TEMPERATURE. the probe cable doesn’t interfere with door seal. Do not leave the probe in the oven if it is not inserted in food; this could cause damage to the oven. The Micro-Thermometer probe is essential when using both the Temperature Cook and Sim ‘N Cook TM controls. When temperature cooking, insert the probe at least one inch into the food which you are cooking.
— How to Use Sim ‘N CookTMControl loosely around the probe, allowing some space for venting (see pictures in your cookbook). Do not use the lids to your casseroles. Setting the oven to use the “Sire ‘N Cook” control is easy. You don’t enter time because it is a temperature function. You don’t enter temperature or power level because the oven does that automatically. There is no automatic shut-off.
How to UseTemp HoId Temp Hold is an especially handy feature of your microwave oven. It lets you hold foods at serving temperature, keeping them “just-cooked” hot and fresh. . Solid (not rolled) roasts may be held below 150°. However, during the microwave roasting process, a great amount of heat is stored in the roast. Keeping the roast in the warm oven cavity during TEMP/HOLD can cause a greater increase in internal temperature than when allowing the roast to stand outside the oven on a kitchen counter.
. How to Use Memory Function The Memory Entry/Recall pad allows you to store complete 2, 3, or 4-step programs or any l-step cooking function which requires the entry of time or temperature. Just set the oven and press the Memory Entry/Recall pad instead of Start. As Memory Entry/ Recall pad is pressed, readout becomes blank, indicating that oven can now be used for other programs.
m Forget what you programmed the oven @ do? Just ask. ● ●O @Es ● 0 m Your new microwave oven will remind you of what’s tocome. Suppose you programmed the oven in the mornina to defrost, hold, then cook. You stored the inforrna~ tion for later. During the day, while you were using the oven for other things, you forgot what program you entered. ● ● D m TO ASK BEFORE YOU START MICROWAVING: TO ASK WHILE YOU’RE MICROWAVING: 1. Touch MEMORY ENTRY/RECALL.
How to Use the Hold/Timer Your HOLD/TIMER, which operates without microwave energy, has three timing functiorls. are timing a three minute phone call, touch 3, 0, and O. The readout panel shows 3:00. It operates as a Minute Timer, it can be set to delay cooking or may be used as a hold setting after defrosting. Hold/Timer can be set up to 99 minutes. Step 3: Touch START. The readout display shows the time as it counts down. Step 1: Touch HOLD/TIMER The read-out panel shows :0.
The Exhaust Feature ~ . \ I The exhaust hood feature on your GE microwave oven is equipped with a metal filter which collects grease. When the fan is operated, air is drawn up through the filter and is then discharged through provided venting to the outside. The hood also has a light for illuminating the counter surface. To remove grease filter, grasp the “finger hold” on the filter and push to the rear. The filter will drop out. Soak, t~en agitate filter in hot detergent solution.
Care for Your Microwave Oven A. Your New Microwave Oven is a Valuable Appliance, Protect It From Misuse By Following These Rules: ● Keep your oven clean and sweet-smelling. Opening the oven door a few minutes after cooking helps “air-out” the interior. An occasional thorough wiping with a solution of baking soda and water keeps the interior fresh. ● Don’t use sharp-edged utensils with your oven. The interior and exterior oven walls can be scratched. The control panel can be damaged.
\ \ Y& \\ .:...,....: .,,: .,. To replace hood lamp, first disconnect power at main fuse or circuit breaker panel or pull plug. Remove 2 screws from each side of lower panel and 3 screws from front edge. Lower panel until it rests on range below. Place fingers on top near each end of lamp. Press down and roll top of lamp gently toward front until it stops. Remove. Replace with same type and wattage lamp. Hold lamp near each end and insert prongs in sockets.
Common Problems and Easy Solutions Problem: My oven displayed the “temperature set” and a 3 second signal sounded even though I thought I set it right. Problem: The oven doesn’t seem to work at all. Solution: Make sure power is on. Check to see that 3-prong plug is inserted firmly into a proper outlet. Check the house control box to see that wall outlet and fuses are working. Solution: Be sure probe is in place in oven and connected at the receptacle end.
Need Service? -ou’11 find General Electric Factory Service Centers in all these cities. Gl;en3t#s, ALABAMA Birmingham 35210 2500 Crestwood Boulevard (205) 956-0333 DISTRICT OF COLUMBIA Jessup, MD 20794 8201 Stayton Drive (301) 953-9130 (Decatur-Huntsville) Huntsville -35805 1209 Putnam Drwe (205) 830-0150 Mobde -36609 1107 Beltline Htghway South (205) 471-1451 FLORIDA Fort Lauderdale 33309 1101 W McNab Rd.
FULL ONE-YEAR WARRANTY GENERAL ELECTRIC MICROWAVE RANGE (Includes cooking centers and microwave ovens) FROM GENERAL ELECTRIC TO YOU - This warranty is extended by General Electric to the original purchaser and to any succeeding owner and applies to products purchased in the United States, retained within the 48 contiguous states, the state of Hawaii or the District of Columbia, and employed in ordinary home use.