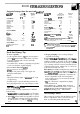
Refrigerator ❑ ! ❑ ● Saf*lnstrudions . . . . . . . . . . . . . . . . . . . . . . . . 3 Problem Solver . . . . . . . . . . . . . . . . . . . . . . . II, ~~~j+l~;;:$j;~~:~{ More questions ?...call f~~f~~j GEAnswr CenteP 80~626.2000 Operating Instrutiions, Tips Air Discharge Outlet,.....................................5 Food Storage Suggestions ..........................5 Ice Trays . . . . . . . . . . . . . . . . . . . . . . . . . . . . . . . . . . . . . . . . . . . . . . . . . . . . . . . . . . .
~LP US ~LP YOU Write dow the model and serial numbers. Read this book areftily. You’ll see them on a label on the back of the refrigerator. These numbers are dso on the Consumer Product Ownership Registration Card that came with your refrigerator. Before sending in the registration card, please write these numbers here: Mdel Number It is intended to help you operate and maintain your new refrigerator properly. Keep it handy for answers to your questions.
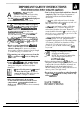
WARN~&When using this appliance, always exercise basic safety precautions, including the following: . Use this apphance ody for ik intended purpose as described in this Use and Care Guide, A a This refrigerator must be properly instied and lomted in accordance with the hstiation hstructions before it is used. If you did not receive an kstallation kstructions sheet with your refrigerator, you can obtain one by cMing, toll free, the GE Answer Center@, 800.626.2000. ,:::::, : , .:::, .,,:::::: : :,, .
Temperature Control Dial The temperature control did has settings from “M~” to MM” plus “0~’. “MN” is the warmest. “MU” is the coldest. Intidly set the temperature control did at “3”. Nter using the refrigerator for 24 hours, adjust the temperature control to the setting that is best suited to your needs. NOTE: ● If the refrigerator is mplugged or turned off, you must allow 3 minutes before starting it or plugging it back in. H you attempt to restart it in less than 3 minutes, it will not start.
— FOOD STOWGE SUGGESmONS Suggested storage times for meat and podtry* Eating quali~ drousafter time shown DAYS IN REFRIGERATOR AT 35° to 40° F. (2°to 4“ c.) MONTHS IN FREEZER AT 0° F. (-18” C.) Fresh Meats Roasts (Beef & Lamb) . . . . . . . . . . . . . . . . . . . . . . 3 to 5 Roasts (Pork & Veal) . . . . . . . . . . . . . . . . . . . . . . . . 3 to 5 Steaks (Beef) . . . . . . . . . . . . . . . . . . . . . . . . . . . . . . . . . . . . 3 to 5 Chops (Lamb) . . . . . . . . . . . . . . . . . . . . . . . .
Cleaning-Ou@ide The door handes and trim (on some models) can be cleaned with a cloth dampened with a solution of mild fiquid dishwashing detergent and water. Dry with a soft cloth. Don’t wax handles or trim. Keep the finish clean. Wipe with a clean cloth, lighdy dampened with kitchen appliance wax or mild liquid dishwashing detergent. Dry and polish with a clean, soft cloth. Do not wipe the refrigerator with a soiled dishwashing cloth or wet towel. These will leave a residue that can damage the paint.
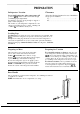
Refrigerator Location Clearances Do not instill refrigerator where temperature will go below 60°F. because it will not run often enough to maintain proper temperatures. Do install it on a floor strong enough to support a fully loaded refrigerator. The location of your refrigerator is important. To save energy avoid locating it next to a range, a heating vent or where tie sun will shine directly on it. Allow the following clearances for ease of installation and proper air circulation. Top . . . . . . . .
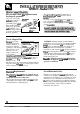
~STALLATION WQ~~NTS ~ORTANT...Please Rad -my For personal safety, t~s appliance must be properly grounded. The power cord of this PREFERRED apphance is equipped MHHOD with a three-prong ah (grounding) plug wtich .? mates with a standard p~ + three-prong (grounding) Insure proper wdl outlet (Fig. 1) to ground exists minimize the possibility &fore use of electric shock hazard from this appliance. I Have the wdl outlet and circuit checked by a qurdified electricim to m~e sure the outlet is .DroDerlv . .
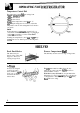
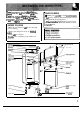
~ese instructions are for c- the @es from the lefi side to the at side. Hyou ever want to ch~e the @es back to the ri@t side, fo~ow tiese same instructions (mere& reverse d references to lefi and ri@t). ONCE YOU BEGIN Q Handle parts =e~ to avoid s-tching paint %t screws down by their related parts to avoid using them in the wrong places. . men reins-g door hinges, be sure to use the same number of shims and washers as were origin~y used.
Refer to the disassembly diagram and change the door hinges in the fo~owing procedure. The numbers in the diagram indicate the procedure order in the instructions. 1. Remove the hinge cap by twisting it off. 2. Remove the upper hexagonal head screws. The freezer door can now be removed. 3. Remove the middle hexagonal head screws. The refrigerator door can now be removed. Tilt the refrigerator back or ky it on its back for steps 4,5, and 6.
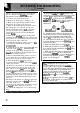
● Q~STIONS? USE THIS PROBLEM SOLVER PROBLEM REFRIGERATOR DOES NOT OPERATE MOTOR OPERATES FOR LONG PERIODS MOTOR STARTS AND STOP FREQUENTLY VIBRATION OR RATTLING OPERATING SOUNDS OUTSIDE OF THE REFRIGERATOR FEELS WARM FRESH FOOD OR FREEZER COMPARTMENT TEMPERATURE TOO WA~ ● [ POSSIBLE CAUSE May be in defrost cycle when motor does not operate for about 30 minutes. ● Temperature control in OFF position. “ If interior light is not on, refrigerator may not be plugged in at wall outlet.
PROBLEM SOLWR (continued) PROBLEM I POSS~LE CAUSE FROST OR ICE CRYSTALS Frost within package is normal. ● Door may have been left ajar or there may be a package holding the door open. I ● Too frequentortoolong dooropenings. ON FROZEN FOOD ● Door may have been left ajar. ● Turn temwrature control to colder setting. SLOW FREEZING OF ICE CUBES ● ICE CUBES HA~ ODO~ASTE i Too frquent or too long door openings. Q In humid weather, air carries moisture into refrigerator when doors are opened.
NOTES 13
NO~S 14
We’ll Be There With tie purchase ofyour new GE appliance, receive the assurance that ifyou ever need information or assistance horn GE, wdll be tiere. All you have to do is call—toll-free! lmHome Repak Sewice 80ME
YOUR GE REFRIGERAToR WARRANm WHAT IS COVERED Staple sales slip or cancelled ch~ here. Proof of original purchase date is needed to obtain service under warran~. FULL ONE-YEAR WARRANTY For one year from date of original purchase, we will provide, free of charge, parts and service labor in your home to repair or replace any pa~ of the refrigerator that fails because of a manufacturing defect.