GEAppliances ProfileModels24 & 27 with RefreshmentCenter andElectronicDispenser Part No. 162D7736PO05 Pub.No.
Congratulations! YouAre Now Part of the GEFamily. Welcome We're to the GE family. proud products of our quality and we are committed to providing dependable service. You'll see it in this easy-to-use Owner's Manual and you'll hear it in the friendly voices of our customer service department. Best of all, you'll experience these values each time you use your refrigerator. That's important, because your new refrigerator will be part of your family for many years.
Safety Information GE& You, A Service Partnership. Ask any GEappliance owner and they will tellyou we stand behind our products with unmatched quality service. However, did you know that most questions result from simple problems thatyou can easily fix yourself injust a few minutes? This Owner's Manual can tell you how. manual Inside you will find many helpful hints on how to use and maintain your refrigerator properly.
IMPORTANTSAFETYINFORMATION. READALLINSTRUCTIONSBEFOREUSING. WARNING! Use this appliance only for its intended purpose as described in this Owner's Manual. SAFETY PRECAUTIONS When using electrical appliances, basic safety precautions should be followed, including the following: [] This refrigerator must be [] In refrigerators properly installed and located in accordance with automatic the Installation of the ejector before contact Instructions it is used.
IMPORTANT'. PROPER DISPOSAL OFTHEREFRIGERATOR Child entrapment and suffocation the past.Junked or abandoned are not problems refrigerators dangerous...even if they will sit for "just a few days." If you are getting rid of your old refrigerator, follow the instructions below of are still please to help prevent accidents. Before You Throw Away YourOld Refrigerator or Freezer:. [] Take off the doors. [] Leave the shelves in place so that children may not easily climb inside.
IMPORTANT SAFETYINFORMATION. READALL INSTRUCTIONSBEFOREUSING. WARNING! HOW TOCONNECT ELECTRICITY Do not, under any circumstances, cut or remove the third (ground)prong from the power cord. Forpersonal safeq, this appliance must be properly grounded. The power cord of this appliance is equipped with a 3-prong (grounding) plug which mates with a standard (grounding) wall outlet to minimize shock hazard from this appliance.
The largerslotin the adaptermustbealignedwith thelargerslotin thewall outlettoprovideproperpolarityin theconnectionofthe powercord. Whendisconnectingthepowercordfrom theadapter,alwayshold the adapterin placewith onehandwhilepulling thepowercord plugwith theotherhand.If thisisnot done,theadapterground terminalisverylikelytobreakwithrepeateduse. If theadaptergroundterminalbreaks,DO NOT USE the until a proper ground has been refrigerator established.
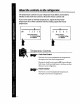
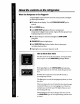
About the controlson the refrigerator. The temperature controls on your refrigerator have letters and numbers. Initially set the fresh food control at 5 and the freezer control at C. If you want colder or warmer temperatures,adjust the fresh food temperature first. When satisfied with that setting, adjust the freezer temperature.
The Electronic Monitor and Diagnostic System monitors the operation of your refrigerator and controls dispenser functions. ElectronicMonitor and DiagnosticSystem Lighted word NOR/IOIL indicates detected _DOOR either by the diagnostic that no failure has been system. OPEN. Red signal light flashes door is open. to tell you when WARM TEMP.Red signal light tells you when freezer _ keeping temperature Flashing diagnostic is above noxrnal.
About the controlson the refrigerator. When YourRefrigerator is First Plugged In All panel lights come on for five seconds, go offexcept a beep sounds, [] Pk- flashes in the display. Touch erase it. [] Word NO_q/l£ SYSff_M CHECK-RESE'rpad temperature is higher than normal. temperature [] Door alarm to glows. [] Red WARM TEblPlight glows if freezer keeping and lights as follows: beeper compartment It goes offwhen proper food- is reached. is activated and light on DOOR pad glows.
Why the Red WARM TEMP Light Glows At first, it's probably refrigerator few hours hasn't because completely your newly-installed cooled down yet. Wait a for it to cool, and then the light will go out. From then on, the red light will glow whenever temperatures inside get too high for proper storage, happens, ffthis absolutely necessary, open the doors and close them food only when as quickly as possible. As soon as inside temperatures retum to normal, the light goes out.
About the controlson the refrigerator. How the Electronic Monitor and Diagnostic System Works The electronic monitor when something Ifa diagnostic and diagnostic code appears needs special system alerts you starts to go wrong. attention. display code flashes are accompanied on the display, something To get your attention, the until you erase it. The first 6 flashes by beeps.
This flashing code tells you to check Has any of it started the freezer door to thaw? A package compartment door open. more often than absolutely code is displayed. your frozen Touching food. may be holding Don't open the necessarywhile this the SYSTEM CHECK-RESET pad after the freezer compartment temperature returned to normal will erase the code. This flashing has code tells you the power to the refrigerator has been interrupted for more than two seconds.
About the controlson the refrigerator. How To Test Temperatures Use the milk test for the fresh food compartment. of milk on the top shelf and check warm or too cold, adjust Place a container it a day later, ffthe the temperature Use the ice cream test for the freezer compartment. container of ice cream in the center of the freezer a day. ffit's too hard or too soft, adjust milk is too controls. Place a and check it after the temperature controls.
About the refrigeratorshelves and dishes. Not all features are on all models. Rearranging theShelves Shelves in the fresh food and freezer compartments are adjustable. •!?ii_'ii _,_., _iiiiiiiil;ii ,,_ _, •••_i_iii "_, •'•_!!!ii_ ¸¸_•_...... •_ ,•:_•_:•_ '•"•_'_il _•!_L, _i__ _, __,, ¸, _,_,_• O.ick _e" ....DishesS,_em and lids are not des_qned for I I _'- use on the range top, broiler or in the regular oven. Such use can be hazardous. ............
About the storagedrawers. Not aft features are on all models. Fruit and Vegetable Drawers Excess water that may accumulate drawers should of the and the drawers wiped dry. AdjustableHumidi_yDrawers t Slide the control to provide ?_ii! all the way to the HIGH setting high humidity recommended for most vegetables. Slide the control iliill be emptied in the bottom ••_il i_ ¸ iiiiiiiiiiii_i_ all the way to the LOWsetting provide lower humidity most fruits.
About storagedrawer removal Not all features are on all models. Drawer Removal Drawers can eas'dy be removed pulfing past the stop location. by tilting up slightly and Removethe door bins from the fresh food door beforeremoving the drawe_. To remove the shelf above the top drawer, first remove the top drawer and any food on the shelf. Then shelf up at the front To replace tilt the and lift it up and out of the tracks.
About the additional features. Not all features are on all models. Deep Door Shelves in the Freezer Compartment Detachable shelfextenders door shelves, storage providing deepen more and enclose storage room fixed and greater flexibility. To remove: Lift the shelf extender mounting hooks come straight up until the out of the slots in the door. To replace: Line up the hooks with the slots in the door and push in and down.
About the refreshmentcenter. Refreshment Center Compartment It makes frequently door readily accessible compartment refrigerator used items stored through door without the refreshment having center to open the main door. It provides an extra counter-high own light right at the refrigerator center on the fresh food compartment work surface with its when the refreshment door is open. Close the door after use.
About the automatic icemaker. A newly-installed refrigerator may take 8 to 12hours to begin making ice. Automatic Icemaker The icemaker will produce approximately depending eight cubes per cycle-- 120 cubes in a 24-hour on freezer temperature, conditions.
About the ice and water dispenser. To Use the Dispenser Press the rim of the glass gently against the dispenser pad. Select CUBEDIC£ CRUSHEDICE(on some models) or CHILLEDWATER. The spill shelf is not self-draining. spotting, To reduce the shelf and its grille should water be cleaned regularly. If no water is dispensed when the refrigerator is first installed, there may be air in the water line system.
About the ice and water dispenser. i_i!_ _ii!![ ii! ¸ i ! _iiii_iii_J!i,_ii i i_iiii_!i!i_! The water filter is an option at extra cost and is available from your dealer. Specify WR97X0214. It has complete • :___ installation i_i_iii_iii,_! ¸ _ copper instructions and installs on 1/40.D. " water line. Important Facts About YourDispenser n Add ice before filling the glass with a beverage. n Do not add ice from trays or bags to the storage crush or dispense [] Avoid overfilling glasses.
Care and cleaning of the refrigerator. Cleaningthe Outside Re_ center corapaame_ door---outside. It's important that you use only window ammonia or a damp cloth to clean Avoid using wax on the refreshment The dispenser well, beneath dry. Water cleaner the glass and trim. center door. the grille, should left in the well may leave deposits. the deposits by adding undiluted vinegar Soak until the deposits disappear or become enough without be wiped Remove to the well.
Care and cleaning of the refrigerator. Cleaningthelnside Refreshment center compartment door--inside. Wipe up spills right away. Use one tablespoon (15 ml) of baking soda in one quart (1 L) of water to clean the inside door surface, refreshment center bin and inside access door. Rinse, wipe dry. To hells prevent odocg leave an open in the fresh food and freezer box of baking soda compartments.
Under the Refrigerator For most efficient refrigerator operation, dean. Remove up dust. For best results, use a brush It is available the the base grille and sweep away or vacuum purpose. keep the area under specially designed at most appliance for this parts stores.
Replacing the light bulbs. Turning the control to the OFFposition does not remove power to the light circuit. FreshFoodCompartment-UpperLight Unplug refrigerator. Pull offthe Pull bottom then rotate temperature control knobs. of the light shield down and forward, the top up and off. After replacing with an appliancebulb of the same or lower wattage, reinstall the light shield and plug the refrigerator back in.
Refreshment Center (onsome rr_els) Unplug the refrigerator. Open fresh food compartment door, remove bin and raise refreshment center inner door. Press sides of flexible light shield tabs and allow the shield to release top locking to swing down. Unscrew burned-outbulb and replace it with an appliancebulb of the same or lower wattage. Placerear tab of light shield into door and rotate shield up until tabs lock into slots above. Plugrefrigerator back in.
Preparing to install the refrigerator. Read _eSe instmctio, s !comp!ete_ and Carefully. WaterSupplyto the Icemaker You will need to connect the icemaker A water supply kit (containing and instructions) m to a cold water line. copper is available tubing, shutoffvalve, fittings at extra cost from your dealer. RefrigeratorLocation Do not install the refrigerator 60°F. proper (16°C.) because where the temperature it will not run often enough will go below to maintain temperatures.
Rollers The milers have 3purposes: Rollers adjust so the door closes easily when opened about [Raise the front about 5/8" (15 mm) from the floor.] Rollers adjust so the refrigerator and does not wobble. Rollers allow you to move the refrigerator To adjust the rollers, remove Turn is firmly positioned the roller _¢nlterclock_ise adjusting on the floor away from the wall for cleaning. the base grille by pulling screws clockwise to Iowerit. halfway. it out at the bottom.
Installing the water line. Read these instructions completely and carefully. Before YouBegin This water line installation is not warranted by the refrigerator or icemaker manufacturer. Follow these instructions carefully to minimize the risk of expensive water damage. Water hammer (water banging in the pipes) in house plumbing can cause damage to refrigerator parts and lead to water leakage or flooding.
What YouWill Need dlow [] A cold water supp_ The water pressure must be between 20 and 120 p.s.i. [] Power drill. [] Copper tubin_ 1/4" outer the water supply. diameter to connect the refrigerator Be sure both ends of the tubing to are cut square. Do not use plastic tubing or plastic fittings becausethe water supply line is under pressure at all times. Certain types of plastic tubing may become brittle with age and crac£ resulting in water leakage.
Installing the water line. Install the Shutoff Install Valve the shutoffvalve tChoose a location water pipe. When water pipe, make the bottom, frequently used drinking for the valve that is easily accessible. into the side of a vertical horizontal on the nearest to avoid drawing Fasten Tighten from drilling the shutoffvalve the clamp to connect off any sediment from the water pipe. bit. Remove any burrs the hole in the pipe. to the cold water pipe with the pipe clamp.
Route the Copper Tubingand Connect It to the Shutoff Valve Route the copper tubing Route the tubing through refrigerator or adjacent between the cold water a hole drilled base cabinet) line and the refrigerator. in the wall or floor (behind the as close to the wall as possible. Be sure there is sulficient extra tubing [about 8 feet (244 cm)coiled into 3 turns of about 10" (25 cm] diameter] to allow the refrigerator to move out from the wall after installation.
Installing the water line. Read these instructionscompletely and careful!y. Connect the Tubingto the Refrigerator Before making the connection to the refrigerator, be sure the refrigerator power cord is not plugged into the wall outlet. We recommend that could installing a water filter if your water supply has sand or particles clog the screen of the refrigerator's water valve. Install it in the water line near the refrigerator.
Normal operatingsounds. Dependingon the placement of the refrigerator inyour kitchen, you may want to place a piece of rubber backed carpet under the refrigerator to reduce noise. The new high effidency and will have a higher compressor runs faster pitch hum or pulsating sound while operating. Defrost timer and refrigerator and off. control air inside temperatures the freezer which throughout. on the defrost heater sound defrost clicks on causing during a the cycle.
Beforeyou call for service... Troubleshootingtips Save time and money! Review the charts on the following pages first and you may not need to call for service. Possible Causes What ToDo Refrigerator 6oes no[ :: Refrigerator • Wait about operate defrost , in defrost cycle. 30 minutes cycle to end. • Move the flesh food control to desired Fresh food control in OFFpofifion. temperature ....... Refrigerator unplugged .....
Possible Causes What To Do Temperature control starts and stops motor to maintain even • This is normal. temperatures. Front roller screws or • See the Rollerssection. front leveling legs need adjuring. Slight vibration normal is • Try moving dishes around in refrigerator. Temperature control not set cold enough. • See the About the controls Warm weather or frequent door openings. • Set the temperature control one step colder. See the About the controls on the refrigerator section.
Beforeyou call for service... Possible Causes What ToDo Door left open. " Check to see if package is holding door open. Temperature control not set cold enough. •See the Aboutthecontrols ontherefrigerator section. Ice storage bin needs cleaning. • Empty and wash bin. Discard old cubes. Food transmitting taste to ice cubes. • Wrap foods well. odor/ Interior of refrigerator needs deaning, • See the Care and cleaning section. Poor-tastingincomingwater.
Possible Causes What ToDo Water supply line turned off or not connected. • See the Installing the water line section. Supplyline dogged with sediment. Air may be trapped in the water system. • Press the dispenser pad for at least two minutes. Foods transmitting odor to refrigerator. • Foods with strong odors should be fighdy wrapped. • Keep an open box of baking soda in the refrigerator; replace every three months. Spoiled food. Interior Moislute forms on Moisaxe:collects inside needs cleaning.
Beforeyou call for service... Possible Causes Hotair frombottom ofrehigerater Normal air flow cooling motor. In the refrigeration process, it is normal that heat be expelled in the area under the refrigerator. Some floor coverings will discolor at these normal What ToDo Your floor covering supplier should be consulted if you object this discoloration. to and safe temperatures. Water on kitchen floor or on bottom of freezer Drain in the bottom of the freezer dogged. Cubes jammed in chute.
ConsumerWarranty For customers in Canada CAMCOwarrants the replacement prove to be defective purchase. charge, The or repair in material Such parts will be repaired subject to the terms DEALERwarrants to provide Charge) Motor against to be defective sealed Compressor, defects at the option or workmanship m This warranty applies Refrigerator Camco and is connected abuse, accident, sealed refrigeration installed according to an adequate commercial and Refrigerant of Camco four years.
Refrigerator Warranty(Forcustomers in the United States) All warranty service provided by our Factory Service Centers, or an authorized CustomerCare®technician. For service, call 800-GE-CARES. GE Will Replace, At No Charge To You: A_part of the refrigerator in materials which fails due to a defect or workmanship. During warranty, GE will also provide, and in-home service to replace this full one-year free of charge, all labor the defective part.