Built-In Oven Self-Cleaning Oven with Trivection™ www.GEAppliances.com Safety Instructions . . . . . . . . . . . .2–7 Operating Instructions Adjusting Temperature . . . . . . . . . .34 Clock, Timer and Control Lockout . . . . . . . . . . . . . . .12 Controls . . . . . . . . . . . . . . . . . . . .9–11 Convection . . . . . . . . . . . . . . . .24–27 Defrost Feature, Guide . . . . . . .19, 20 Introduction . . . . . . . . . . . . . . . . . . .8 Oven . . . . . . . . . . . . . . . . . . . . .
WARNING! For your safety, the information in this manual must be followed to minimize the risk of fire or explosion, electric shock, or to prevent property damage, personal injury, or loss of life. PRECAUTIONS TO AVOID POSSIBLE EXPOSURE TO EXCESSIVE MICROWAVE ENERGY Operating Instructions Safety Instructions IMPORTANT SAFETY INFORMATION. READ ALL INSTRUCTIONS BEFORE USING.
SAFETY PRECAUTIONS When using electrical appliances, basic safety precautions should be followed, including the following: WARNING—Grounding Instructions: WARNING—To reduce the risk of burns, electric shock, fire, injury to persons or exposure to excessive microwave energy: ■ Be sure your appliance is properly installed and grounded by a qualified technician in accordance with the provided installation instructions. ■ Have the installer show you the location of the circuit breaker or fuse.
Safety Instructions IMPORTANT SAFETY INFORMATION. READ ALL INSTRUCTIONS BEFORE USING. WARNING! SAFETY PRECAUTIONS ■ Do not store flammable materials in an oven. ■ Never leave jars or cans of fat drippings in or near your oven. CAUTION : Items of interest to ■ Do not store or use combustible materials, gasoline or other flammable vapors and liquids in the vicinity of this or any other appliance.
TRIVECTION™ OVEN Read and follow the specific “Precautions to Avoid Possible Exposure to Excessive Microwave Energy” section in this manual. ■ Some products such as whole eggs and sealed containers—for example, closed jars—will explode and should not be heated in this oven. Such use of the oven could result in injury. ■ In defrost mode, remove wire twist-ties from paper or plastic containers before placing bags in the oven. ■ Do not boil eggs in this oven.
ALL THESE THINGS ARE NORMAL WITH YOUR TRIVECTION™ OVEN ■ Steam or vapor escaping from around the door. ■ Dimming of the oven light and change in the blower sound may occur. Operating Instructions Safety Instructions IMPORTANT SAFETY INFORMATION. READ ALL INSTRUCTIONS BEFORE USING. ■ The microwave fan may operate with both ovens off. It is cooling the control and will turn itself off. ■ Some TV-radio interference might be noticed while using your oven.
COOK MEAT AND POULTRY THOROUGHLY… Cook meat and poultry thoroughly—meat to at least an INTERNAL temperature of 160°F and poultry to at least an INTERNAL temperature of 180°F. Cooking to these temperatures usually protects against foodborne illness. ■ Do not clean the door gasket. The door gasket is essential for a good seal. Care should be taken not to rub, damage or move the gasket. ■ Keep the oven vent unobstructed. ■ Be sure to wipe up excess spillage before starting the self-cleaning operation.
The GE Profile oven with Trivection™ technology is a microwave-assist wall oven designed to cook food up to five times faster than a traditional oven. This oven gives the user the flexibility to cook food in traditional cooking modes (bake or broil), convection modes (convection bake and convection roast) or in speedcook modes (speed bake and speed broil). This oven features easy-to-use controls that will guide you through oven operations. Bake Baking is cooking with heated air.
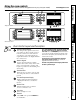
(Throughout this manual, features and appearance may vary from your model.) www.GEAppliances.com SELECT Safety Instructions Using the oven controls. CONTROL LOCK KITCHEN TIMER OVEN LIGHT ON/OFF Operating Instructions Single oven control. SELECT UPPER OVEN LOWER OVEN CONTROL LOCK OVEN LIGHT KITCHEN TIMER OVEN LIGHT ON/OFF Double oven control. Control Screen & Keypad All cooking modes, special features and oven settings are directed and operated from the control screen.
(Throughout this manual, features and appearance may vary from your model.) SELECT Operating Instructions Safety Instructions Using the oven controls. Troubleshooting Tips Care and Cleaning Control Screen and Keypad Press pad beside display to select item in display. Broil Oven Control Sleep Feature—Any time the oven is not in use (no cooking, no cleaning, no help and no timers) for more than 10 minutes, the oven control will go to sleep.
Control Screen and Keypad Help This oven has additional settings that you may choose to use. See the Settings section. Provides basic information on each function and how to find the function. If selected from the home screen, it gives general help. If selected while performing a function, it gives help on that function. Select Exit to leave Help. Recipes NOTE: On double wall ovens, Recipes is available only on the upper oven.
Safety Instructions To Set the Clock Make sure the clock is set to the correct time of day. The clock must be set to the correct time of day for the automatic oven timing functions to work properly. The time of day cannot be changed during timed baking, a self-cleaning cycle or delayed start time. Select SETTINGS. Select CLOCK. Press the number pads. Select ENTER. To Set the Timer KITCHEN TIMER Press the KITCHEN TIMER pad. ON/OFF The timer is an hour and minute timer only.
www.GEAppliances.com To avoid possible burns, place the racks in the desired position before you turn the oven on. Before you begin… The racks have stop-locks, so that when placed correctly on the supports, they will stop before coming completely out, and will not tilt. NOTE: A cooling fan will automatically turn on during all cooking modes. This fan turns on to cool internal parts. It may run for up to 1-1/2 hours after the oven is turned off.
Microwave Assisted In the Trivection oven, a microwave is used to assist cooking. The combination of microwave, convection fan and heating elements is unique for each food category. NOTE: The microwave will cycle on and off while cooking to best distribute energy to the food. The microwave turns off and the cook time stops counting down when the oven door is opened. NOTE: The convection fan may cycle on and off and change direction while cooking to best distribute hot air in the oven.
Other Speedcooking Tips. . . You must preheat your oven. Put the food in the oven after the preheat beep when the oven control displays “Put Food In Oven” and then press START. You must press the START key after placing the food in the oven to start the speedcook mode. All frozen foods should be speedcooked using the FROZENFOODS category. When baking potatoes, the recommended cooking temperature is 350°F and cooking time is 90 minutes for medium sized potatoes.
How to Set the Oven for Speed Baking Select SPEEDCOOK from the main menu. Select SPEED BAKE when baking or roasting. Select food type. You can select FROZENFOODS, MEAT or VEG/CASS. Select MORE to see additional categories—POULTRY/FISH, BAKEDGOODS and BREADS. Reference the table for food category and time savings. NOTE: You will need to select a subcategory for some food types. For example, if you select VEG/CASS, you will need to select between BAKED POTATO, VEGETABLE or CASSEROLE.
Traditional Roasting Guide Meats Beef Poultry Rare† Medium Well Rare† Medium Bone-in, Boneless (3 to 5 lbs.) Canned, Butt, Shank (3 to 5 lbs., fully cooked) Bone-in, Boneless (3 to 5 lbs.) Medium Well Whole Chicken (2-1/2 to 3-1/2 lbs.) Cornish Hens, Unstuffed (1 to 1-1/2 lbs.) Stuffed (1 to 1-1/2 lbs.) Duckling (4 to 5 lbs.) Turkey, whole* Unstuffed (10 to 16 lbs.) Unstuffed (18 to 24 lbs.) Turkey Breast (4 to 6 lbs.) Minutes/Lb.
How to Set the Oven for Speed Broiling Select START. Start will not appear on control screen until door is opened and food is put in oven. Countdown of cook time will begin. NOTE: Food may be checked at any time by opening the door. The microwave and convection fan will turn off and the time countdown will stop while the door is open. They will resume when the door is closed. Heat is provided by the upper element and microwave. Air is circulated with the reversing fan system. Oven door must be closed.
www.GEAppliances.com The defrost feature allows you to thaw food for a set amount of time. Cookware/Tips for Defrosting For best results, remove food from packaging and place on broil pan and grid. If food is left in packaging, slit, pierce or vent to prevent heat buildup. You can use all cookware/containers that are oven safe or microwave-safe. Arcing is the microwave term for sparks in the oven.
Defrosting Guide Rack Position Defrost Time Stand Time D C D D B 9 min. 9 min./lb. 9 min./lb. 9 min./lb. 10–12 min./lb. 5 min. 10 min. 5 min. 10 min. 10 min. Turn over, break apart and remove defrosted meat at signals. Turn over and separate at signals. Turn over and break apart at signals. Turn over and separate at signals. Shield warm areas with small pieces of foil. Roasts Boneless and Bone-in A 8–9 min./lb. 30 min. Turn over at signals. Shield warm areas with small pieces of foil.
www.GEAppliances.com To avoid possible burns, place the racks in the desired position before you turn the oven on. Aluminum Foil You can use aluminum foil to line the broiler pan and broiler grid. However, you must mold the foil tightly to the grid and cut slits in it just like the grid. Cut slits in the foil just like the grid. Never entirely cover a rack with aluminum foil. This will disturb the heat circulation and result in poor baking.
On double oven models, you can use timed baking in one oven while using self-clean in the other; you can also use timed baking in both ovens at the same time. NOTE: Foods that spoil easily—such as milk, eggs, fish, stuffings, poultry and pork—should not be allowed to sit for more than 1 hour before or after cooking. Room temperature promotes the growth of harmful bacteria. Be sure that the oven light is off because heat from the bulb will speed harmful bacteria growth.
www.GEAppliances.com How to Set the Oven for Broiling Select HI for high broil or LO for low broil. LO is used to broil thicker cuts of meat without over-browning them. Select START. We recommend preheating for 5 minutes with the door closed whether you broil food with the door open or closed. Place the meat or fish on the broiler grid and pan. Follow suggested rack positions in the Broiling Guide.
Convection Fan In a convection oven, a fan circulates hot air over, under and around the food. This circulating hot air is evenly distributed throughout the oven cavity. As a result, foods are evenly cooked and browned—often in less time with convection heat. Operating Instructions Safety Instructions Using the convection modes. DO NOT leave the door open for long periods of time while using convection cooking or you may shorten the life of the convection heating element.
Roasting rack Post Grid ■ Good for large tender cuts of meat, uncovered. The convection fan circulates the heated air evenly over and around the food. Meat and poultry are browned on all sides as if they were cooked on a rotisserie. Using the roasting rack provided, heated air will be circulated over, under and around the food being roasted. The heated air seals in juices quickly for a moist and tender product while, at the same time, creating a rich golden brown exterior.
On double oven models, you can use timed baking or roasting in one oven while using self-clean in the other; you can also use timed baking or roasting in both ovens at the same time. You will hear a fan while cooking with these features. The convection fan will stop when the door is opened, but the heat will not turn off. NOTE: Foods that spoil easily—such as milk, eggs, fish, stuffings, poultry and pork—should not be allowed to sit for more than 1 hour before or after cooking.
How to Set a Delayed Start and Automatic Stop You can set the oven control to delay-start the oven, cook for a specific length of time and then turn off automatically. Make sure the clock shows the correct time of day. Select CONVECTION. Select OPTIONS. Select DELAY BAKE. Using the number pads, enter the time of day you want the oven to turn on and start cooking. Select ENTER. Select TIMED BAKE. Using the number pads, enter the desired convection cooking time.
Safety Instructions You can preset up to six temperature/cooking time combinations with this function. You can then bake, convection bake/roast or speed bake any of these six favorite recipes without choosing settings each time. NOTES: You cannot program broil, defrost, dehydrate, warmer, proof, speed broil , Delay Bake or self-clean in RECIPES. Your oven will remember FAVORITES that have been programmed even after a power outage. The cooking time you enter does not include preheat time.
www.GEAppliances.com The proofing feature maintains a warm environment useful for rising yeast-leavened products. How to Set the Oven For Proof NOTE: For best results, cover the dough with a cloth or with greased plastic wrap (the plastic may need to be anchored underneath the container so the oven fan will not blow it off). Select FEATURES, then MORE, then PROOF and then START. The interior oven lights turn on and remain on during proofing.
Safety Instructions The oven door must be closed and all controls must be set correctly for the cycle to work properly. Before a Clean Cycle We recommend venting your kitchen with an open window or using a ventilation fan or hood during the first self-clean cycle. Remove the broiler pan, broiler grid, all cookware and any aluminum foil from the oven. Wipe up heavy soil on the oven bottom.
The oven door must be closed and all controls must be set correctly for the cycle to work properly. How to Delay the Start of Cleaning Select FEATURES. Select SELF CLEAN. Select upper or lower oven on double oven models. When goes off, you will be able to open the door. NOTE: On double oven models, you can set a delay clean in both ovens. However, the second oven set will automatically delay the start of cleaning until the end of the first oven’s clean cycle.
Your new touch pad control has additional settings that you may choose to use. They remain in the control’s memory, even after a power failure. NOTE: If a setting is selected, it will have blocks before and after. For example: ( settings ) . If the setting is not selected, it will not have a block before and after. For example: (settings). Clock The clock must be set to the correct time of day for the automatic oven timing functions to work properly.
Auto Recipe™ Conversion When using convection bake, the Auto Recipe™ Conversion feature automatically changes entered traditional baking temperatures to convection baking temperatures. For example, if you enter a regular recipe temperature of 350°F and select START, the display will show Con and then the converted temperature of 325°F. Select CONVTEMP to turn the option ON or OFF. After setting this option, select HOME.
You may find that your new oven cooks differently than the one it replaced. Use your new oven for a few weeks to become more familiar with it. If you still think your new oven is too hot or too cold, you can adjust the temperature yourself. Do not use thermometers, such as those found in grocery stores, to check the temperature setting of your oven. These thermometers may vary 20–40 degrees.
(Designed for use on the Jewish Sabbath and Holidays.) www.GEAppliances.com The Sabbath feature can be used for baking/roasting only. It cannot be used for convection, broil, speedcook, defrost, proof, dehydrate, warm, warmer, self-clean or Delay Bake cooking. NOTE: ■ The oven light in the lower oven of a double wall oven (on some models) comes on automatically when the door is opened and goes off when the door is closed.
(Designed for use on the Jewish Sabbath and Holidays.) How to Set for Sabbath Feature in Timed Baking/Roasting— Immediate Start and Automatic Stop Make sure that the clock shows the correct time of day. Select BAKE. On double oven models, select upper or lower oven. Using the number pads, enter the desired temperature between 170°F and 550°F. No audible signals will be given and no temperature will be displayed. Select OPTIONS. Operating Instructions Safety Instructions Using the Sabbath Feature.
How to Exit the Sabbath Feature Touch the CLEAR/OFF pad to make sure that the oven is turned OFF. No audible signal will be given. Hold the BACK key for 3 seconds. No audible signal will be given. This will take the oven control out of the Sabbath feature. The control will return to the Features menu where SABBATH was originally selected. Select HOME to return to the main menu on the control display. Operating Instructions Care and cleaning of the oven.
Stainless Steel Surfaces Do not use a steel-wool pad; it will scratch the surface. Shake CERAMA BRYTE® bottle well. Place a small amount of CERAMA BRYTE® Stainless Steel Appliance Cleaner on a damp cloth or damp paper towel. Clean a small area (approximately 8″ x 8″), rubbing with the grain of the stainless steel if applicable. Dry and buff with a clean, dry paper towel or soft cloth. Repeat as necessary.
Roasting rack Upper Trivection™ oven rack Oven Racks and Convection Roasting Rack Clean the oven racks and the convection roasting rack with an abrasive cleanser or steel wool. After cleaning, rinse the racks and rack with clean water and dry with a clean cloth. Lower oven rack NOTES: Oven Heating Elements Do not clean the broil element. Any soil will burn off when the element is heated. To clean the area below the bake element, gently lift the element and clean with warm, soapy water.
Safety Instructions Operating Instructions Care and Cleaning Troubleshooting Tips Consumer Support Before you call for service… Troubleshooting Tips Save time and money! Review the charts on the following pages first and you may not need to call for service. Problem Possible Causes What To Do Food does not speed bake properly Oven controls improperly set. • See Using the Trivection™ Oven section. Rack position is incorrect or the rack is not level. • See Using the Trivection™ Oven section.
What To Do Arcing between metal surfaces in oven while speedcooking or defrosting Improper spacing between metal surfaces and/or aluminum foil. • See Using the Trivection™ Oven section. Display shows “Miswired detected” Wiring from house to oven is incorrect. • Contact installer or qualified electrician to check house wiring to oven. Option not seen on the display screen Option may be listed on the next screen. • Select MORE to see additional items.
Safety Instructions Operating Instructions Care and Cleaning Troubleshooting Tips Problem Possible Causes What To Do Oven temperature too hot or too cold Oven temperature needs adjustment. • See the Adjust the oven temperature—Do it yourself! section. Oven will not work Oven controls improperly set. • See the Using the oven section. A fuse in your home may be blown or the circuit breaker tripped. • Replace the fuse or reset the circuit breaker.
What To Do Light bulb is loose or defective. • Tighten or replace the bulb. Pad operating light is broken. • Call for service. “F— and a number or letter” flash in the lower oven display You have a function error code. • Press the CLEAR/OFF pad. Allow the oven to cool for one hour. Put the oven back into operation. If the function code repeats. • Disconnect all power to the oven for at least 30 seconds and then reconnect power. If the function error code repeats, call for service.
Looking For Something More? You can find these accessories and many more at www.GEAppliances.com, or call 800.626.2002 (during normal business hours). Have your model number ready. Troubleshooting Tips Care and Cleaning Operating Instructions Safety Instructions Accessories. Oven Elements Oven Racks Broil Pan Cleaner Light Bulbs Trivection™ VHS Tape Consumer Support Visit www.GEAppliances.com for more information.
GE Service Protection Plus™ GE, a name recognized worldwide for quality and dependability, offers you Service Protection Plus ™—comprehensive protection on all your appliances— No Matter What Brand! Benefits Include: • Backed by GE • All brands covered • Unlimited service calls • All parts and labor costs included • No out-of-pocket expenses • No hidden deductibles • One 800 number to call We’ll Cover Any Appliance. Anywhere. Anytime.
Consumer Product Ownership Registration Dear Customer: Thank you for purchasing our product and thank you for placing your confidence in us. We are proud to have you as a customer! Follow these three steps to protect your new appliance investment: 1 2 3 Complete and mail your Consumer Product Ownership Registration today. Have the peace of mind of knowing we can contact you in the unlikely event of a safety modification. After mailing the registration below, store this document in a safe place.
All warranty service provided by our Factory Service Centers, or an authorized Customer Care® technician. To schedule service, on-line, 24 hours a day, visit us at www.GEAppliances.com, or call 800.GE.CARES (800.432.2737). Staple your receipt here. Proof of the original purchase date is needed to obtain service under the warranty. GE Will Replace: One Year From the date of the original purchase Any part of the speedcook electric convection oven which fails due to a defect in materials or workmanship.
Consumer Support. GE Appliances Website www.GEAppliances.com Have a question or need assistance with your appliance? Try the GE Appliances Website 24 hours a day, any day of the year! For greater convenience and faster service, you can now download Owner’s Manuals, order parts, catalogs, or even schedule service on-line. You can also “Ask Our Team of Experts™” your questions, and so much more... Schedule Service www.GEAppliances.com Expert GE repair service is only one step away from your door.