Safety Instructions . . . . . . . . . . . .2, 3 Ice Machine Remove Packaging . . . . . . . . . . . . . . . . . . 4 Operating Instructions Controls and Features . . . . . . . . . . . . .4, 5 Starting the Ice Machine. . . . . . . . . . . . . 5 Care and Cleaning . . . . . . . . . . . . . . . 6-8 Owner’s Manual and Installation Instructions UNC15 Installation Instructions Grounding the Ice Machine . . . . . . . . . . 9 Before You Begin . . . . . . . . . . . . . . . . . . . . 9 Location and Preparation. .
IMPORTANT SAFETY INFORMATION. READ ALL INSTRUCTIONS BEFORE USING. SAFETY GE Appliances website For more information on your appliance operation, visit www.GEAppliances.com or call 800.GECARES (800.432.2737). In Canada visit GEAppliances.ca or call 800.561.3344. ICE MACHINE SAFETY INFORMATION This is the safety alert symbol. This symbol alerts you to potential hazards that can kill or hurt you and others.
GEAppliances.com SAFETY (CONT.) OUTDOOR USE NOTICE: KEEP FROM FREEZING: Severe damage will occur to the unit if left in or operated in temperatures beyond the limits listed in this manual. That damage is NOT covered by warranty. KEEP DRY: Do not locate in low lying areas where puddles will accumulate PROVIDE SHADE: Heat gain from the sun will reduce the unit's ability to make and store ice, and ultraviolet radiation from the sun can potentially damage the unit's plastic components.
Remove packaging IMPORTANT: Do not remove any permanent instruction labels inside your ice machine or the Tech Sheet that is fastened behind the lower access panel. • Do not use sharp instruments, rubbing alcohol, flammable fluids or abrasive cleaners to remove tape or glue. These products can damage the surface of your ice maker. For more information, see Important Safety Instructions. • Remove tape and any labels from your ice maker before using (except the model and serial number label).
About the controls and features. GEAppliances.com Control panel POWER ON/OFF ICE MAKING CHECK WATER TIME TO CLEAN CLEAN RESET Front service panel Ice scoop kickplate Starting the ice machine. Initial Start Up 1. Turn on the water supply. 2. Switch on the electrical power. 3. Push and release the ON/OFF switch to start the machine. The ICE MAKING light next to the ON/OFF switch will glow white. Warm air will flow out of the left front grille.
Care and cleaning. Cleaning the Outside The stainless steel door and door handle can be cleaned with a commercially available stainless steel cleaner. Cleaners with oxalic acid such as Bar Keepers Friend Soft Cleanser™ will remove surface rust, tarnish and small blemishes. Use only a liquid cleanser free of grit and rub in the direction of the brush lines with a damp soft sponge. Do not use appliance wax or polish on the stainless steel.
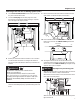
GEAppliances.com Removing Scale from the Ice Making System (Cont.) 6. Locate float valve ON/OFF lever. Move lever up about half way to shut off the water valve. 9. Fill the reservoir with the scale remover solution from the squirt bottle. Use about half (8 oz) of the solution. 7. Locate the drain plug. Pull the drain plug out to drain the reservoir and evaporator. When draining is complete, return the plug to its original position.
Care and cleaning. Removing Scale from the Ice Making System (Cont.) 12. Pull the drain plug again to drain the system and then replace it. 13. Replace the reservoir cover. 16. Use any left over scale remover solution to scrub the scale off of the bin liner. If none is left over, use pre-mixed or mix 1 quart according to the directions. 14. Replace the upper back wall of the bin using the original screws. Push in to snap bottom of back panel into place. 17. Rinse the liner with hot water. 15.
Installation Instructions Ice Machine Questions? Call 800.GE.CARES (800.432.2737) or visit our Website at: GEAppliances.com In Canada, call 1.800.561.3344 or visit our Website at: www.GEAppliances.ca GROUNDING THE ICE MACHINE WARNING Electrical Shock Hazard. Failure to follow these instructions can result in death, fire, or electrical shock.
Installation Instructions INSTALLING THE ICE MACHINE (Cont.) ICE MACHINE LOCATION AND PREPARATION (Cont.) ICE MACHINE LOCATION AND PREPARATION (Cont.) Utility and Operational Requirements • This ice machine must be connected to a potable water supply. • The water supply must have a conductivity of at least 10 microSiemens/cm. The water to this ice machine must be potable, or fit for human consumption. During ice making some minerals will stick to the ice making components.
Installation Instructions ADVANCE PLANNING (Cont) ACCESSORIES Installation Notes Finished stainless steel door panels with handles are available from GE Appliances for attachment to the ice machine.The panel kits are: • ZIP80SS - Stainless steel door with Euro Style Handles • PIP70SS - Stainless steel door with Profile Style Handles To order, go to www.GEApplianceParts.com or call 877-959-8688. In Canada visit www.GEAppliances.ca or call 800.561.3344. A drain pump is available for this ice machine.
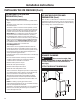
Installation Instructions INSTALLING THE ICE MACHINE (Cont.) DIMENSIONS FLOOR DRAIN ACCESS HOLE 3 7/8" 20 3/8" 3/4" 22" 3/4" SHEET METAL DOOR FRONT - IF DOOR KIT INSTALLED 1/4" O.D. COPPER .63 MIN. CABINET DOOR 2 3/4" WATER INLET COMPRESSION FITTING PROVIDED 2 3/8" DOOR KIT AND HANDLE 14-7/8" 5 1/8" 33 7/8" 29-1/8" 4-1/4" 3 1/4" 2 1/2" 2-3/4" AIR OUT 115V POWER CORD 1" LEG ADJUSTMENT (4) PLACES 7 1/2" LEFT SIDE SVC. 11 5/8" 12 DRAIN ACCESS - FLEXIBLE TUBING 5/8" I.D. x 7/8" O.D.
Installation Instructions DOOR SWING Moving the hinges allows the door to open from either the left or the right side. Change the swing BEFORE attaching the door panel. To change: 1. Open the door. Remove 4 stainless steel screws opposite the hinge side on the front of the cabinet. 2. Remove innermost screw holding each hinge to the cabinet. Loosen the other screw. Loosen Remove IMPORTANT: If installing a stainless steel door panel or custom panel, skip to INSTALLING THE DOOR PANEL section. 10.
Installation Instructions INSTALLING THE ICE MACHINE (Cont.) INSTALLING THE DOOR PANEL (Cont.) The ice machine is supplied without a conventional door covering, allowing the attachment of a stainless steel door panel or a custom panel. NOTE: If the door swing is to be changed, it needs to be done BEFORE attaching the door panel. 7. Drill pilot holes on the back of the panel at your markings. Use a drill stop to prevent drilling through the panel.
Installation Instructions INSTALLING THE DOOR PANEL (Cont) If the door swing is going to be changed please complete prior to installing the door panel. See page 13. Attaching the Door Panel The panel will be held on by 6 sheet metal screws and 2 machine screws. 1. Remove the gasket from the inside of the door and retain for later use. 2. Remove any plastic covering the stainless steel panel. 3.
Installation Instructions INSTALLING THE ICE MACHINE (Cont.) PLUMBING - DRAIN PUMP PLUMBING - GRAVITY DRAIN (cont) Drain Installation 4. Remove the clamp and barbed elbow and take off the plastic cover in the base pan below the drain hose. 5. Connect a straight 5/8" barbed connector to the drain hose, securing with the supplied hose clamp. 6. Cut an 8"piece of 5/8" OD x 7/8" OD tygon (clear plastic) tubing.
Installation Instructions INSTALLATION The ice machine is supplied with a power cord. Do not remove the grounding pin from the cord's plug. Do not use extension cords. Follow all codes. Connect the machine so its own 115v, 15amp circuit. 1. If the electrical outlet for the ice maker is behind the unit, plug it into the unit. 2. Position the unit in the installation opening. 3. Turn on the water supply. Make sure that the icemaker is plugged in and the power is on. 4.
Before you call for service… Troubleshooting Tips Save time and money! Review the charts on the following pages first and you may not need to call for service. Problem Possible Causes What to Do Low capacity Restricted drain or standing water in the bin Clean the air cooled condenser fins. Clean the ice making system. Check the drain line for kinks No ice Switch is OFF Press the ON/OFF button to turn the power on. Electric breaker has been tripped Flip the electric breaker back on.
Ice Machine Warranty. GEAppliances.com For US Customers, all warranty service provided by our Factory Service Centers, or an authorized Customer Care® technician. To schedule service, visit us online at GEAppliances.com, or call 800.GE.CARES (800.432.2737). Please have serial number and model number available when calling for service. In Canada, call 800.561.3344. Staple your receipt here. Proof of the original purchase date is needed to obtain service under the warranty.
Consumer Support. GE Website In the U.S.: GEAppliances.com Have a question or need assistance with your appliance? Try the GE Website 24 hours a day, any day of the year! You can also shop for more great GE products and take advantage of all our on-line support services designed for your convenience. In Canada: www.GEAppliances.ca Schedule Service In the U.S.: GEAppliances.com Expert GE repair service is only one step away from your door.
Machine À Glaçons Consignes de sécurité . . . . . . . .2, 3 Déballage . . . . . . . . . . . . . . . . . . . . . . . . . 4 Consignes d’utilisation Manuel d’utilisation et instructions d’installation Commandes et fonctions . . . . . . . . . . .4, 5 Démarrage de la machine à glaçons. . . 5 Entretien et nettoyage . . . . . . . . . . . . 6-8 UNC15 Installation instructions Mise à la terre de la machine à glaçons . . . . . . . . . . . . . . . . . . . . . . . . . 9 Avant de commencer. . . . . . . . . . . . .
INSTRUCTIONS IMPORTANTES DE SÉCURITÉ. LISEZ TOUTES LES INSTRUCTIONS AVANT L’UTILISATION. SÉCURITÉ Site Internet d’Électroménagers GE Pour de plus amples informations sur le fonctionnement de votre appareil, consultez le site www.electromenagersge.ca ou composez le 800.561.3344. RENSEIGNEMENTS DE SÉCURITÉ CONCERNANT LA MACHINE À GLAÇONS Ce symbole représente une alerte de sécurité. Ce symbole vous avise de dangers possibles pouvant causer la mort, des blessures ou autres.
electromenagersge.ca SÉCURITÉ (CONT.) AVIS CONCERNANT L’UTILISATION À L’EXTÉRIEUR : PROTÉGER DU GEL : Des dommages sévères à l’appareil surviendront s’il est soumis à des températures internes ou ambiantes qui excèdent les limites spécifiées dans ce manuel. Ce type de dommage ne sera PAS couvert par la garantie. GARDER AU SEC : Ne placez pas l’appareil dans des dépressions où des flaques peuvent se former.
Déballage. IMPORTANT: N’enlevez aucune étiquette d’instructions permanente à l’intérieur de la machine à glaçons ni fiche technique fixée derrière le panneau d’accès inférieur. • Retirez le ruban adhésif et toute étiquette de votre machine à glaçons avant l’utilisation (sauf l’étiquette des numéros de modèle et de série). • N’utilisez pas d’instruments coupants, de l’alcool à friction, des fluides inflammables ni des nettoyants abrasifs pour enlever l’adhésif ou la colle.
Commandes et fonctions. electromenagersge.ca Panneau de commande POWER ON/OFF ICE MAKING CHECK WATER TIME TO CLEAN CLEAN RESET Panneau de service frontal Pelle à glaçons Coup-de-pied Démarrage de la machine à glaçons. Démarrage initial 1. Ouvrez l’alimentation d’eau. 2. Mettez l’appareil sous tension. 3. Pressez et relâchez l’interrupteur ON/OFF pour démarrer l’appareil. Le voyant ICE MAKING (Production de glace) à côté de l’interrupteur ON/OFF brillera en blanc.
Entretien et nettoyage. Nettoyage des surfaces extérieures On peut nettoyer la porte et la poignée en acier inoxydable à l’aide d’un nettoyant pour inox commercial. Les nettoyants qui contiennent de l’acide oxalique tels que Bar Keepers Friend Soft Cleanser™ vont éliminer la rouille, le ternissement et les petites taches. Utilisez seulement un nettoyant liquide exempt d’abrasif et frottez dans la direction des lignes de brossage à l’aide d’une éponge humide douce.
electromenagersge.ca Nettoyage du tartre dans le système de la machine à glaçons (suite) 6. Repérez le levier ON/OFF du robinet à flotteur. Déplacez le levier vers le haut environ jusqu’à mi-course pour fermer le robinet d’eau. POWER ON/OFF ICE MAKING CHECK WATER TIME TO CLEAN CLEAN RESET 7. Repérez le bouchon de vidange. Tirez sur le bouchon pour vidanger le réservoir et l’évaporateur. Une fois la vidange terminée, remettez le bouchon en place.
Entretien et nettoyage. Nettoyage du tartre dans le système de la machine à glaçons (suite) 12. Tirez de nouveau sur le bouchon de vidange pour vidanger le système puis remettez-le en place. 13. Replacez le couvercle du réservoir. 14. Replacez le panneau arrière supérieur du bac à l’aide des vis d’origine. Poussez sur le bas du panneau arrière pour l’encliqueter en place. 15.
Instructions d’installation Machine à glaçons Si vous avez des questions, appelez le 1.800.561.3344 ou visitez notre site Web à l’adresse : www.electromenagersge.ca MISE À LA TERRE DE LA MACHINE À GLAÇONS AVERTISSEMENT Risque de choc électrique. Le non-respect de ces instructions peut entraîner des risques d’incendies, des chocs électriques ou la mort.
Instructions d’installation INSTALLATION DE LA MACHINE À GLAÇONS (suite) EMPLACEMENT ET PRÉPARATION DE LA MACHINE À GLAÇONS (SUITE) EMPLACEMENT ET PRÉPARATION DE LA MACHINE À GLAÇONS Spécifications relatives à l’alimentation d’eau et aux conditions ambiantes • Cette machine à glaçons doit être raccordée à une alimentation d’eau potable. • L’alimentation d’eau doit présenter une conductivité d’au moins 10 microSiemens/cm.
Instructions d’installation PLANIFICATION PRÉALABLE (suite) ACCESSOIRES Notes d’installation Des panneaux de finition en acier inoxydable avec poignées sont offerts par Électroménagers GE pour fixation à la machine à glaçons. Les ensembles de panneau sont les suivants : • ZIP80SS – Porte en acier inoxydable avec poignées style Euro • PIP70SS - Porte en acier inoxydable avec poignées style Profile Pour commander, allez sur le site www.GEApplianceParts. com ou composez le 877-959-8688.
Instructions d’installation INSTALLATION DE LA MACHINE À GLAÇONS (suite) DIMENSIONS TROU D’ACCÈS POUR DRAIN DE PLANCHER 3-7/8 po 20-3/8 po 3/4 po RACCORD DE COMPRESSION POUR TUYAU DE CUIVRE 1/4 PO (D.E.) FOURNI 22 po 2-3/4 po PANNEAU MÉTALLIQUE FRONTAL DE PORTE 3/4 PO – SI L’ENSEMBLE DE PORTE EST INSTALLÉ PORTE ARMOIRE 0,63 PO MIN.
Instructions d’installation DIRECTION DE L’OUVERTURE DE PORTE La pose des charnières peut se faire d’un côté ou l’autre pour permettre l’ouverture de la porte à droite ou à gauche. Décidez du côté de l’ouverture AVANT de fixer le panneau de porte. Pour changer de côté : 1. Ouvrez la porte. Enlevez les 4 vis en acier inoxydable à l’opposé du côté charnière sur le devant de l’armoire. 2. Enlevez la vis située la plus à l’intérieur qui fixe la charnière à l’armoire. Desserrez l’autre vis.
Instructions d’installation INSTALLATION DE LA MACHINE À GLAÇONS (suite) INSTALLATION DU PANNEAU DE PORTE La machine à glaçons est livrée sans recouvrement de porte conventionnel, permettant ainsi la fixation d’un panneau en acier inoxydable ou d’un panneau personnalisé. REMARQUE : Si la direction d’ouverture de la porte doit être changée, il faut procéder AVANT de fixer le panneau de porte.
Instructions d’installation INSTALLATION DU PANNEAU DE PORTE (suite) Si le sens de l’ouverture de porte doit être changé, veuillez procéder avant d’installer le panneau de porte. Voir la page 13. Fixation du panneau de porte Le panneau sera fixé par 6 vis à tôle et 2 vis de mécanique. 1. Enlevez le joint d’étanchéité depuis l’intérieur de la porte et conservez-le pour plus tard. 2. Enlevez toute pellicule de plastique recouvrant le panneau. 3.
Instructions d’installation INSTALLATION DE LA MACHINE À GLAÇONS (suite) PLOMBERIE – POMPE DE VIDANGE Installation du système de vidange Une pompe de vidange est offerte pour cette machine à glaçons. On peut se procurer l’ensemble de pompe de vidange numéro UPK3 sur le site www.GEApplianceparts. com ou en composant le 877-959-8688. Au Canada, visitez le site GEAppliances.ca ou composez le 800.561.3344.
Instructions d’installation INSTALLATION La machine à glaçons est livrée avec un cordon électrique. Ne retirez pas la broche de mise à la terre de la fiche du cordon. N’utilisez pas de rallonge. Observez tous les codes d’électricité. Branchez la machine sur son propre circuit de 115 V, 15 ampères. 1. Branchez la machine à glaçons dans la prise électrique si celle-ci se situe derrière l’appareil. 2. Placez l’appareil dans l’ouverture de l’installation. 3. Ouvrez l’alimentation d’eau.
Avant de faire un appel de service… Conseils de dépannage Économisez temps et argent! Consultez d’abord les tableaux des pages suivantes et vous pourriez vous éviter un appel de service. Problème Causes possibles Correctifs Faible capacité Tuyau de vidange restreint ou eau stagnante dans le bac Nettoyez les ailettes du condensateur refroidi à l’air. Nettoyez le système de production de glace. Vérifiez que le tuyau de vidange ne comporte pas de plis.
Garantie de la machine à glaçons. Toutes les réparations en vertu de la garantie sont fournis par nos Centre de Service d’Usine ou par un technicien autorisé Customer Care®. Pour prévoir une réparation, consultez notre site GEAppliances.com ou appelez le 800.GE.CARE5 (800.432.2737). Veuillez avoir votre numéro de série et votre numéro de modèle à portée de main lorsque vous appelez pour obtenir un service. Au Canada, appelez le 800.561.3344. Agrafez votre facture ici.
Service à la clientèle. Site Web appareils électroménagers GE www.electromenagersge.ca Vous avez une question ou vous avez besoin d’aide pour votre appareil électroménager? Contactez-nous par Internet au site www.electromenagersge.ca 24 heures par jour, tous les jours de l’année. Service de réparations 1.800.561.3344 Service de réparations GE est tout près de vous. Pour faire réparer votre électroménager GE, il suffit de nous téléphoner.
Máquina de hielo Instruciones De Seguridad . . .2, 3 Retire el embalaje . . . . . . . . . . . . . . . . . . . . 4 Operating Instructions Controles y Funciones . . . . . . . . .4, 5 Activación de la máquina de hielo . . . . . 5 Cuidado y limpieza . . . . . . . . . . . . . . . . 6-8 Manual del propietario e instalación UNC15 Installation Instructions Conexión a Tierra de la Máquina de Hielo . . . . . . . . . . . . . . . . . . . . . . . . . . . 9 Antes de Empezar . . . . . . . . . . . . . . . . . . .
IMPORTANTE INFORMACIÓN DE SEGURIDAD. LEA TODAS LAS INSTRUCCIONES ANTES DE SU USO. SEGURIDAD Sitio Web de Electrodomésticos de GE Para más información sobre el funcionamiento de su refrigerador, visite www.GEAppliances.com o comuníquese al 1-800-GECARES (432-2737). INFORMACIÓN DE SEGURIDAD DEL REFRIGERADOR Éste es el símbolo de alerta de seguridad. El mismo alerta sobre potenciales riesgos de muerte o lesiones tanto para usted con para otras personas.
GEAppliances.com SEGURIDAD (CONT.) AVISO DE USO EN ÁREAS EXTERIORES: EVITE EL CONGELAMIENTO: La unidad podrá sufrir daños graves si se deja o utiliza a temperaturas que superan los límites que figuran en este manual. Dicho daño NO está cubierto por la garantía. MANTÉNGALA SECA: No la ubique en áreas bajas donde se produzcan charcos.
Retire el embalaje IMPORTANTE: No retire ninguna etiqueta de instrucciones permanente dentro de la máquina de hielos ni la Ficha Técnica colocada detrás del panel de acceso inferior. • No use instrumentos puntiagudos, no frote alcohol, no use líquidos inflamables, ni limpiadores abrasivos para retirar cinta o pegamento. Estos productos pueden dañar la superficie de la máquina de hielo. Para más información, lea la sección de Instrucciones Importantes de Seguridad.
Acerca de los controles y funciones. GEAppliances.com Panel de control POWER ON/OFF ICE MAKING CHECK WATER TIME TO CLEAN CLEAN RESET Panel frontal de servicio Cuchara de hielo Zócalo Activación de la máquina de hielo. Inicio 1. Abra el suministro de agua. 2. Encienda la corriente eléctrica. 3. Presione y libere el botón ON/OFF (Encender/ Apagar) para iniciar la máquina. La luz ICE MAKING (Producción de Hielo) junto al interruptor de encendido/ apagado brillará en blanco.
Cuidado y limpieza. Limpieza de la Parte Exterior La puerta y la manija de la puerta de acero inoxidable se pueden limpiar con un limpiador de acero inoxidable disponible comercialmente. Los limpiadores con ácido oxálico tales como Bar Keepers Friend Soft Cleanser™ eliminarán el óxido, deslustres y pequeñas manchas sobre la superficie. Use sólo un limpiador líquido libre de material abrasivo y frote en la dirección de las líneas del cepillo con una esponja suave y húmeda.
GEAppliances.com Eliminación del Sarro del Sistema de Producción de Hielo (Cont.) 6. Ubique la válvula del flotador en la palanca de ON/ OFF (Encender/ Apagar). Mueva la palanca hacia arriba aproximadamente hasta mitad de camino para cerrar la válvula de agua. POWER ON/OFF ICE MAKING CHECK WATER TIME TO CLEAN CLEAN RESET 7. Ubique el tapón de desagüe. Quite el tapón de desagüe para drenar el depósito y el evaporador. Una vez completado el desagüe, vuelva a colocar el tapón en su posición original.
Cuidado y limpieza. Eliminación del Sarro del Sistema de Producción de Hielo (Cont.) 12. Vuelva a quitar el tapón de desagüe para drenar el sistema y luego reemplace el mismo. 13. Reemplace la tapa del depósito. 14. Reemplace la pared superior trasera del cesto usando los tornillos originales. Coloque la parte inferior del panel trasero presionando la misma hasta su posición. 15.
Instrucciones para la instalación Máquina de Hielo Si tiene preguntas, llame al 1.800.GE.CARES o bien visite nuestra página Web: GEAppliances.com CONEXIÓN A TIERRA DE LA MÁQUINA DE HIELO ADVERTENCIA Riesgo de Descarga Eléctrica. Si no se siguen estas instrucciones se podrá producir a muerte, incendios o descargas eléctricas.
Instrucciones de Instalación INSTALACIÓN DE LA MÁQUINA DE HIELO (Cont.) UBICACIÓN Y PREPARACIÓN DE LA MÁQUINA DE HIELO (CONT.) UBICACIÓN Y PREPARACIÓN DE LA MÁQUINA DE HIELO (CONT.) Requisitos y Servicios Públicos y Funcionamiento • Esta máquina de hielo debe estar conectada a un suministro de agua potable. • El suministro de agua potable debe contar con una conductividad de por lo menos 10 microSiemens/cm. El agua hacia esta máquina de hielo debe ser potable, o estar apta para consumo humano.
Instrucciones de Instalación PLANIFICACIÓN AVANZADA (Cont) ACCESORIOS Notas de Instalación Están disponibles paneles acabados para puertas de acero inoxidable con manijas a través de GE Appliances, los cuales se pueden adherir a la máquina de hielo. Los kits de los paneles son: • ZIP80SS - Puerta de acero inoxidable con Manijas Estilo Euro • PIP70SS - Puerta de acero inoxidable con Manijas Estilo Profile Para ordenar, visite www.GEApplianceParts.com o comuníquese al 877-959-8688. En Canadá, visite www.
Instrucciones de Instalación INSTALACIÓN DE LA MÁQUINA DE HIELO (Cont.) DIMENSIONES ORIFICIO DE ACCESO AL DESAGÜE POR EL PISO 3-7/8" 20-3/8" 3/4" UNIÓN DE COMPRENSIÓN DE ENTRADA DE AGUA DE COBRE DE 1/4" DE DIÁM. EXT. PROVISTA 22" FRENTE DE LA PUERTA DE CHAPA METÁLICA DE 3/4" – SI EL KIT DE LA PUERTA ESTÁ INSTALADO, PUERTA DEL GABINETE DE UN MÍN. DE .
Instrucciones de Instalación APERTURA DE LA PUERTA Mover las bisagras permite que la puerta se abra ya sea desde la izquierda o la derecha. Cambie la apertura ANTES de adherir el panel de la puerta. Para hacer un cambio: 1. Abra la puerta. Retire los 4 tornillos de acero inoxidable del lado opuesto a las bisagras frente al gabinete. 2. Retire el tornillo que está más adentro sosteniendo cada bisagra al gabinete. Afloje el otro tornillo. Aflojar Retirar 9. 10. 11. 12. 3.
Instrucciones de Instalación INSTALACIÓN DE LA MÁQUINA DE HIELO (Cont.) INSTALACIÓN DEL PANEL DE LA PUERTA La máquina de hielo es provista sin una cobertura convencional para puerta, permitiendo adherir un panel para puerta de acero inoxidable o un panel estándar. NOTA: Si la dirección de la puerta puede ser modificada, será necesario realizar la misma ANTES de adherir el panel de la puerta.
Instrucciones de Instalación INSTALACIÓN DEL PANEL DE LA PUERTA (Cont.) Si se modificará la apertura de la puerta, complete este paso antes de instalar el panel de la puerta. Lea la página 13. Adherencia del Panel de la Puerta El panel será sostenido por 6 tornillos para chapa metálica y 2 tornillos para metal. 1. Retire la junta del interior de la puerta o conserve la misma para uso posterior. 2. Retire cualquier cobertura plástica que esté recubriendo el panel de acero inoxidable. 3.
Instrucciones de Instalación INSTALACIÓN DE LA MÁQUINA DE HIELO (Cont.) PLOMERÍA – BOMBA DE DESAGÜE Instalación del Desagüe Una bomba de desagüe está disponible para esta máquina de hielo. El número del kit de la bomba de desagüe es UPK3 y está disponible en www.geapplianceparts.com o llamando al 877-9598688. En Canadá, visite www.GEApppliances.ca o comuníquese al 800-561-3344.
Instrucciones de Instalación INSTALACIÓN La máquina de hielo es suministrada con un cable de corriente. No retire el perno de conexión a tierra del enchufe del cable. No use prolongadores. Siga todos los códigos. Conecte la máquina de modo que el circuito posea 115v, 15 amp. 1. Si el tomacorriente eléctrico de la máquina de hielo está detrás de la unidad, enchufe el mismo en la unidad. 2. Posicione la unidad en la abertura de la instalación. 3. Abra el suministro de agua.
Antes de solicitar un servicio… Solucionar problemas ¡Ahorre tiempo y dinero! Revise las tablas en las siguientes páginas y tal vez no necesitará de solicitar un servicio. Problema Baja capacidad Causas Posibles Desagüe restringido o agua restante en el cesto Qué hacer Limpie los alerones del condensador enfriados por el aire. Limpie el sistema de la máquina de hielo. Controle que no haya torceduras en la tubería de desagüe. Sin hielo El interruptor está en OFF (Apagado).
Garantía de la Máquina de Hielo. Todo el servicio de garantía es provisto por nuestros Centros de Servicio de Fabricación, o un técnico autorizado de Servicio al Cliente (Customer Care®). Para programar una visita del servicio técnico, visítenos en GEAppliances.com, o comuníquese al 800. GE.CARES (800.432.2737). Cuando llame para solicitar el servicio, tenga los números de serie y modelo disponibles. Agrafez votre facture ici.
Servicio al consumidor. Página Web de GE GEAppliances.com ¿Tiene alguna pregunta sobre su electrodoméstico? ¡Pruebe la página Web de GE 24 horas al día, cualquier día del año! Para mayor conveniencia y servicio más rápido, ya puede descargar los Manuales de los Propietarios, pedir piezas o incluso hacer una cita en línea para que vengan a realizar una reparación. Solicite una reparació GEAppliances.com El servicio de expertos GE está a tan sólo un paso de su puerta.