ICE MACHINE SAFETY INFORMATION . . . . . . . . .3 USING THE ICE MACHINE Packaging . . . . . . . . . . . . . . . . . . . . . . . . . . . .5 Controls . . . . . . . . . . . . . . . . . . . . . . . . . . . . . .5 Features . . . . . . . . . . . . . . . . . . . . . . . . . . . . . .6 Starting the Ice Machine . . . . . . . . . . . . . . . .6 OWNER’S MANUAL AND INSTALLATION INSTRUCTIONS UNC15 INSTALLATION INSTRUCTIONS Grounding the Ice Machine . . . . . . . . . . . . . .7 Before You Begin . . . . . . . . . .
THANK YOU FOR MAKING GE APPLIANCES A PART OF YOUR HOME. Whether you grew up with GE Appliances, or this is your first, we’re happy to have you in the family. We take pride in the craftsmanship, innovation and design that goes into every GE Appliances product, and we think you will too. Among other things, registration of your appliance ensures that we can deliver important product information and warranty details when you need them. Register your GE appliance now online.
READ ALL INSTRUCTIONS BEFORE USING THE APPLIANCE WARNING To reduce the risk of fire, explosion, electric shock, or injury when using your ice machine follow these basic safety precautions: Ŷ 7 KLV LFH PDFKLQH PXVW EH SURSHUO\ LQVWDOOHG and located in accordance with the Installation Instructions before it is used. Ŷ 7 R SUHYHQW VXIIRFDWLRQ DQG HQWUDSPHQW KD]DUGV WR children, remove the door from any appliance before disposing of it or discontinuing its use.
SAFETY INFORMATION IMPORTANT SAFETY INFORMATION READ ALL INSTRUCTIONS BEFORE USING THE APPLIANCE OUTDOOR USE NOTICE KEEP FROM FREEZING: Severe damage will occur to the unit if left in or operated in temperatures beyond the limits listed in this manual. That damage is NOT covered by warranty. WATER SUPPLY: Avoid a long run of hose or tubing exposed to the sun. Plastic water supply tubing should EH UDWHG IRU SRWDEOH ZDWHU DQG LQFOXGH 89 SURWHFWLRQ Copper tubing is recommended.
Remove Packaging IMPORTANT: Do not remove any permanent instruction labels inside your ice machine or the Tech Sheet that is fastened behind the lower access panel. Ŷ 'R QRW XVH VKDUS LQVWUXPHQWV UXEELQJ DOFRKRO flammable fluids or abrasive cleaners to remove tape or glue. These products can damage the surface of \RXU LFH PDNHU )RU PRUH LQIRUPDWLRQ VHH ,PSRUWDQW 6DIHW\ ,QVWUXFWLRQV Ŷ 5HPRYH WDSH DQG DQ\ ODEHOV IURP \RXU LFH PDNHU before using (except the model and serial number label).
USING THE ICE MACHINE: )HDWXUHV 6WDUWLQJ WKH LFH PDFKLQH Features Control panel POWER ON/OFF ICE MAKING CHECK WATER TIME TO CLEAN CLEAN RESET )URQW VHUYLFH SDQHO Ice scoop .LFNSODWH Starting the ice machine This machine takes in room temperature air at the lower right front and forces warm air out the lower left front. Restricting the airflow or operating the machine in a hot or cold environment will adversely affect the ability of the ice machine to make ice.
ICE MACHINE Questions? Call 800.GE.CARES (800.432.2737) or visit our Website at: GEAppliances.com In Canada, call 1.800.561.3344 or visit our Website at: GEAppliances.ca GROUNDING THE ICE MACHINE WARNING Electrical Shock Hazard. )DLOXUH WR IROORZ WKHVH LQVWUXFWLRQV FDQ UHVXOW LQ GHDWK fire, or electrical shock.
INSTALLATION INSTRUCTIONS Installation Instructions ICE MACHINE LOCATION AND PREPARATION (Cont.) Utility and Operational Requirements • This ice machine must be connected to a potable water supply. • The water supply must have a conductivity of at least PLFUR6LHPHQV FP The water to this ice machine must be potable, or fit for human consumption. During ice making some minerals will stick to the ice making components. The higher the mineral content, the more mineral build up will occur.
ADVANCE PLANNING CAUTION Due to excessive weight, TWO PEOPLE ARE REQUIRED TO MOVE AND INSTALL THIS Ice maker. Failure to do so can result in back or other injury. Cutout & Product Dimensions Installation Notes A drain pump is available for this ice machine. The GUDLQ SXPS NLW QXPEHU LV 83. DQG LV DYDLODEOH DW GEApplianceparts.com or by calling In Canada visit GEAppliances.ca or call 800.561.3344.
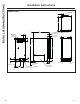
INSTALLATION INSTRUCTIONS Installation Instructions DIMENSIONS FLOOR DRAIN ACCESS HOLE 3 7/8" 20 3/8" 3/4" 22" 3/4" SHEET METAL DOOR FRONT - IF DOOR KIT INSTALLED 1/4" O.D. COPPER .63 MIN. CABINET DOOR 2 3/4" WATER INLET COMPRESSION FITTING PROVIDED 2 3/8" DOOR KIT AND HANDLE 14-7/8" 5 1/8" 33 7/8" 29-1/8" 4-1/4" 3 1/4" 2 1/2" 2-3/4" AIR OUT 115V POWER CORD 7 1/2" LEFT SIDE SVC. 11 5/8" AIR IN 1" LEG ADJUSTMENT (4) PLACES DRAIN ACCESS - FLEXIBLE TUBING 5/8" I.D. x 7/8" O.D.
DOOR SWING Moving the hinges allows the door to open from either the left or the right side. Change the swing BEFORE attaching the door panel. To change: 1. Open the door. Remove 4 stainless steel screws opposite the hinge side on the front of the cabinet. 2. Remove innermost screw holding each hinge to the FDELQHW /RRVHQ WKH RWKHU VFUHZ /RRVHQ Remove 3. Slide the door to the side so the keyhole on the hinge clears the screw and remove from cabinet. 4. Remove the screws that were loosened and save.
INSTALLATION INSTRUCTIONS Installation Instructions INSTALLING THE DOOR PANEL The ice machine is supplied without a conventional door covering, allowing the attachment of a stainless steel door panel or a custom panel. NOTE: If the door swing is to be changed, it needs to be done BEFORE attaching the door panel. Door Panel )LQLVKHG VWDLQOHVV VWHHO GRRU SDQHOV ZLWK KDQGOHV DUH available from GE Appliances for attachment to the ice machine. See Accessories on page 21.
INSTALLING THE DOOR PANEL (Cont) If the door swing is going to be changed please complete prior to installing the door panel. See page 11. Attaching the Door Panel The panel will be held on by 6 sheet metal screws and 2 machine screws. 1. Remove the gasket from the inside of the door and retain for later use. 2. Remove any plastic covering the stainless steel panel. 3. Place the door panel onto the outside of the door and secure it with 2 machine screws in the left center and right center of the door.
INSTALLATION INSTRUCTIONS Installation Instructions PLUMBING - DRAIN PUMP PLUMBING - GRAVITY DRAIN (cont) Drain Installation 4. Remove the clamp and barbed elbow and take off the plastic cover in the base pan below the drain hose. &RQQHFW D VWUDLJKW EDUEHG FRQQHFWRU WR the drain hose, securing with the supplied hose clamp.
PLACEMENT OF THE ICE MACHINE The ice machine is supplied with a power cord. Do not remove the grounding pin from the cord's plug. Do not XVH H[WHQVLRQ FRUGV )ROORZ DOO FRGHV &RQQHFW WKH machine so its own 115v, 15amp circuit. 1. If the electrical outlet for the ice maker is behind the unit, plug it into the unit. 2. Position the unit in the installation opening. 3. Turn on the water supply. Make sure that the icemaker is plugged in and the power is on. 4.
CARE AND CLEANING Care And Cleaning Cleaning the Outside Cleaning the Condenser The stainless steel door and door handle can be cleaned with a commercially available stainless steel cleaner. &OHDQHUV ZLWK R[DOLF DFLG VXFK DV %DU .HHSHUV )ULHQG Soft Cleanser™ will remove surface rust, tarnish and small blemishes. The condenser has fins and tubes that can become clogged with dirt and lint. 8VH RQO\ D OLTXLG FOHDQVHU IUHH RI JULW DQG UXE LQ WKH direction of the brush lines with a damp soft sponge.
Removing Scale from the Ice Making System (Cont.) 6. Push tab on front edge of reservoir cover and remove the cover. NOTE: Adjacent wires are low YROWDJH DQG DUH QRW KD]DUGRXV / RFDWH WKH GUDLQ SOXJ 3XOO WKH GUDLQ SOXJ RXW WR drain the reservoir and evaporator. When draining is complete, return the plug to its original position.
CARE AND CLEANING Care And Cleaning (Cont.) Removing Scale from the Ice Making System (Cont.) 7XUQ WKH :DWHU 6KXW 2II )ORDW 9DOYH NQRE WR WKH 2II position, replace the reservoir cover, and then turn WKH :DWHU 6KXW 2II )ORDW 9DOYH NQRE EDFN WR WKH 2Q position. 14. Replace the upper back wall of the bin using the original screws. Push in to snap bottom of back panel into place.
Save time and money! Review the charts on the following pages first and you may not need to call for service. Problem Possible Causes What to Do Low capacity Restricted drain or standing water in Clean the air cooled condenser fins. the bin Clean the ice making system. Check the drain line for kinks No ice 6ZLWFK LV 2)) Press the ON/OFF button to turn the power on.
LIMITED WARRANTY GE Appliances Ice Machine Limited Warranty GEAppliances.com $OO ZDUUDQW\ VHUYLFH LV SURYLGHG E\ RXU )DFWRU\ 6HUYLFH &HQWHUV RU DQ DXWKRUL]HG &XVWRPHU &DUH® technician. To schedule service online, visit us at geappliances.com/service RU FDOO *( $SSOLDQFHV DW *( &$5(6 3OHDVH have your serial number and your model number available when calling for service. In Canada, visit GEAppliances.
Looking For Something More? )LQLVKHG VWDLQOHVV VWHHO GRRU SDQHOV ZLWK KDQGOHV DUH available from GE Appliances for attachment to the ice machine.The panel kits are: =,3 66 6WDLQOHVV VWHHO GRRU ZLWK (XUR 6W\OH Handles 3,3 66 6WDLQOHVV VWHHO GRRU ZLWK 3URILOH 6W\OH Handles • CIP75SS - Stainless steel door with Café Style Handles To order, go to GEApplianceParts.com or call In Canada visit GEAppliances.
NOTES 22 Notes 49-60744-4
49-60744-4 NOTES Notes 23
CONSUMER SUPPORT Consumer Support GE Appliances Website Have a question or need assistance with your appliance? Try the GE Appliances Website 24 hours a day, any day of the year! You can also shop for more great GE Appliances products and take advantage of all our on-line support VHUYLFHV GHVLJQHG IRU \RXU FRQYHQLHQFH ,Q WKH 86 GEAppliances.com In Canada: GEAppliances.
MACHINE À GLAÇONS INFORMATION DE SÉCURITÉ . . .3 UTILISANT LA MACHINE À GLAÇONS MANUEL D’UTILISATION ET INSTRUCTIONS D’INSTALLATION Déballage . . . . . . . . . . . . . . . . . . . . . . . . . . . . .5 Commandes . . . . . . . . . . . . . . . . . . . . . . . . . .5 Fonctions . . . . . . . . . . . . . . . . . . . . . . . . . . . . .6 Démarrage de la machine à glaçons . . . . . .6 UNC15 INSTALLATION INSTRUCTIONS Mise à la terre de la machine à glaçons . . .7 Avant de commencer . . . . . . . . . . . . . .
NOUS VOUS REMERCIONS D’ACCUEILLIR GE APPLIANCES CHEZ VOUS Que vous ayez grandi avec GE Appliances ou qu’il s’agisse de votre première acquisition, nous sommes heureux de vous accueillir dans notre famille. Nous sommes fiers du savoir-faire, de l’innovation et de l’esthétique qui composent chaque appareil GE Appliances, et nous pensons que vous le serez aussi.
LISEZ TOUTES LES INSTRUCTIONS AVANT UTILISANT LA MACHINE À GLAÇONS AVERTISSEMENT $¿Q GH UpGXLUH OH ULVTXH G¶LQFHQGLH G¶H[SORVLRQ GH FKRF pOHFWULTXH RX GH EOHVVXUH ORUV de l’utilisation de votre machine à glaçons, observez ces mesures de sécurité suivantes : Ŷ & H PDFKLQH j JODoRQV GRLW rWUH FRUUHFWHPHQW LQVWDOOp conformément aux Consignes d’Installation avant toute utilisation.
INFORMATION DE SÉCURITÉ INSTRUCTIONS IMPORTANTES DE SÉCURITÉ LISEZ TOUTES LES INSTRUCTIONS AVANT UTILISANT LA MACHINE À GLAÇONS AVIS CONCERNANT L’UTILISATION À L’EXTÉRIEUR PROTÉGER DU GEL : Des dommages sévères à l’appareil surviendront s’il est soumis à des températures internes ou ambiantes qui excèdent les limites spécifiées dans ce manuel. Ce type de dommage ne sera PAS couvert par la garantie. ALIMENTATION D’EAU : Évitez l’exposition au soleil de longues sections de tuyau.
Retirer l'emballage IMPORTANT: N’enlevez aucune étiquette d’instructions permanente à l’intérieur de la machine à glaçons ni fiche technique fixée derrière le panneau d’accès inférieur. Ŷ 5HWLUH] OH UXEDQ DGKpVLI HW WRXWH pWLTXHWWH GH YRWUH PDFKLQH à glaçons avant l’utilisation (sauf l’étiquette des numéros de modèle et de série). Ŷ 1¶XWLOLVH] SDV G¶LQVWUXPHQWV FRXSDQWV GH O¶DOFRRO j IULFWLRQ des fluides inflammables ni des nettoyants abrasifs pour enlever l’adhésif ou la colle.
UTILISANT LA MACHINE À GLAÇONS: Fonctions/ Démarrage de la machine à glaçons 6 Fonctions Panneau de commande POWER ON/OFF ICE MAKING CHECK WATER TIME TO CLEAN CLEAN RESET Panneau de service frontal Pelle à glaçons Coup-de-pied Démarrage de la machine à glaçons Cette machine aspire l’air à température ambiante depuis sa face frontale inférieure droite et expulse l’air chaud depuis sa face frontale inférieure gauche.
MACHINE À GLAÇONS Si vous avez des questions, appelez le 1.800.561.3344 ou visitez notre site Web à l’adresse : electromenagersge.ca MISE À LA TERRE DE LA MACHINE À GLAÇONS AVERTISSEMENT Risque de choc électrique. Le non-respect de ces instructions peut entraîner des risques d’incendies, des chocs électriques ou la mort.
INSTRUCTIONS D’INSTALLATION Instructions d’installation EMPLACEMENT ET PRÉPARATION DE LA MACHINE À GLAÇONS (SUITE) Spécifications relatives à l’alimentation d’eau et aux conditions ambiantes • Cette machine à glaçons doit être raccordée à une alimentation d’eau potable. • L’alimentation d’eau doit présenter une conductivité d’au moins 10 microSiemens/cm. L’eau alimentant cette machine à glaçons doit être potable et convenir à la consommation humaine.
PLANIFICATION PRÉALABLE ATTENTION En raison du poids important, DEUX PERSONNES SONT NÉCESSAIRES POUR DÉPLACER ET INSTALLER cette machine à glaçons. L’omission d’agir ainsi peut causer des blessures, notamment au dos. Dimensions du produits et des découpes Notes d’installation Une pompe de vidange est offerte pour cette machine à glaçons. On peut se procurer l’ensemble de pompe de vidange numéro UPK3 sur le site GEApplianceparts.com ou en composant le 877-959-8688. Au Canada, visitez le site GEAppliances.
INSTRUCTIONS D’INSTALLATION Instructions d’installation DIMENSIONS TROU D’ACCÈS POUR DRAIN DE PLANCHER 3-7/8 po 20-3/8 po 3/4 po RACCORD DE COMPRESSION POUR TUYAU DE CUIVRE 1/4 PO (D.E.) FOURNI 22 po 2-3/4 po PANNEAU MÉTALLIQUE FRONTAL DE PORTE 3/4 PO – SI L’ENSEMBLE DE PORTE EST INSTALLÉ PORTE ARMOIRE 0,63 PO MIN.
DIRECTION DE L’OUVERTURE DE PORTE La pose des charnières peut se faire d’un côté ou l’autre pour permettre l’ouverture de la porte à droite ou à gauche. 'pFLGH] GX F{Wp GH O¶RXYHUWXUH $9$17 GH IL[HU OH SDQQHDX de porte. Pour changer de côté : 1. Ouvrez la porte. Enlevez les 4 vis en acier inoxydable à l’opposé du côté charnière sur le devant de l’armoire. 2. Enlevez la vis située la plus à l’intérieur qui fixe la charnière à l’armoire. Desserrez l’autre vis. Desserrer Enlever 3.
INSTRUCTIONS D’INSTALLATION Instructions d’installation INSTALLATION DU PANNEAU DE PORTE La machine à glaçons est livrée sans recouvrement de porte conventionnel, permettant ainsi la fixation d’un panneau en acier inoxydable ou d’un panneau personnalisé. 5. 6. REMARQUE : Si la direction d’ouverture de la porte doit rWUH FKDQJpH LO IDXW SURFpGHU $9$17 GH IL[HU OH SDQQHDX GH porte. 7. Couper le panneau à la largeur et la hauteur spécifiées. Déterminez la position du haut du panneau.
INSTALLATION DU PANNEAU DE PORTE (suite) Si le sens de l’ouverture de porte doit être changé, veuillez procéder avant d’installer le panneau de porte. Voir la page 11. Fixation du panneau de porte Le panneau sera fixé par 6 vis à tôle et 2 vis de mécanique. 1. Enlevez le joint d’étanchéité depuis l’intérieur de la porte et conservez-le pour plus tard. 2. Enlevez toute pellicule de plastique recouvrant le panneau. 3.
INSTRUCTIONS D’INSTALLATION Instructions d’installation PLOMBERIE – POMPE DE VIDANGE Installation du système de vidange PLOMBERIE – VIDANGE PAR GRAVITÉ (suite) Une pompe de vidange est offerte pour cette machine à glaçons. On peut se procurer l’ensemble de pompe de vidange numéro UPK3 sur le site GEApplianceparts.com ou en composant le 877-959-8688. Au Canada, visitez le site GEAppliances.ca ou composez le 800.561.3344. 4.
PLACEZ LA MACHINE À GLAÇONS La machine à glaçons est livrée avec un cordon électrique. Ne retirez pas la broche de mise à la terre de la fiche du cordon. N’utilisez pas de rallonge. Observez tous les codes d’électricité. Branchez la machine sur son propre circuit de 115 V, 15 ampères. 5. Versez quelques litres d’eau dans le bac de conservation de la glace; sur les machines qui en sont équipées, la pompe devrait démarrer et l’eau devrait se vidanger. Vérifiez l’absence de fuites. 1.
ENTRETIEN ET NETTOYAGE Entretien et nettoyage Nettoyage des surfaces extérieures Nettoyage du condensateur On peut nettoyer la porte et la poignée en acier inoxydable à l’aide d’un nettoyant pour inox commercial. Les nettoyants qui contiennent de l’acide oxalique tels que Bar Keepers Friend Soft Cleanser™ vont éliminer la rouille, le ternissement et les petites taches. Le condensateur est constitué d’ailettes et de tubes que la saleté et la charpie peuvent obstruer.
Nettoyage du tartre dans le système de la machine à glaçons (suite) 6. 7. Poussez la languette située sur le bord frontal du couvercle du réservoir et retirez le couvercle. REMARQUE : Les fils adjacents conduisent une faible tension et ne sont pas dangereux. 5HSpUH] OH ERXFKRQ GH YLGDQJH 7LUH] VXU OH ERXFKRQ SRXU vidanger le réservoir et l’évaporateur. Une fois la vidange terminée, remettez le bouchon en place.
ENTRETIEN ET NETTOYAGE Entretien et nettoyage (Suite) Nettoyage du tartre dans le système de la machine à glaçons (suite) 13. 7RXUQH] OH ERXWRQ GX URELQHW GH VHFWLRQQHPHQW G¶HDX j flotteur) à la position OFF (arrêt), replacez le couvercle du réservoir, puis retournez le bouton du robinet de sectionnement d’eau (à flotteur) à la position ON (marche). 16. Utilisez le reste de solution de produit antitartre pour nettoyer le tartre résiduel sur le revêtement du bac.
Économisez temps et argent! Consultez d’abord les tableaux des pages suivantes et vous pourriez vous éviter un appel de service. Problème Causes possibles Causes possibles Faible capacité 7X\DX GH YLGDQJH UHVWUHLQW RX HDX stagnante dans le bac Nettoyez les ailettes du condensateur refroidi à l’air. Nettoyez le système de production de glace. Vérifiez que le tuyau de vidange ne comporte pas de plis.
GARANTIE LIMITÉE GE Appliances Garantie Limitée de la machine à glaçons electromenagersGE.ca 7RXWHV OHV UpSDUDWLRQV HQ YHUWX GH OD JDUDQWLH VRQW IRXUQLV SDU QRV &HQWUH GH 6HUYLFH G¶8VLQH RX SDU XQ WHFKQLFLHQ DXWRULVp &XVWRPHU Care®. Pour prévoir une réparation, consultez notre site electromenagersge.ca/fr/soutien/demande-de-service ou appelez le 800.661.1616. Veuillez avoir votre numéro de série et votre numéro de modèle à portée de main lorsque vous appelez pour obtenir un service.
À la Recherche de Quelque Chose de Plus? Des panneaux de finition en acier inoxydable avec poignées sont offerts par Électroménagers GE pour fixation à la machine à glaçons. Les ensembles de panneau sont les suivants : • ZIP80SS – Porte en acier inoxydable avec poignées style Euro • PIP70SS - Porte en acier inoxydable avec poignées style Profile • CIP75SS - Porte en acier inoxydable avec poignées style Café Pour commander, allez sur le site electromenagersge.
SOUTIEN AU CONSOMMATEUR Soutien au consommateur Site Web de GE Appliances Vous avez une question ou vous avez besoin d’aide pour votre appareil électroménager? Visitez le site Web de GE Appliances 24 heures par jour, tous les jours de l’année! Vous pouvez aussi y trouver d’autres formidables produits GE Appliances et tirer avantage de tous nos services d’assistance en ligne. Aux États-Unis : GEAppliances.com Au Canada : ElectromenagersGE.
MÁQUINA DE HIELO INSTRUCIONES DE SEGURIDAD . . . . . . . . . . . . . . . . . . .3 USO DE LA MÁQUINA DE HIELO MANUAL DEL PROPIETARIO E INSTRUCCIONES DE INSTALACIÓN Embalaje . . . . . . . . . . . . . . . . . . . . . . . . . . . . .5 Controles . . . . . . . . . . . . . . . . . . . . . . . . . . . . .5 Funciones . . . . . . . . . . . . . . . . . . . . . . . . . . . .6 Activación de la Máquina de Hielo . . . . . . .6 UNC15 INSTRUCCIONES DE INSTALACIÓN Conexión a Tierra de la Máquina de Hielo . . . . . . .
GRACIAS POR HACER QUE GE APPLIANCES SEA PARTE DE SU HOGAR. Ya sea que haya crecido usando GE Appliances, o que ésta es su primera vez, nos complace tenerlo en la familia. Sentimos orgullo por el nivel de arte, innovación y diseño de cada uno de los electrodomésticos de GE Appliances, y creemos que usted también. Entre otras cosas, el registro de su electrodoméstico asegura que podamos entregarle información importante del producto y detalles de la garantía cuando los necesite.
ADVERTENCIA $ ¿Q GH UHGXFLU HO ULHVJR GH LQFHQGLR H[SORVLyQ GHVFDUJDV HOpFWULFDV R OHVLRQHV DO XVDU su refrigerador, siga estas precauciones básicas de seguridad: Ŷ ( VWD PiTXLQD GH KLHOR VH GHEHUi LQVWDODU \ XELFDU adecuadamente de acuerdo con las Instrucciones de Instalación antes de ser usado. Ŷ ' HVHQFKXIH OD PiTXLQD GH KLHOR DQWHV GH KDFHU reparaciones, reemplazar una lámpara de luz o hacer una limpieza.
INFORMACIÓN DE SEGURIDAD INFORMACIÓN IMPORTANTE DE SEGURIDAD LEA TODAS LAS INSTRUCCIONES ANTES DE USAR AVISO DE USO EN ÁREAS EXTERIORES EVITE EL CONGELAMIENTO: La unidad podrá sufrir daños graves si se deja o utiliza a temperaturas que superan los OtPLWHV TXH ILJXUDQ HQ HVWH PDQXDO 'LFKR daño NO está cubierto por la garantía. MANTÉNGALA SECA: No la ubique en áreas bajas donde se produzcan charcos.
Retire el embalaje IMPORTANTE: No retire ninguna etiqueta de instrucciones permanente dentro de la máquina de hielos ni la Ficha Técnica colocada detrás del panel de acceso inferior. Ŷ 5HWLUH OD FLQWD \ FXDOTXLHU HWLTXHWD GH VX PiTXLQD GH KLHOR DQWHV GHO XVR H[FHSWR OD HWLTXHWD GHO PRGHOR \ HO Q~PHUR GH serie). Ŷ 1R XVH LQVWUXPHQWRV SXQWLDJXGRV QR IURWH DOFRKRO QR XVH líquidos inflamables, ni limpiadores abrasivos para retirar cinta o pegamento.
EL USO DE LA MÁQUINA DE HIELO: Funciones/ Activación de la máquina de hielo 6 Funciones Panel de control POWER ON/OFF ICE MAKING CHECK WATER TIME TO CLEAN CLEAN RESET Panel frontal de servicio Cuchara de hielo Zócalo Activación de la máquina de hielo Esta máquina hace entrar el aire de la temperatura ambiente por la parte inferior derecha frontal y hace salir el aire caliente por la parte inferior izquierda frontal.
MÁQUINA DE HIELO Si tiene preguntas, llame al 1.800.GE.CARES o bien visite nuestra página Web: GEAppliances.com CONEXIÓN A TIERRA DE LA MÁQUINA DE HIELO ADVERTENCIA UBICACIÓN Y PREPARACIÓN DE LA MÁQUINA DE HIELO Riesgo de Descarga Esta máquina de hielo fue diseñada para uso interior, en un DPELHQWH FRQWURODGR R HQ H[WHULRU GHQWUR GH FLHUWRV OtPLWHV Si no se siguen estas instrucciones se podrá producir a muerte, incendios o descargas eléctricas.
INSTRUCCIONES DE INSTALACIÓN Instrucciones de instalación UBICACIÓN Y PREPARACIÓN DE LA MÁQUINA DE HIELO (Cont.) Requisitos y Servicios Públicos y Funcionamiento • Esta máquina de hielo debe estar conectada a un suministro de agua potable. • El suministro de agua potable debe contar con una conductividad de por lo menos 10 microSiemens/cm.
PLANIFICACIÓN AVANZADA PRECAUCIÓN Debido a un peso excesivo, SE REQUIERE QUE DOS PERSONAS MUEVAN E INSTALEN ESTA máquina de hielo. Si esto no se cumple, se podrán producir lesiones en la espalda u otras heridas. DIMENSIONES DEL PRODUCTO Y ESPACIO 24" 34" a 35" 15" Mín.
INSTRUCCIONES DE INSTALACIÓN Instrucciones de instalación DIMENSIONES ORIFICIO DE ACCESO AL DESAGÜE POR EL PISO 3-7/8" 20-3/8" 3/4" UNIÓN DE COMPRENSIÓN DE ENTRADA DE AGUA DE COBRE DE 1/4" DE DIÁM. EXT. PROVISTA 22" FRENTE DE LA PUERTA DE CHAPA METÁLICA DE 3/4" – SI EL KIT DE LA PUERTA ESTÁ INSTALADO, PUERTA DEL GABINETE DE UN MÍN. DE .
APERTURA DE LA PUERTA Mover las bisagras permite que la puerta se abra ya sea desde la izquierda o la derecha. Cambie la apertura ANTES de adherir el panel de la puerta. Para hacer un cambio: $EUD OD SXHUWD 5HWLUH ORV WRUQLOORV GH DFHUR LQR[LGDEOH del lado opuesto a las bisagras frente al gabinete. 2. Retire el tornillo que está más adentro sosteniendo cada bisagra al gabinete. Afloje el otro tornillo.
INSTRUCCIONES DE INSTALACIÓN Instrucciones de instalación INSTALACIÓN DEL PANEL DE LA PUERTA La máquina de hielo es provista sin una cobertura convencional para puerta, permitiendo adherir un panel para SXHUWD GH DFHUR LQR[LGDEOH R XQ SDQHO HVWiQGDU NOTA: Si la dirección de la puerta puede ser modificada, será necesario realizar la misma ANTES de adherir el panel de la puerta. Panel de la Puerta 5. Corte el panel hasta el ancho y alto especificados.
INSTALACIÓN DEL PANEL DE LA PUERTA (Cont) Si se modificará la apertura de la puerta, complete este paso antes de instalar el panel de la puerta. Lea la página 11. Adherencia del Panel de la Puerta El panel será sostenido por 6 tornillos para chapa metálica y 2 tornillos para metal. 1. Retire la junta del interior de la puerta o conserve la misma para uso posterior. 2.
INSTRUCCIONES DE INSTALACIÓN Instrucciones de instalación PLOMERÍA – BOMBA DE DESAGÜE Instalación del Desagüe 8QD ERPED GH GHVDJH HVWi GLVSRQLEOH SDUD HVWD PiTXLQD GH KLHOR (O Q~PHUR GHO NLW GH OD ERPED GH GHVDJH HV UPK3 y está disponible en GEApplianceparts.com o OODPDQGR DO (Q &DQDGi YLVLWH GEApppliances.ca o comuníquese al 800.661.1616.
COLOCACIÓN DE LA MÁQUINA DE HIELO La máquina de hielo es suministrada con un cable de FRUULHQWH 1R UHWLUH HO SHUQR GH FRQH[LyQ D WLHUUD GHO HQFKXIH del cable. No use prolongadores. Siga todos los códigos. Conecte la máquina de modo que el circuito posea 115v, 15 amp. 5. Vierta un par de cuartos de galón de agua en la hielera; HQ PiTXLQDV HTXLSDGDV FRQ ERPED GH GHVDJH OD ERPED GH GHVDJH VH GHEH LQLFLDU \ GHEH ERPEHDU DJXD Controle que no haya pérdidas. 1.
CUIDADO Y LIMPIEZA Cuidado y limpieza Limpieza de la Parte Exterior Limpieza del Condensador /D SXHUWD \ OD PDQLMD GH OD SXHUWD GH DFHUR LQR[LGDEOH VH SXHGHQ OLPSLDU FRQ XQ OLPSLDGRU GH DFHUR LQR[LGDEOH GLVSRQLEOH FRPHUFLDOPHQWH /RV OLPSLDGRUHV FRQ iFLGR R[iOLFR WDOHV FRPR %DU .HHSHUV )ULHQG 6RIW &OHDQVHU HOLPLQDUiQ HO y[LGR deslustres y pequeñas manchas sobre la superficie. El condensador cuenta con alerones y tubos que pueden atascarse con suciedad y pelusas.
Eliminación del Sarro del Sistema de Producción de Hielo (Cont.) 3 UHVLRQH OD OHQJHWD VREUH HO H[WUHPR IURQWDO GH OD WDSD del depósito y retire la tapa. NOTA: Los cables adyacentes son de bajo voltaje y no son peligrosos. / OHQH HO GHSyVLWR FRQ OD VROXFLyQ SDUD OLPSLDU VDUUR XVDQGR OD ERWHOOD FRQ VLVWHPD GH FKRUUR 8VH DSUR[LPDGDPHQWH OD mitad (8 onzas) de la solución. POWER ON/OFF 8 ELTXH HO WDSyQ GH GHVDJH 4XLWH HO WDSyQ GH GHVDJH para drenar el depósito y el evaporador.
CUIDADO Y LIMPIEZA Cuidado y limpieza (Cont.) Eliminación del Sarro del Sistema de Producción de Hielo (Cont.) 13. Gire la perilla de la válvula de cierre del agua (flotador) a la posición de apagado, vuelva a colocar la tapa del depósito y luego gire la perilla de la válvula de cierre del agua (flotador) a la posición de encendido. 16. Use cualquier resto de solución para eliminar sarro para frotar el sarro del cobertor del cesto.
£$KRUUH WLHPSR \ GLQHUR 3ULPHUR UHYLVH ORV FXDGURV TXH DSDUHFHQ HQ ODV VLJXLHQWHV SiJLQDV \ HV SRVLEOH TXH QR necesite solicitar reparaciones. Problema Causas Posibles Qué hacer Baja capacidad 'HVDJH UHVWULQJLGR R DJXD UHVWDQWH HQ Limpie los alerones del condensador enel cesto friados por el aire. Limpie el sistema de la máquina de hielo. Controle que no haya torceduras en la WXEHUtD GH GHVDJH Sin hielo El interruptor está en OFF (Apagado).
GARANTÍA LIMITADA GE Appliances Garantía Limitada de la Máquina de Hielo GEAppliances.com Todo el servicio de garantía es provisto por nuestros Centros de Servicio de Fabricación, o un técnico autorizado de Servicio al Cliente (800.462.2737). Para programar una visita del servicio técnico, visítenos en GEAppliances.com, o comuníquese al 800.GE.CARES (800.432.2737). Cuando llame para solicitar el servicio, tenga los números de serie y modelo disponibles.
¿Busca Algo Más? Están disponibles paneles acabados para puertas de DFHUR LQR[LGDEOH FRQ PDQLMDV D WUDYpV GH *( $SSOLDQFHV los cuales se pueden adherir a la máquina de hielo. Los kits de los paneles son: =,3 66 3XHUWD GH DFHUR LQR[LGDEOH FRQ 0DQLMDV (VWLOR Euro 3,3 66 3XHUWD GH DFHUR LQR[LGDEOH FRQ 0DQLMDV (VWLOR 3UR¿OH &,3 66 3XHUWD GH DFHUR LQR[LGDEOH FRQ 0DQLMDV (VWLOR Café Para ordenar, visite GEApplianceParts.com o comuníquese DO (Q &DQDGi YLVLWH GEAppliances.
SOPORTE PARA EL CONSUMIDOR Soporte para el Consumidor Sitio Web de GE Appliances ¢'HVHD UHDOL]DU XQD FRQVXOWD R QHFHVLWD D\XGD FRQ VX HOHFWURGRPpVWLFR" £,QWHQWH D WUDYpV GHO 6LWLR :HE GH *( $SSOLDQFHV ODV KRUDV GHO GtD FXDOTXLHU GtD GHO DxR 8VWHG WDPELpQ SXHGH FRPSUDU PiV HOHFWURGRPpVWLFRV PDUDYLOORVRV GH *( $SSOLDQFHV \ aprovechar todos nuestros servicios de soporte a través de Internet, diseñados para su conveniencia. En EE.UU.: GEAppliances.