
manual


6 49-1000436 Rev. 0
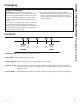
Starting the ice machine
POWER
ON/OFF
CLEAN
RESET
TIME TO
CLEAN
CHECK
WATER
ICE
MAKING
Ice scoop
.LFNSODWH
Control panel
)URQWVHUYLFHSDQHO
Initial Start Up
1. Turn on the water supply.
2. Switch on the electrical power.
3XVKDQGUHOHDVHWKH212))VZLWFKWRVWDUWWKH
PDFKLQH7KH,&(0$.,1*OLJKWQH[WWRWKH212))
switch will glow white.
,WZLOOWDNHDERXWPLQXWHVIRUWKHLFHPDFKLQHWREHJLQ
dropping nugget ice into the storage bin. It is normal for
that ice to melt and continue to melt but at a slower rate
as the bin cools. It will take about 6-7 hours to fill up the
LFHVWRUDJHELQ7KHVWRUDJHELQKROGVDERXWOEVRILFH
when full.
Discard the first bin full of ice.
Features
USING THE ICE MACHINE:)HDWXUHV6WDUWLQJWKHLFHPDFKLQH
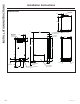
This machine takes in room temperature air at the lower
right front and forces warm air out the lower left front.
Restricting the airflow or operating the machine in a hot
or cold environment will adversely affect the ability of the
ice machine to make ice.
When the door is opened, the control panel, ice making
area and ice storage bin are visible. The scoop is located
in a holder along the right side wall.
This is a gravity drain model that must have a building
drain connection below the level of the drain tube at the
back of the cabinet. A pump can be installed, which can
IRUFHGUDLQZDWHUXSDPD[LPXPRIIHHWDOORZLQJLW
to be located where a gravity drain isn't available. See
Accessories on page 21 for more information on the
drain pump.
Warm Air Out
Air Intake