
Installation Guide


10 49-2000930 Rev. 0
Installation Preparation
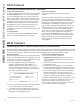
PRODUCT DIMENSIONS
INSTALLATION PREPARATION
Design varies by model
15"
12 1/2"
A"
21 7/8"
7 5/8"
28 7/16"
Model A
UVC9420 39-1/2"
UVC9480 45-3/4"
ADVANCE PLANNING
Duct Install Planning
Ŷ7KLVKRRGLVGHVLJQHGWREHYHQWHGYHUWLFDOO\WKURXJK
the ceiling. Use a 10" round duct. Use locally
supplied elbows to vent horizontally through the rear
wall.
Ŷ8VHPHWDOGXFWZRUNRQO\
Ŷ'HWHUPLQHWKHH[DFWORFDWLRQRIWKHYHQWKRRG
ŶPlan the route for venting exhaust to the outdoors.
To maximize the ventilation performance of the vent
system:
1. Minimize the duct run length and number of
transitions and elbows.
2. Maintain a constant duct size.
3. Seal all joints with duct tape to prevent any leaks.
NOTE: Flexible vent is not recommended. Flexible
vent creates back pressure and air turbulence that
greatly reduces performance.
Ŷ0D[LPXPHTXLYDOHQWGXFWOHQJWKIRU&)0
foot for vent hoods.
Ŷ,QVWDOODZDOOFDSRUURRIFDSZLWKGDPSHUDWWKH
exterior opening. Purchase the wall or roof cap and
any transition and length of duct needed in advance.
Vent system can terminate either through the roof
RUWKHZDOO7RYHQWWKURXJKDZDOODHOERZLV
needed and installed immediately above the hood.
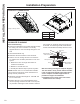
Wall and Ceiling Framing for Adequate Support
This vent hood is heavy and the cabinet structure
needs to support the weight of the loaded insert
sleeve. Adequate structural support must be
provided in all types of installations.
Ŷ,QVWDOODWLRQZLOOEHHDVLHULIWKHYHQWKRRGLV
installed before the cooktop.
Roof Cap
Round Duct
Wall Cap
Add Insulation
and/or Caulk
Add Insulation
and/or Caulk
Cabinet
Add tape to joint
Hood