
Owners Manual


49-2000707 Rev. 4 19
3
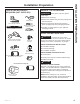
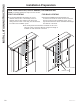
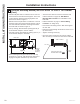
INSTALL HOOD ONTO WALL
• Pull house wiring through knockout at the back or
top of the hood.
• Lift the hood and place over the hooks on the
installation bar. Allow the hood to slide down into
position.
• Check to be sure the hood is level and centered.
• Tighten wall anchor screws (C) to finish hood body
installation to the wall.
• Remove cover from junction box inside the hood.
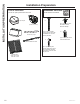
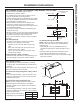
24” minimum over electric
range or cooktop, or 30”
minimum over gas range
or cooktop, and 36”
recommended maximum.
Centerline of
Installation Space
INSTALLATION INSTRUCTIONS
Installation Instructions
4
(Alternate Mounting Method)
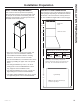
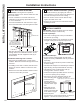
INSTALL HOOD TO SOFFIT OR
CABINET
SKIP THIS STEP IF USING WALL MOUNTING
METHOD
IMPORTANT: Soffit or cabinet framing must be
capable of supporting 100 lbs. for 30" and 36"
models and 150 lbs. for 48" models.
When necessary the hood may be installed so that
it is supported by the soffit or cabinet.
• The soffit should be constructed with 2"x4"’s.
• Use a level to draw the cooktop or range center
line.
• Continue the centerline forward on the bottom of
the soffit.
• Install horizontal wood supports between the 2”x4”,
at distance A to the left and right, as per the table
below.
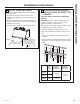
“A”
Center-
line to
Center
Stud
“B”
Opening for
Ductwork for
top venting
“C”
Opening for
Ductwork for
back venting
30”
Models
8-3/4”
8-3/8” W x
11-1/4” H
10-1/2” W x
13-1/4” H
36”
Models
13-3/4”
48”
Models
17-3/4”
10-5/8” W x
11-1/4” H
B
A
A
C