
Installation Guide

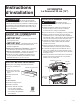

UX12B36PSS
12” High Backsplash
WARNING
To prevent ignition of combustible
materials, the entire back wall above the range
must be protected by a backsplash constructed of
non-combustible material.
This stainless steel backsplash accessory must be
installed in combination with a custom, non-combustible
backsplash built beyond the 12” height of the backsplash.
BEFORE YOU BEGIN
Read these instructions completely and carefully.
■ IMPORTANT — Save these instructions
for local inspector’s use.
■ IMPORTANT — Observe all governing
codes and ordinances.
■ Note to Installer — Be sure to leave these
instructions with the consumer.
■ Note to Consumer — Keep these instructions with
your Owner’s Manual for future reference.
■ This kit provides for the installation of a 12” high
backsplash for 30”, 36” or 48” Professional Ranges
and Rangetops.
Installation
Instructions
31-10690-1 01-18 GEA
TOOLS AND MATERIALS REQUIRED
■Glovestoprotectagainstsharpedges
■T-15and#2Phillips
screwdrivers
■Drillwith3/32”and
9/64”bits
■Safetyglasses
■Level
■Pencil
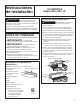
This Kit Includes
■Wallsupportpanel
■Coverpanel
■Hardwarepackagewith
–5StainlessSteelTorx15
#8self-tappingscrews
–5Phillips#2panheadwood
#10screws
INSTALL 12” BACKSPLASH
WARNING
This backsplash must be securely
fastened to the wall. Failure to do so could result in
damage or personal injury.
■Installandleveltherangeorrangetopandthe
range hood according to the installation instructions.
■Removethebacksplashpackagingandprotective
film.
■Usealeveltopencilahorizontallineonthewall,1/8”
abovetherangeorrangetop.The1/8”gapallowsthe
cover panel to overlap the wall support panel.
■Locatewallstudsoneachside.Wherestudsarenot
available, plan to use wall anchors (not provided).
■Alignthewallsupportpanelonthemarked
horizontallineandcenteredlefttoright.
■Thewallsupportpanelmustbesecuredtothewall
atall4corners.Usewoodscrews(provided)orwall
anchors (not provided) to secure the support panel
to the wall.
■Placethecoverpaneloverthewallsupportpanel
andsecurewithTorxscrews(provided).Install2
screws on each side.
WallSupportPanel
CoverPanel
Hardware
Package
761Dia65
Install4WoodScrews
InstallT-15
Screws
Wall
Support
Panel
WallSupport
Panel
CoverPanel
Center
Arrow
1/8”