
Installation guide


Safety Information
BEFORE YOU BEGIN
Read these instructions completely mid carefully.
•IMPORTANT S_,,etheseinstructionsfor
local inspector's use. Observe all governing
codes and ordinances,
• Note to Installer - Be sm'e to leave these instruc-
tions with the Consmner.
• Note to Consumer - Keep these instructions with
your Owner's Mamml tot flltm'e reterence.
• Skill Level - Installation of this dishwasher requires
basic mechanical and electrical skills, Proper installa-
tion is the responsibility of the installer, Product
failure due to improper installation is not covered
under the GE Applimace Warranty.
• Completion Time - 1 to 2 Hours. Nex_ installa-
tions require more time than replacement installa-
tions.
•IMPORTANT - ThedishwasherMUST
be installed to allow for futm'e removal fl'om the
enclosm'e if serxice is required,
If you receixed a damaged dislmasher, you should
immediatelv contact wmr dealer or builder.
READ CAREFULLY.
KEEP THESE INSTRUCTIONS.
FOR YOUR SAFETY
Read and observe all CAUTION and WARNINGS
shown throughout these instructions.
For Monogram local service in your area,
1-800-444-1845.
For Monogram service in Cmmda
1-888-880-3030
For Monogram Parts and Accessories, call
1-800-626-2002.
CONTENTS
Design Information
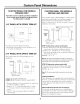
Product Dimensions ....................................................... 3
Models Available ............................................................ 3
Advance Plam_ing .......................................................... 3
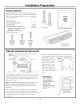
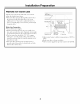
Installation Preparation
Materials Xzbu Will Need ................................................. 4
Tools Ybu Will Need ....................................................... 4
Parts Supplied ................................................................. 5
Prepare Dishwasher Enclosure ..................................... 5
Drain Requirements ....................................................... 6
Prepare Electrical Wiring ............................................... 7
Prepare Hot Water Line ................................................. 8
Custom Pm_el Dimensions
Custom Panels tor ZBD6400 ......................................... 9
Custom Panels fin" ZBD7000, ZBD7005 ........................ 9
Installation Instructions
Step l, Rem_we Packaging ........................................... l 0
Step 2, Install Leveling Legs ....................................... 10
Step 3, Remove Access Covers .................................... 10
Step 4, Install 90 ° Elbow ............................................... ] 0
Step 5, Install Power Cord ............................................ ] 1
Step 6, Level Dishwasher. ............................................. ] 1
Step 7, Slide Dishwasher into Opening ....................... ] ]
Step 8, Cmmect _vVater Line ........................................ 11
Step 9, Com_ect Drain Line ........................................ 19
Step 10, Cmmect Electrical ......................................... 19
Step ] 1, Position and Level Dishwasher. ..................... 13
Step ] 2, Pre-Test Check List ........................................ 13
Step ] 3, Dishwasher Wet Test ..................................... 13
Step 14, Secm'e Dishwasher
to Cabinet or Cotmtertop ....................................... 14
Step 15, Install Toekick, Custoul Toekick .................. 14
Step ] 6, Install Side Trim Strips .................................. 14
Panel Installation for Models
ZBD7000 and ZBD7005 ............................................ 15
2