
Installation guide


Installation Instructions
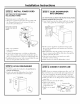
[STEP 14] SECURE DISHWASHER
TO CABINET AND
COUNTERTOP
To maintain position and aligmnent, the dislmashei _
must be secured to the countertop and ac!jacent
cabin ets.
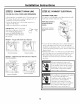
Secure dishwasher to countertop:
• Drill pilot holes through the motmting bracket and
into the ui_derside of the coui_tertop. Secure with
screws A prox ided.
Screw_ J
/
/
// ,
IMPORTANT: To avoid damage to your dishwasher,
drive screws straight and flush. Protruding screw heads
may scratch the top of the escutcheon or door mid cm_
interfere with door closing.
Secure dishwasher to adjacent cabinets:
• Remove plastic plugs button on the inside of the
dishwasheI _fl'ame. One on each side.
• Drill pilot holes through the dishwasher holes and
into the ac!jacent cabinets. Install screws B provided.
• Replace plastic plug buttons.
T
lug Butt0ns_-_ _-_
Screw B
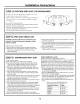
[STEP 151 INSTALL TOEKICK
• Loosen depth
ac!j ustm ent screws
inside the
bracket.
• Slide bracket out
to proper depth.
Tighten screws.
• Attach supplied
toekick to
brackets with
SCI'eWS C provided.
Do not tighten.
• At!just the toekick
to touch the floor.
Tighten screws.
Attachment Screws
Adjust to
Toekick
Depth
Adjustto TouchFloor
INSTALL A
CONTINUOUS
CUSTOM
TOEKICK
Notchthe continuous
toekickto allowthe door
panelto swingunderthe
dishwasher.
A contintlOtlS CtlStOUl toekick is recou/iuended _'k)F
models with long CtlStOUl door panels.
• Cut a notch in the toekick deep enough to allow the
door to swing fl'eelv trader the dishwasher.
• Check for interterence by slowly opening and closing
the door. If the door touches the toekick, triln to
prevent iI]terfereI]ce.
• Secure the toekick to ac!jacent cabinets in such a
umlmer that it inav be i'emoved if selwice is required.
[STEP 16] ADJUST SIDE TRIM STRIPS
. AdjustSideTrim .
• Open the door fully. _""Pto Meet Cabinetry_''_
• Loosen (but do not
reI//ove) screws holding
the top and side trims.
• At!just trilu to coyer
opening gap. Tighten
screws.
14