
Installation guide


Installation Instructions
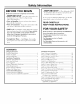
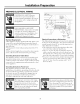
BEFORE YOU BEGIN:
CUSTOM PANEL INSTALLATION: Ifvou intend to
install custom door panels, (on some models) refer to
trim kit installation instructions. Custom panels should
be in place bet0re installing tile dishwasher.
ISTEP 1] REMOVE PACKAGING
Cut tile shipping carton and use it as a pad beneath tile
dishwasher. This will protect tile finished floor in tile
kitchen.
• Remove wrapping and uncoil tile drain hose in tile
back of tile dishwasher. Do not remove rear insulation
blanket,
• Lay the dishwasher on it's back, Do not kink or crush
the drain hose,
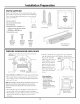
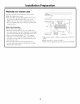
[STEP 2] INSTALL LEVELING LEGS
Min.
Rernove
RedPlugs
Unscrew
RearLegsto
Rear Installation
Insulation Height
Blanket
• Measm'e installation opening fi'om tile floor to tile
bottom of tile co/mtertop.
• Install tile fl'ont leveling legs into holes on tile brack-
ets. Use a wrench to screw tile legs in until tile overall
height of tile dishwasher is 1/4" less than tile installa-
tion opening height.
Note: InstaU the legs as shown, 1-1/4" min from the
bottom of the bracket.
• Remove and discard tile red plugs fl'om tile fl'ont
holes.
lSTEP31REMOVE ACCESS COVER
AccessCoverJuncti°_c"
• ReIllOX e sol/nO instllation board and tile access coxer
plate.
• Install UL listed strain relief on.jUllCtioi_ box.
lSTEP 41 INSTALL 90 ° ELBOW
• Install tile 90 ° elbow onto tile water inlet. Use thread
seal tape or pipe thread compo/md. Thread seal tape
should be wrapped in sam e direction as tile threads on
tile elbow.
• Tile 90 ° elbow should time tile inlet water line.
10