
Installation guide


Installation Instructions
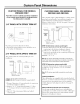
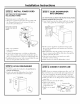
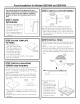
[STEP 5] INSTALL POWER CORD
SKIP THIS STEP IF DISHWASHER
WILL BE DIRECT WIRED
• Maxim mn power cord length is 6 ft.
• The power cord and connections must comply with
the National Electrical Code, Section 422 and/or
local codes and ordinances.
Insert power cord wires
through strain relief and
tighten.
• Strip 1/2" insulation
fi'om ends of power
cord wires.
• Comlect incoming power cord white to dishwasher
white, black to black and grom/d to dishwasher green
wire. Use UL listed wire c(mnectors of appropriate size.
• Install junction box cover with screws provided. Be sure
wires are not pinched under the cover.
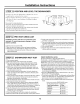
[STEP 7] SLIDE DISHWASHER
INTO OPENING
DO NOT PUSH AGAINST THE FRONT PANEL WITH
KNEES, DAMAGE WILL OCCUR!
• Insert draii_ hose into the cabinet wall hole. If a power
cord is used, guide the end through a separate hole.
• Position water supply line and house wn'ing on the
floor of the opening to avoid interterence with base
of dishwasher.
• Slide dishwasher into the opening a Jew inches at a
time. As you proceed, pull the drain hose through the
cabinet wall under the sink.
• Check to be sure there is 11o interterence with
waterline or house wiring.
• Again, check to be sure the dishwasher is level.
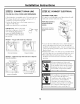
[STEP 61 LEVEL DISHWASHER
• Careflflly, upright the dishwasher, be careful not to
bend the leveling legs.
• Check to be sm'e the dishwasher is level and is
ac!justed to fit the installation cutout height.
Level
Top
and
Sides
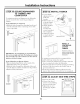
[STEP 8] CONNECT WATER LINE
NOTE: If you are using an existing water line, cut 1" off
the end. Always use a new ferrule and compression mlt.
• The water supply line should be flushed to clear anv
fi)reign material betore c(mnecting to the dishwasher.
• Make sure there are 11o sharp bends or kinks to restrict
water flow.
• Insert water line into the 90 ° elbow.
• Slide terrule against
elbow and secm'e with
COll/pFession n/lt.
• Replace access panel
plate.
Compression Nut
HotWater
90° Elbow SupplyLine
11