
Installation guide


Installation Instructions
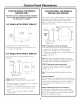
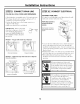
ISTEP 111 POSITION AND LEVEL THE DISHWASHER
• Check to be sure tile dishwasher is a(!justed to correct
height and is centered in tile ctltotlt.
• Open and close tile door to insure proper operation of
tile door. If there is any binding or rubbing, rea(!just
leveling legs.
Use a wrench to make adjustments.
• If the door rubs on the right side ofthe cabinet, extend the left rear
leg by unscrewing it one quarter turn.
• If the door rubs against the left side of the cabinet, extend the right
rear leg by unscrewing it one quarter turn.
• Check level again. Repeatthe procedure if necessary.
DoorRub Door
OnRight OnLeft
Adjust Adjust
This This
Leg Leg
[STEP 12] PRE-TEST CHECK LIST
Installation service calls are not covered by your
warranty. To avoid unnecessary charges, review
this list carefully.
[] Checkto be sure power is 0FE
[] Open the door and remove all foam and paper packaging.
[] Pull lower rack out, about halfway. Check to be sure it does
not roll back or forwards on the door. If the rack moves,
adjust leveling legs.
[] Verify water supply and drain lines are not kinked or in contact
with other components.
[] Turn on the sink hot water faucet and verify water temperature.
Incoming water temperature must be between 120°Fand 150°E
120°Fmin. temperature is required for best wash performance.
[] Turn on water supply.
[] Open the door. Check to be sure Insulation Board does not
interfere with door opening.
ISTEP 13] DISHWASHER WET TEST
[] Turn on power supply.
[] Select the normal cycle and press the start button.
[] The control will indicate a slow/no fill by flashing the CHINA
CRYSTAL LIGHTWASH ORWASH CYCLElight. Check water
supply, then adjust fill time according to the chart shown.
[] Check to be sure that water enters the dishwasher, wait up to
2 minutes. If water does not enter the dishwasher, check to be
sure that water is turned on.
[] Check for leaks under the dishwasher. If a leak is found, turn
power and water off, then tighten connections. Restore power
and water supply.
[] Check for leaks around the door. A leak around the door could be
caused by door rubbing or hitting against adjacent cabinetry.
Reposition the dishwasher if necessary.
[] After the dishwasher drains check drain lines. If leaks are found,
turn power off, correct as necessary.
[] The control will indicate a slow/no drain by flashing the RINSE
ONLY,SANI WASH or HEAT OPTIONS.Check that the airgap is
clear of debris and that the knockout in the disposer or waste tee
is fully removed. Check that the drain hose is not kinked.
[] Open the dishwasher door and make sure that most of the water
has drained. If not, check that disposer plug has been removed
and that air gap is not plugged.
[] Cancel the dishwasher cycle and complete the installation.
[] Remove protective film if present from the control panel and door.
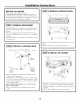
CHECK WATER FILL LEVEL
For best performance, check the water fill level.
Run through a complete RINSE ONLYcycle to ensure it is emptying
and filling correctly. For low water pressure situations run the
RINSE ONLYcycle 3 times. Half-way through the final RINSE ONLY
cycle, pause the dishwasher and check the water level inside the
dishwasher. If the water level is not above the minimum water level
(marked on the lower spray support tower), increase the fill level.
1. Ensure the dishwasher is not running through a cycle. Depress
the WATER TEMP button for 10seconds until the second buzzer
sounds (except on ZBD6600).
2. Press the START/CANCELbutton to select fill time, as per chart
(65 seconds is the factory setting).
3. To test time, press DELAYSTART.The dishwasher will start filling.
Listen for the dishwasher to complete filling. Once filled, the fill
level must be checked to ensure fill time is correct.
4. Once complete, press the WATERTEMP button to exit fill time
mode.
Continueto press the START/CANCELbutton
until the desired indicator is illuminated.
CycleStatue Indicators Fill Time
SENSING 60seconds
WASHING 65seconds
RINSING 70seconds
DRYING 80seconds
CLEAN 90seconds
13