
Installation guide


Installation instructions
POWER SUPPLY
WARNING: (Pleaseread carefully).
FORPERSONAL SAFETY,THIS APPLIANCE
MUST BE PROPERLYGROUNDED. Failure to
follow these instructions can result in death,
fire, or electrical shock.
AVERTISSEMENT :
(S'ilvous lisezavec soin).POURVOTRE
SI_CURITI_,CETAPPAREIL DOlT f:TRE
CORRECTEMENTMIS A LA TERRE.Le
non-respect de ces instructions peut causer
la mort, un incendie ou un choc electrique.
Do not use an extension cord or adapter plug with
this appliance. Follow National Electrical Code or
prevailing local codes and ordinances.
This icemaker must be supplied with 115V,60Hz, and
connected to an individual, properly grounded branch
circuit, and protected by a 15or 20 amp circuit breaker
or time delay fuse.
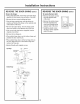
Electrical Supply Should
Enter From Back Wall
In Shaded Area.
• A properly grounded three-prong receptacle should
be located within reach of the icemaker's 66" long
power cord. For a built-in installation, locate the
receptacle in the shaded area shown.
IMPORTANT: (Please read carefully).
The power cord of this appliance is
equipped with a three-prong (ground-
ing) plug that mates with a standard
three-prong grounding wall receptacle
to minimize the possibility of electric
shock. The customer should have the
wall receptacle and circuit checked by a qualified
electrician to make sure the receptacle is properly
grounded and has the correct polarity.
• Where a standard two-prong wall receptacle is
encountered, it is the personal responsibility and
obligation of the customer to have it replaced with
a properly grounded three-prong wall receptacle.
Do not,under any circumstances, cut or remove
the third (ground) prong from the power cord.
DO NOT USEAN EXTENSION CORD.
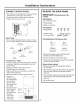
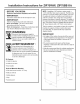
REMOVE PACKAGING AND PARTS
• Lay the carton on rear face
and break open the bottom
flap.
• Set the carton upright
with all four bottom flaps
outward.
• Lift carton up and off
icemaker.
• Remove all tape and
packaging material from the outside and inside
of the cabinet.
• Locate parts package with plastic plug buttons.
Set aside.
Open Bottom Flaps
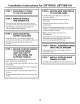
ADJUST HEIGHT OF ICEMAKER
Height adjustments may be necessary to install
the icemaker below a countertop, and may be
accomplished by adjusting both the front and rear
leveling legs. The icemaker must be level to operate
properly.
Raise Lower
To level and adjust the height:
• With one person holding the icemaker, carefully tilt
the machine to access the leveling legs.
• Use an adjustable wrench to turn the legs.
-Turn legs right to lower, turn left to raise the
icemaker.
• Check top and side with a level. Continue adjusting
legs until the icemaker is level and stable.
5