i stoll rio i structio Automotic Icemaker ZDIC150 ZDIS150 Design Guide With Instollotion Instructions monogram.
Installation • BEFORE YOU BEGIN: Read these instructions completely CONTENTS and carefully. • IMPORTANT: Save these instructions for local inspector's use. • IMPORTANT: Observe all governing codes and ordinances. Note to Installer - Be sure to leave these instructions with the Consumer. Note to Consumer - Keep these instructions with gour Owner's Manual for future reference. WARNING: This appliance must be properlg grounded. Failure to do so can result in death, fire or electrical shock.
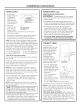
Design Information MODELS AVAILABLE ZDIC!50, ZDIS!50 Available in black, white and stainless steel, The icemaker nag be installed below a countertop or used free-standing, CUTOUT & PRODUCT DIMENSIONS Cutout dimensions Additional _'n I J" The installation of a 3/4" thick '-t._\k/ custom panel will require an L "16-1/2" with a 3/4" thick custom panel addtona strip on the1-1/2"wdef hinge side. er 34" rain. Adjustable to 34-1/2" shown allow for a full door swing.
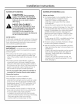
Installation ADVANCE PLANNING CAUTION: Due toexcessive weight, TWO PEOPLE ARE REQUIRED TO MOVE AND INSTALL THIS ICEMAKER. Failure to do so can result in back or other injurg. MISE EN GARDE : A cause de son poids _lev_; IL FAUT DEU× PERSONNES POUR DEPLACER ET INSTALLER CETTE MACHINE GLA_ONS. Le non-respect de ces instructions peut causer des blessures au dos ou d'autre nature.
Installation POWER SUPPLY REMOVE PACKAGING AND PARTS WARNING: (Please read FOR PERSONAL SAFETY,THIS APPLIANCE carefully). MUST BE PROPERLY GROUNDED. Failure to follow these instructions can result in death, fire or electrical shock. AVERTISSEMENT : (S'ilvous lisezavec soin). POUR VOTRE SI_CURITI_,CET APPAREILDOlT/:TRE CORRECTEMENT MIS/_ LA TERRE.Le non-respect Instructions de ces instructions peut causer OUun choc _lectrique.
Installation Instructions WATER SUPPLY WATER SUPPLY (cont.) • A cold water supplg is required for icemaker operation. The water pressure must be between REVERSE OSMOSIS WATER SUPPLY IM PORTANT: The performance of the icemaker mag be affected when it is connected to a reverse osmosis sgstem. 30 and !20 p.s.k • Route GE Sma rtCon nect T" Water Supply Should Kit o r !/4" O.D. Enter From Back Wall In Shaded Area. copper tubing between house cold water line and the water connection locution.
Installation Instructions CONNECT WATER SUPPLY REVERSE THE DOOR SWING • The water line should be flushed to clear ang foreign material before connecting to the icemaken IM PORTANT: • Connect the water line to the water supplg tube outside of the rear access coven Disconnect power to the icemaker.
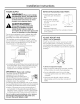
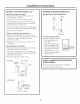
Installation Instructions REVERSE THE DOOR SWING Icont.I REVERSE THE DOOR SWING Icont.} Reverse the hinges (all models}: * Remove the screws opposite the door hinges, top and bottom. Set aside. Reinstall the door (all models) (cont.): _- Top 4inge J * Remove the two screws holding top hinge. * Turn the hinge upside down, with the hinge pin pointing up. Reinstall the hinge on the opposite side at the bottom of the door. * Remove the bottom hinge.
Installation Instructions • BEFORE YOU BEGIN: Read these instructions completely and carefully. • IMPORTANT: Save these instructions for local inspector's use. • IMPORTANT: Observe all governing codes and ordinances. • Note to Installer - Be sure to leave these instructions with the Consumer. • Note to Consumer - Keep these instructions with gour Owner's Manual for future reference. WARNING: Disconnect electrical power supplg to icemaker before installing front panel.
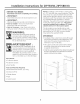
Installation I STEP1 DISCONNECT Instructions for ZIP75WW, ZIP75BB Kit STEP 5 POWER TO THE ICE MACHINE SECURE SIDE TRIM PIECES TO CUSTOM PANEL • Lag the custom panel appearance-side-down on a clean surface. STEP 2 REMOVE HANDLE AND NAMEPLATE • Align top and bottom panel sides, side trim to the custom • Remove the door handle bg removing the two top mounting screws. Set screws aside. Discard handle. • Tope the side trim pieces to the back of the custom panel.
ZTBSSI Monogram Tubular Handle Kit • BEFORE YOU BEGIN: Read these instructions TOOLS AND MATERIALS REQUIRED: completely and carefully. • • • • • • • IMPORTANT: Save these instructions for local inspector's use. • IMPORTANT: Observe all governing codes and ordinances. • Note to Installer - Be sure to leave these instructions with the Consumer.
NOTE: While performing installations described in this book, safetg glasses or goggles should be worn. For Monogram ® local service in your area, call 1.800.444.1848. NOTE: Product improvement is a continuing endeavor at General Electric. Therefore, materials, appearance and specifications are subject to change without notice. GE Consumer Pub.No. 31-46199-1 ] PartNo.