
Installation guide


Installation Instructions
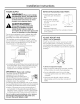
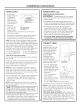
CONNECT WATER SUPPLY
• The water line should be flushed to clear ang
foreign material before connecting to the icemaken
• Connect the water line to the water supplg tube
outside of the rear access coven
Water
Supply
Line
m
m
'm
Copper Tubing:
• Use a standard plumbing female connector or union
for !/4" copper tubing that can be purchased Iocallg.
Coupling
(NotS@plied)
Lineto
Icemaker
Ferrule
(Not Supplied)
\
Nut
(Supplied)
Nut
(Supplied)
\
GE SmartConnect'" Tubing:
• Insert the molded end of the tubing into the
icemaker connection. Tighten the compression
nut until it is just hand tight.
Tighten one additional turn with a wrench.
Overtightening can cause leaks!
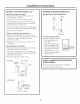
Make sure there are no sharp bends or kinks that
could restrict water flow.
Slide the icemaker into its permanent location.
Water Pan
Drain_
Water Valve
5-11/16" 4-5/8"
• To prevent
rattling, be sure
the copper tubing
does not touch
the side wall or
other parts inside
the cabinet.
Open the shut-
off valve. Check
for leaks. Tighten
ang connections
(including
connections
at the valve)
if necessarg.
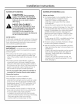
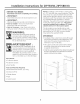
REVERSE THE DOOR SWING
IM PORTANT: Disconnect power to the icemaker.
Tools Required:
• 1/4" and 5/16" wrench
• Flat putts knife
• Phillips screwdriver
Parts Supplied:
• 4 hinge screws
(on some models)
®®®®
Parts Identification: (For Reference Onlg)
Hinge Pin
Handle Screw
5/16" Hex Head Endcap Screw
Hinge Screw
Remove door handle (black and white models):
• Remove the black or white handle.
• Remove the handle screws and lift off handle.
Remove the door (all models):
• Remove the hinge pin from the top hinge.
• Lift the door off of the bottom hinge. Place the
hinge pin back into the top hinge.
For stainless steel model:
• Remove two screws each from the top and
bottom of the stainless steel door skin.
• Remove the door skin and edge protectors from
the door.
Reverse the door endcaps (all models):
• Remove the screws and endcaps from the door,
top and bottom.
• Place the top endcap onto the bottom of the
opposite side of the door with the long flat side
facing the door front.
• Place the bottom endcap onto the top of the
opposite side of the door, with the long flat side
facing the door front.
• Set the door aside.