Installation Instructions Outdoor/IndoorRefrigerator ZDOD240 DesignGuide With Installation Instructions Monogram_
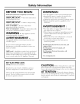
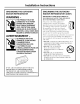
Safety Information BEFORE YOU BEGIN: WARNINGS: Read • Use these instructions completely IMPORTANT for local inspector's and Note to Installer cords with - Be sure the to leave Consun_er. - Kee I) these instHlctions tot fllttlre reference. Manual l)to l)erlx,,grounded . See page with (Yet appareil dolt Consulter page receixed _tre pour ti'aved trait betore be cordon its intended puri)ose. electrical service or damaged.
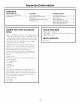
Important Information CONTENTS ImportantInformation Caring for Your Stainless Steel ......................3 Tools, Hardware ............................................... 3 Design Guide The Installation Space .................................... 4 Product Clearances and Location Requirements ................................................... 4 Preparation for Built-In Under-Counter Installations Only ............................................. 4 Installation Instructions Grounding the Product ....
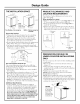
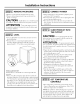
Design Guide THE INSTALLATION SPACE PRODUCT CLEARANCES AND LOCATION REQUIREMENTS 23-3/4" Tile Outdoor/Indoor Refligerator a l l 0 ° door swing. When installed in a corner: 34-1/2" • Allow 5-1/4" rain. clearance on tile hinge side tor tile 90 ° door swing and to allow racks to slide out. • Allow 15" n]ininmln clearance on tile hinge side tor a fldl 110 ° door swing. • Test tile door swing. Carefull) open and close tile (tooi: Tile door should not rtlb or catch on ac!jacent cabinet U.
Installation Instructions GROUNDING THE OUTDOOR/ INDOOR REFRIGERATOR GROUNDING THE OUTDOOR/ INDOOR REFRIGERATOR (CONT.) WARNING - IMPORTANT: READ CAREFULLY. FOR PERSONAL SAFETY, THIS APPLIANCE MUST BE PROPERLY GROUNDED. THIS PRODUCT MUST BE CONNECTED TO A POWER SOURCE WITH GROUND FAULT CIRCUIT INTERRUPT (GFCI) PROTECTION WHEN INSTALLED IN AN OUTDOOR LOCATION.
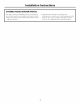
Installation Instructions ISTEP 11 REMOVE PACKAGING • ]_einove corner • Remove all packing plastic blocks and s,,,.u fl)r and children. Remove ATTENTION ne sont drawer tape and (,bje(-ts area les enfimts. pas discard : choke any parts not hazard used. petits.biets pe.,e.t 11 fautjeter toutes les pi_ces qui utilis_es. ISTEP 41 SLIDE PRODUCT THE CUTOUT ISTEP 21 LEVEL • Use an a(!justable the leveling legs.
Installation Instructions STAINING WOOD DRAWER FRONTS The drawer use, oil fl'om • The fronts drawer a(!iacent are unfinished hands may accumulate fl'onts may be cabinetry. stained cherry and and wood. stain sealed During the wood. to match • Apply the stain and sealer according to the manufhcttn'er's instructions. To avoid unpleasant odor; keep the door open to ventilate and allow the stain/ sealer to dry completely before using the product.
NOTE:While performing installations described in this book, safety glasses or goggles should be worn. • ® I_or Mo_wgmm loc_d _rvic_J i_ )our are., ) 5. l. 800.444. l,_4 c_dl NOTE: Producl improvem( nt is a cominuing ( ndeavor at General Electlq(. Th¢ v,:d'or¢, matt vials, app(arance an([ specificalions are sul)ject Io change withoul llOliC(>. Pub.No.31-51542-1 ] PartNo.