Owner’s Manual 27″ and 30″ Convection Wall Oven ZEK938 – 27″ Single Wall Oven ZEK958 – 27″ Double Wall Oven ZET938 – 30″ Single Wall Oven ZET958 – 30″ Double Wall Oven
Consumer Information Wall Oven Introduction Your new Monogram wall oven makes an eloquent statement of style, convenience and kitchen planning flexibility. Whether you chose it for its purity of design, assiduous attention to detail— or for both of these reasons—you’ll find that your Monogram wall oven’s superior blend of form and function will delight you for years to come. Your Monogram wall oven was designed to provide the flexibility to blend in with your kitchen cabinetry.
Before using your wall oven Read this manual carefully. It is intended to help you operate and maintain your new wall oven properly. Keep it handy for answers to your questions. If you don’t understand something or need more help, there is a list of toll-free consumer service numbers included in the back section of this manual. OR Visit our Website at: www.monogram.
IMPORTANT SAFETY INSTRUCTIONS WARNING! For your safety, the information in this manual must be followed to minimize the risk of fire or explosion, electric shock, or to prevent property damage, personal injury or loss of life.
SAFETY PRECAUTIONS • Do not leave children alone—children should not be left alone or unattended in an area where an appliance is in use. They should never be allowed to sit or stand on any part of the appliance. • Do not touch the heating elements or the interior surface of the oven. These surfaces may be hot enough to burn even though they are dark in color.
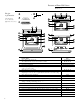
Features of Your Wall Oven Wall Oven Design information (Not all features are on all models. Appearance may vary.) 1 4 2 5 6 7 6 17 8 16 3 15 14 7 10 6 17 11 8 16 13 12 9 15 15 10 14 10 14 11 11 12 12 13 13 Feature Index 6 1 Oven Racks with Stop-Locks Two additional racks may be ordered. Pub No.
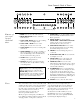
Oven Control, Clock & Timer Wall Oven Double oven control shown. (Appearance may vary.) Features of your oven control, clock and timer 1 BAKE. Press to select the bake function. 2 BROIL HIGH/LOW. Press to select the broil function. 3 CONV BAKE/MULTI. Press to select baking with convection on multiple racks. 4 CONV BAKE/1 RACK. Press to select baking with convection on one rack. 5 CONV ROAST. Press to select roasting with convection. 6 WARM/PROOF. Press once for warming or twice for proofing.
Oven Control, Clock & Timer Wall Oven Clock The clock must be set for the automatic oven timing functions to work properly. The time of day clock cannot be changed during Delay Start. (It can be changed during a regular bake or broil operation.) To set the clock 1 Press the CLOCK pad. 2 Press the number pads the same way you read them. For example, to set 12:34, press the number pads 1, 2, 3 and 4 in that order.
Using the timer 1 Press the TIMER ON/OFF pad. 2 Press the number pads to set the time. For example, to enter 2 hours and 45 minutes, touch 2, 4 and 5 in that order. If you make a mistake, press the TIMER ON/OFF pad and begin again. 3 Press the START pad. After pressing the START pad, “SET” disappears; this tells you the time is counting down, although the display does not change until one minute has passed. Seconds will not be shown in the display until the last minute is counting down.
Special Features Wall Oven Special features of your oven control Tones at the end of a timed cycle Your new touch pad control has additional features that you may choose to use. failure, except for the Sabbath feature, which will have to be reset. They remain in the control’s memory until the steps are repeated. When the display shows your choice, press the START pad.
12-hour, 24-hour or clock blackout Your control is set to use a 12-hour clock. If you would prefer to have a 24-hour military time clock or black out the clock display, follow the steps below. 1 Press the BAKE and BROIL HIGH/LOW pads (on double oven models, use the upper oven controls) at the same time for 3 seconds until the display shows “SF.” 2 Press the CLOCK pad once. The display will show “12 hr.” If this is the choice you want, press the START pad.
Special Features Wall Oven Fahrenheit or Celsius temperature selection Your oven control is set to use the Fahrenheit temperature selections, but you may change this to use the Celsius selections. 1 Press the BAKE and BROIL HIGH/LOW pads (on double oven models, use the upper oven controls) at the same time for 3 seconds until the display shows “SF.” 2 Press the BROIL HIGH/LOW and COOK TIME pads at the same time. The display will show “F” (Fahrenheit).
Using the Sabbath Feature Wall Oven Designed for use on the Jewish Sabbath and Holidays. The Sabbath feature can be used for baking/roasting only. It cannot be used for convection, broiling, self-cleaning or Delay Start cooking. Sabbath Feature: How to set for regular baking or roasting NOTE: The oven light comes on automatically (on some models) when the door is opened and goes off when the door is closed. The bulb may be removed. See the Oven Light Replacement section.
Using the Sabbath Feature Wall Oven Sabbath Feature: How to set for timed baking or roasting – immediate start and automatic stop Make sure the clock shows the correct time of day and the oven is OFF. 1 Press and hold both the BAKE and BROIL HIGH/LOW pads, at the same time, until the display shows “SF.” NOTE: If bake or broil appears in the display, the BAKE and BROIL HIGH/LOW pads were not touched at the same time. Touch the CLEAR/OFF pad and begin again.
How to exit the Sabbath feature 1 Touch the CLEAR/OFF pad. 2 If the oven is cooking, wait for a random delay period of approximately 30 seconds to 1 minute, until only ⊃ is in the display. 3 Press and hold both the BAKE and BROIL HIGH/LOW pads, at the same time, until the display shows “SF.” 4 Tap the DELAY START pad until “12 shdn” or “no shdn” appears in the display. “12 shdn” indicates that the oven will automatically turn off after 12 hours.
Baking or Roasting Wall Oven Before you begin… To avoid possible burns, place the racks in the desired position before you turn the oven on. The racks have stop-locks, so that when placed correctly on the supports, they will stop before coming completely out, and will not tilt. G When placing and removing cookware, pull the rack out to the bump on the rack support. E F D C To remove a rack, pull it toward you, tilt the front end up and pull it out.
Preheating and pan placement Preheat the oven if the recipe calls for it. To preheat, set the oven at the correct temperature. Preheating is necessary for good results when baking cakes, cookies, pastry and breads. For ovens without a preheat indicator light or tone, preheat 10 minutes. Aluminum foil Baking results will be better if baking pans are centered in the oven as much as possible. Pans should not touch each other or the walls of the oven.
Broiling Wall Oven How to set the oven for broiling 1 Place the meat or fish on the broiler grid in the broiler pan. 2 Follow suggested rack positions in the Broiling Guide. If your oven is connected to 208 volts, rare steaks may be broiled by preheating the broiler and positioning the oven rack one position higher. 3 Press the BROIL HIGH/LOW pad once for HI Broil. To change to LO Broil, press the BROIL HIGH/LOW pad again. 4 Press the START pad. 5 When broiling is finished, press the CLEAR/OFF pad.
Broiling guide for 27 ″ ovens (on some models) The size, weight, thickness, starting temperature and your preference for doneness will affect broiling times. This guide is based on meats at refrigerator temperature. Food Quantity and/ or Thickness Rack Position First Side Time (min.) Second Side Time (min.) Ground Beef Well Done 1 lb. (4 patties) 1/2 to 3/4″ thick C 10 7 Space evenly. Up to 8 patties take about the same time. Beef Steaks Rare† Medium Well Done 1″ thick 1 to 11⁄2 lbs.
Broiling Wall Oven Broiling guide for 30 ″ ovens (on some models) The size, weight, thickness, starting temperature and your preference for doneness will affect broiling times. This guide is based on meats at refrigerator temperature. Food Quantity and/ or Thickness Rack Position First Side Time (min.) Second Side Time (min.) Ground Beef Well Done 1 lb. (4 patties) 1/2 to 3/4″ thick E E 10 10 7 9 Space evenly. Up to 8 patties take about the same time.
Timed Baking Wall Oven Using the timed baking and roasting features NOTE: Foods that spoil easily, such as milk, eggs, fish, stuffings, poultry and pork, should not be allowed to sit for more than 1 hour before or after cooking. Room temperature promotes the growth of harmful bacteria. Be sure that the oven light is off because heat from the bulb will speed harmful bacteria growth. How to set an immediate start and automatic stop The oven will turn on immediately and cook for a selected length of time.
Timed Baking Wall Oven How to set a delayed start and automatic stop You can set the oven control to delay-start the oven, cook for a specific length of time and then turn off automatically. Make sure the oven clock shows the correct time of day. 1 Press the BAKE pad. 2 Using the number pads, enter the desired temperature. 3 Press the COOK TIME pad. NOTE: If your recipe requires preheating, you may need to add additional time to the length of the cooking time.
Using the Probe Wall Oven Temperature probe For many foods, especially roasts and poultry, internal food temperature is the best test for doneness. The temperature probe takes the guesswork out of roasting by cooking foods to the exact doneness you want. Cable Plug Use of probes other than the one provided with this product may result in damage to the probe. Use the handles of the probe and plug when inserting and removing them from the meat and outlet.
Using the Probe Wall Oven Proper placement of the probe After preparing the meat and placing it on a trivet or on the broiler pan grid, follow these directions for proper probe placement. 1 Lay the probe on the outside of the meat along the top or side and mark with your finger where the edge of the meat comes to on the probe. The point should rest in the center of the thickest meaty part of the roast. 2 Insert the probe completely into the meat, up to the handle.
How to set the oven for roasting when using the probe 1 Insert the probe into the meat. 2 Plug the probe into the outlet in the oven. Make sure it is pushed all the way in. Close the oven door. 3 Press the PROBE pad. 4 Press the number pads to set the desired internal food or meat temperature. The maximum internal temperature for the food that you can set is 200°F. 5 Press the BAKE pad. 6 Press the number pads to set the desired oven temperature. 7 Press the START pad.
Using the Convection Oven Wall Oven Convection fan In a convection oven, a fan circulates hot air over, under and around the food. This circulating hot air is evenly distributed throughout the oven cavity. As a result, foods are evenly cooked and browned—often in less time with convection heat. NOTE: The convection fan will cycle on and off while cooking to best distribute hot air in the oven. The convection fan shuts off when the oven door is opened.
Cookware for convection cooking Before using your convection oven, check to see if your cookware leaves room for air circulation in the oven. If you are baking with several pans, leave space between them. Also, be sure the pans do not touch each other or the walls of the oven. Paper and Plastic Heat-resistant paper and plastic containers that are recommended for use in regular ovens can be used in convection ovens. Plastic cookware that is heat-resistant to temperatures of 400°F can also be used.
Using the Convection Oven Wall Oven How to set the oven for convection baking or roasting To avoid possible burns, place the racks in the correct position before you turn on the oven. 1 Press the CONV BAKE/1 RACK pad (Convection Bake 1-Rack mode) for 1-rack convection baking. This mode is used for cooking food items on only 1 rack in convection bake. Press the CONV BAKE/MULTI pad (Convection Bake Multi mode) for multi-rack convection baking.
How to set the oven for convection roasting when using the probe CAUTION: To prevent possible burns, do not unplug the probe from the oven outlet until the oven has cooled. Do not store the probe in the oven. For best results when roasting large turkeys and roasts, we recommend using the probe included in the convection oven. 1 Place the rack (on 27″ models use the offset rack) in the lowest rack position (A). Insert the probe into the meat. 2 Plug the probe into the outlet in the oven.
Timed Convection Baking Wall Oven Using the timed features for convection cooking NOTE: Foods that spoil easily, such as milk, eggs, fish, stuffings, poultry and pork, should not be allowed to sit for more than 1 hour before or after cooking. Room temperature promotes the growth of harmful bacteria. Be sure that the oven light is off because heat from the bulb will speed harmful bacteria growth.
How to set a delayed start and automatic stop You can set the oven control to delay-start the oven, cook for a specific length of time and then turn off automatically. Make sure the oven clock shows the correct time of day. 1 Press the CONV BAKE/1 RACK pad (Convection Bake 1-Rack mode) for 1-rack convection baking. This mode is used for cooking food items on only 1 rack in convection bake. Press the CONV BAKE/MULTI pad (Convection Bake Multi mode) for multi-rack convection baking.
Warming Wall Oven How to set the oven for warming Warm keeps cooked foods warm for up to 3 hours after the cooking function is finished, or it can be activated independently to keep already cooked foods warm. This feature is not designed to reheat cold food. To use this feature independently, press the WARM/PROOF pad once and then the START pad. To activate this feature for use after Timed Baking or Roasting, press the WARM/PROOF pad once while programming the oven and before pressing START.
Proofing Wall Oven How to set the oven for proofing The proofing feature maintains a warm environment useful for rising yeast-leavened products. 1 Place the covered dough in a dish in the oven on rack B or C. NOTE: For best results, cover the dough with a cloth or with greased plastic wrap (the plastic may need to be anchored underneath the container so the oven fan will not blow it off). 2 Press the WARM/PROOF pad twice and then the START pad. The display will read “PrF” (proof).
Adjust the Oven Thermostat Wall Oven Do it yourself! To adjust the oven thermostat You may find that your new oven cooks differently than the one it replaced. Use your new oven for a few weeks to become more familiar with it. If you still think your new oven is too hot or too cold, you can adjust the thermostat yourself. Do not use thermometers, such as those found in grocery stores, to check the temperature setting of your oven. These thermometers may vary 20–40 degrees.
Using the Self-Cleaning Oven Wall Oven Before a clean cycle The oven door must be closed and all controls must be set correctly for the cycle to work properly. We recommend venting your kitchen with an open window or using a ventilation fan or hood during the first self-clean cycle. Remove the broiler pan, broiler grid, probe, all cookware and any aluminum foil from the oven.
Using the Self-Cleaning Oven Wall Oven How to delay the start of cleaning 1 Press the SELF CLEAN STD/LOW pad once for a 4-hour clean time or twice for a 3-hour clean time. A 3-hour self-clean time is recommended for use when cleaning small, contained spills. A self-clean time of 4 hours or longer is recommended for a dirtier oven. 2 If a time other than 4 hours or 3 hours is needed, use the number pads and enter the desired clean time.
Care and Cleaning Wall Oven BE SURE ELECTRICAL POWER IS OFF AND ALL SURFACES ARE COOL BEFORE CLEANING ANY PART OF THE OVEN. Oven racks and convection roasting rack Stainless steel (on some models) All oven racks and the convection roasting rack may be cleaned by hand with an abrasive cleaner or steel wool. After cleaning, rinse the racks with clean water and dry with a clean cloth.
Care and Cleaning Wall Oven Lift-off oven door— removal The door is very heavy. Be careful when removing and lifting the door. Slot Do not lift the door by the handle. To remove the door: 1 Fully open the door. 2 Pull the hinge locks down toward the door frame, to the unlocked position. A tool, such as a small flat-blade screwdriver, may be required. Hinge lock Pull hinge locks down to unlock 3 Firmly grasp both sides of the door at the top.
Oven door To clean the inside of the door: • Because the area inside the gasket is cleaned during the self-clean cycle, you do not need to clean this by hand. • The area outside the gasket and the front frame can be cleaned with a soap-filled steel wool or plastic pad, hot water and detergent. Rinse well with a vinegar and water solution. To clean the outside of the door: • Use soap and water to thoroughly clean the top, sides and front of the oven door. Rinse well.
Care and Cleaning Wall Oven Oven light bulbs NOTE: The glass cover should be removed only when cold. Wearing latex gloves may offer a better grip. Socket Receptacle CAUTION : Before replacing the bulb, disconnect electrical power to the oven at the main fuse or circuit breaker panel. Be sure to let the light cover and bulb cool completely. For your safety, do not touch a hot bulb with bare hands or a damp cloth.
Before You Call For Service… Wall Oven Save time & money! Review the troubleshooting tips on the following pages first and you may not need to call for service. PROBLEM POSSIBLE CAUSE CLOCK AND TIMER DO NOT WORK • A fuse in your home may be blown or the circuit breaker tripped. Replace the fuse or reset the circuit breaker. • Oven controls improperly set. See the Oven Control, Clock and Timer section. OVEN LIGHT DOES NOT WORK • Light bulb is loose or defective. Tighten or replace the bulb.
Before You Call For Service… Wall Oven Troubleshooting tips 42 PROBLEM POSSIBLE CAUSE OVEN DOOR WILL NOT OPEN AFTER A CLEAN CYCLE • The oven is too hot. Allow the oven to cool below locking temperature. OVEN NOT CLEAN AFTER A CLEAN • Oven controls improperly set. See the Using the Self-Cleaning Oven section. • Oven was heavily soiled. Clean up heavy spillovers before starting the clean cycle. Heavily soiled ovens may need to self-clean again or for a longer period of time.
Notes Wall Oven 43
Notes Wall Oven 44
Important Mail Today Consumer Product Ownership Registration GE Appliances Place 1st Class Letter Stamp Here General Electric Company Warranty Registration Department P.O.
Consumer Product Ownership Registration Dear Customer: Thank you for purchasing our product and thank you for placing your confidence in us. We are proud to have you as a customer! Follow these three steps to protect your new appliance investment: 1 2 3 ✄ Complete and mail your Consumer Product Ownership Registration today. Have the peace of mind of knowing we can contact you in the unlikely event of a safety modification.
Consumer Services With the purchase of your new Monogram appliance, receive the assurance that if you ever need information or assistance from GE, we’ll be there. All you have to do is call—toll- free! GE Answer Center® 800.626.2000 Whatever your question about any Monogram major appliance, GE Answer Center® information service is available to help. Your call—and your question—will be answered promptly and courteously. And you can call any time.
Warranty Convection Wall Oven YOUR MONOGRAM WALL OVEN WARRANTY Staple sales slip or cancelled check here. Proof of original purchase date is needed to obtain service under warranty. WHAT IS COVERED From the Date of the Original Purchase FULL ONE-YEAR WARRANTY For one year from date of original purchase, we will provide, free of charge, parts and service labor in your home to repair or replace any part of the oven that fails because of a manufacturing defect.