GE Monogram ® Installation Instructions Stainless Steel Professional Outdoor Cooking Centers 48" Natural g'a,s mode£: ZGG48N42 ZGG48N3 I ZGG48N40 ZGG48N30 48" Liquid Ih'@a)_e model, s: ZGG48L42 ZGG48L31 ZGG48L40 ZGG48I_30 36" Natural ZGG36N31 ZGG36N21 ZGG36N30 ZGG36N20 g'a,s modd, w 36" Liquid !'r@a_e ZGG36L31 ZGG36L21 ZGG36L30 ZGG36120 modd, w 27" Natural g'a,s modd, s: , ,c _ c ZG(,21N21 Z(,(,2 IN20 27 _'Liquid Propa_e , ,c _ c Z(,G21121 , ,c_ c ZG(,2 zL20 model, s:
Before wm begin--Read these instructions completely and careflllly. IMPORTANT: Sine these instructions for local inspector's use. IMPORTANT: OBSERVE ALL GOVERNING CODES AND ORDINANCES. NOTE TO INSTALLER: Be sure to leave these instructions with tile Constm_er. NOTE TO CONSUMER: ftlture reference. Keep these instructions If vou hme questions concerning tile installation of this product, call tile GE Answer Center ® (;onsumer hfformation Serxice at 800.626.2000, 7 days a week.
Design Infi)rmation Ouldoor ModeLs Available Ce_te*w Monogram Outdoor Cooking Centers are tactorv set for LP or natural gas. Order the model t0r your installation situation.
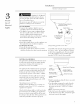
Design Inf_)rmation Min. to Combustibles Product 3"Clearancefor Lid Dimensions / 13-7/8" & Clea__ances 16-1/4' 24-3 2" 27" Wide Models mbustibles 3" Clearancefor Lid 36" Wide Models Min.
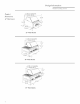
Design Infbrmation Outdoor Advance Planning • Mon(_gram Outdoor Cooking Centers are designed to be installed on a grill cart or into an enclostlre. 27" Models: • In a non-combustible (masonry) enclosure, the grill drops into the opening. A deck (1i" ledge on each side is required tk)r support fl'om the bottom. • Insulated jackets are available to allow the grill to be installed in a combustible enclosure.
Installation Ouldoor • Open Step • the tie-downs Remove the P<_ckagi'ng box and remove Open the grill on • Remove • Remove • Open check lid and b/irners. ( e_ler,s packaging. remove accessoix plastic white side burner grate and tie-downs on b/lrners. the hardware contents. Cooki_g" aeration carton pan. and Coupler and Nipple Natural Gas Regulator (Natural GasModels) LP Regulator Type 1 Acme, 2B lb.
Installation Outdoor All Outdoor Cooking Centers can be installed on a cart designed specifically for that model size. Follow the installation instructions Provide provided with the carts to install. Proceed (;as supply to complete the installation. Cooki_g Center,_ (:AUTION: The grill is heavy. 2 people required to lift and place tile grill into cart or tile enclosure. are tile to Support Built4n hl, stallation • All models combustible may be installed into or non-combustible a enclosm'e.
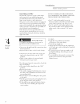
Installation Outdoor Install Electrical tisserie OnRightside (6.5AMPMin. 36" Modeh 12"Min. to Combustibles 3" Clearancefor Lid 34-1 Cooki_g 12" Min. to Combustibles 3" Clearancefor Lid Ce_tler,s Install Electrical Outletfor Rotisserie OnRightside (6.5AMPMin.) _23-3/4" 40-1 35-1/2" 9-1/8" penmg for 6as Supply Line "Openingfor AccessDoors 36" wide models: Installation in a non-combustible for GasSupply Line enclosure. 36" wide models: Installation in a combustible ZX36JYSS 48" Modeh 12" Min.
Installation Outdoor PRODUCT Provide Gas & ( oohb_g ST() [_4(;E When storing LP models indoors, disconnect the LP tank. Store the tank outdoors in a well ventilated area. Do not store spare LP tanks in or near Otltdoor Cooking Center enclosure. tile E#ctrical LP GAS MODELS Suppl>, Ce_ters • Com_ect assembly Resistantto L.P.Gas hreadingCompoundMust Be _ tile regulator/Quick to the hose attached Coupler Sleeve Cmmect to the grill.
Installation Outdoor ELECTRICAL SUPPLY Models with rotisserie require 120V, 60Hz. and cmmected to an individual properly grounded branch circuit protected by a 15 amp circuit breaker or time delay filse. The power cord on the rotisserie is equipped with a three-prong (grotmding) plug which mates with a standard three-prong grotmding wall receptacle to minimize the possibility of shock hazard fi_om this appliance.
Installation Ouldoor 5 :2 ( e_Her,s IN Check Burner, s, iii ii i'i Drip 7 ays and G' ates Cooki_g" i _ iii i i ,il i I ii ! iI !_ i'i / iil • During shipping parts, such as burners and reflectors may haxe mined. Check to be sure all parts are in position. • Remove tile smoker tray (if so equipped). Check to be sm'e smoker bm'ner and deflector plate are installed properly, The bm'ner and plate should be placed over the holding pin at tile back and fl'ont of tile grill.
Installation Outdoor • A match light Do not attempt to tile grill if tile odor of gas is present. SOllle CAUTION: Keep hands and thce as t_u"away from tile grill as possible when lighting. • Open b/irller • Turn tile lid and remove cover. all knobs • Turn gas supply wdve, NOTE: tile side cooktop When stick extension TO MATCH securely extension (enters rod is provided on Illodels.
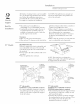
Installation Outdoor Ste 7 Adjusting the Burners A_!jusm_ents should not be required, vibration during transit or variations gas supply make minor a_!justments Coohb_g (enters unless in local necessary. Ac!justments must be made by a qualified technician at tile time of installation. Extreme care should be used after installation. • Turn • Push if ac!justments gas supply on. and turn tile burner are made control knobs \\ to \ tile "LITE" position.
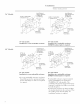
Installation Ouldoor hzstaU Rotis_serie ((/so _,q_i/,i,,,cl) 27" Wide Models: • Slide the motor down into the channel the lett side and tighten thumb on screw. • To use, place pointed end of the skewer into the motor, mad the threaded end resting on the right side support. • Remove the handle fl'om the threaded end of the skewer befiwe using. Ce_ter,s 36" and 48" Wide Models: • The motor will rest on the cast iron and can be tightened against turning the black knob.
Install Access Outdoor Doors Cooki_tg" ( e_tler,s hi, stall \\ Optional Access Doors \ ZXAI) CSS or ZXSI)CSS • The opening fiw double and single access doors should be 24-1/8" wide and 18-1/4" high. • Place the fl'ame into the opening and secure with screws on all sides. • Hang the doors on the hinges as shown. 1.
Note: While performing installations described in this book, safety glasses or goggles should be worn. 7;_obtain _peciflc i_ffinmalion com:erni_g ahr Monogwzm pwducl or service5 _zdl (_E Answer C_ozter_; consu*mn i_lfinm(zHo_l se*wi : al 800. 626.2000_a_ 0 time, d( 0 m nigfiL F_n Mon_g*gzm k)_aI s_.*_6.,i_ your ar*,a, _all 1-800-444-184 5. Pub.