GE Monogram 36" Bottom ® Mount Refrigerators Custom Options Guide and Installation Instructions With Custom and Trim These Monogram designed door to be customized and grille panels. Models: with decorator ZIC36N RH ZIC36N LH Field installed panels are required. Factory installed trim will accommodate 1/4" thick custom panels Lexan ® and stainless Optional range Read or optional steel panel kits. trim kits allow an even broader of custom this bo&_t desired appearance instaUation.
Before you begin - Read these instructions completely and carefully. IMPORTANT- Savethese instructions for local inspector's use. iMPORTANT- OBSERVEALL GOVERNINGCODESAND ORDINANCES. Note to Installer - Be sure to leave these instructions with the Consumer. Note to Consumer - Keep these instructions with your Use and Care Book for future reference. :t I p_j._l_ This appliance must he properly grounded.See "Grounding the Refrigerator," page 12. Consulter.
Design Information 36" Advance Bottom Mount ReJi_igerators Planning Flush or Semi-Flush Enclosure Installations f True FlushInstallation In a flush installation, the refrigerator doors will align evenly with the front face of adjacent cabinet doors. The refrigerator blends into the surrounding cabinetry. Monogram built-in refrigerators can be installed flush with typical 24-3/4"deep cabinetry. When installed semi-flush, the case trim will conceal slight gaps around the enclosure.
Design Information 36" Installation Bottom Mount R@ig_rators Examples Side panels are required whenever the sides of the refrigerator will be exposed. 1/T to 3/4" side panels are normally set into place and fastened to adjacent cabinetry orto the back wall before rolling the refrigerator into the opening. Therefore, the rough-in dimensions must allow for side panel thickness.
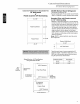
Design Information 36" Bottom Models available ZIC36N RH 36"wide model with handle on the left side, the door swings left to right. Advance planning exterior These refrigerators are designed to be customized with decorator door and grille panels. Field installed custom door and grille panels are required for these models. appearance options Factory installed trim will accommodate 1/4"thick custom panels, Lexan® or stainless steel panel kits.
Design Information 36" Trim kit descriptions Bottom Mount R@ig_rator ZGC2- Provides 1/4" grille panel frame side pieces for 83-1/2"and 84-1/2"installation heights. The supplied grille panel frame is factory set for 84". ZKHTCSS1- Tubular stainless steel handles for 3/4" thick panel installations. This kit must be used in combination with ZKTC36Lor ZKTC36R ZKHCI - Provides the necessary framework to install custom handles, of your choice, onto 1/4"thick panels. (Handles not included.
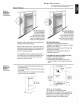
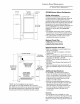
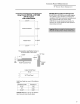
Custom Panel Dimensions 36" SideView FrontView 35"Case_ _6" 0verall'_ 243/4"_ _26 103/4"Max 10"Min 3/4" 841/2" Max 83 1/2"Min H/2" 26" ZIC36N Bottom Bottom Mount Mount ReJi_igerators Refrigerator Design Information Designed to be installed flush or semi-flush with surrounding cabinetry. Cutout dimensions, clearances and side panel sizes are determined by the many installation options available. Side panels must be used whenever the sides of the refrigerator will be exposed.
Custom Panel Dimensions 36" CustomDoorPanel DimensionsUsingStandardTrim 1/4" thick panels or Panels secured to 1/4" thick backing @ Fresh Food Panel Freezer Panel + 35 1/8" 45 1/2" 21 11/16" Mount ReJi_igerators ZIC36N Bottom Mount Refrigerator • 1/4" Panels:Cut panels to size • Custom handles with 1/4 door panels require Trim kits ZKHC1or ZKHCSSl for tubular stainless steel handles Standard 35-1/16 _ Bottom Trim with Panels secured to 1/4" thick backing • Applying a raised panel design
Custom Panel Dimensions 36" CustomDoor Panel Dimensions ZIS36N Using Trim Kits ZKTC36L or ZKTC36R 3/4" thick panel with kit supplied handle 35-1/16" 45-9/16" Fresh Food Panel / / 2141/16" Freezer Panel + 35 4/4" Custom Grille Panel 35 1/4" A 3/4" Thick Panel J.
Custom Panel Dimensions 36" CustomDoor Panel DimensionsUsingStandard Trim Using Trim Kit ZKTC36L or ZKTC36R 3/4" thick panel with custom handle 4F 35 1/4 " Bottom Mount Refrigerators ZIC36N Bottom Mount Refrigerator • The ZKTC36L(or ZI(TC36R)trim kit installed together with a ZKHTC1 custom handle kit provides for the installation of 3/4" thick custom door and grille panels with a custom handle of your choice, Order ZKHTCSS1for tubular stainless steel handles.
Custom Panel Dimensions 36" Bottom Mount Refrigerators Side Panel or Filler Options (Not to scale) Side panels mast he used whenever the sides of the refrigerator will be exposed. _23 9/16"7 114"Side Panels Insert endof side panel into trim, _24 3/4"= 1/2" to 3/4" Side Panels LeadingEdge Flushwith Cabinet Front.The front or leading edge mast be finished to match cabinetry. 84" 84" \\\\ \ Standard 4"high toekick or trim to fit, Height may vary dependingon application.
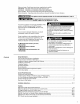
Installation 36" Tools Required Materials Required Hardware Supplied • Tinsnips to cut banding • Stepladder • 1-1/2" open-end wrench • Bucket • Level • Appliance Hand Truck • Tubing cutter • Water shut-off valve (optional but recommended) • Water filter WR97XO214(optional but recommended) • Custom panels for fresh food, freezer drawer, grille panel Bottom • 7/15" open-end wrench • #2 Phillipsscrewdriver • Stubby Phillips screwdriver Mount R@ig_rator • Drill and appropriate bits • 7/16" socket wit
Installation 36" Step 1 Remove Packaging Bottom Mount Refrigerator Refrigerator is much heavier at the top than at the bottom - be careful when moving. When using a hand truck, handle from side only. Le r6frig6rateur est beaucoup plus Iourd en haut qu'en has. II faut _tre prudent Iors des d6placements. Si un diane est utilis6, il faut soulever le r6frig6rateur sur le cOt6 aeulement. • Remove outer carton. - Carefully cut banding atthe top and bottom. • Slide out back corner posts (2).
Installation 36" Step 3 Install Side Panels Bottom Mount ReJi_igerator • Side panels are not required when the refrigerator is installed into an enclosure. Skip this step if you are installing into an enclosure, • Side panels are required whenever the sides of the refrigerator will be exposed and when installed between frameless cabinets. See pages 3 and 4. • Side panel installation will be determined by the design of the side panel you have previously chosen, • Side panels must be installed plumb.
Installation 36" Step 4 Install !_i_r,111 kqh_[€llANTI-TIP PRECAUTIONS he refrigerator is heavy at the top and must be Anti-Tip Brackets ecured to prevent the possibility of tipping forward.
Installation 36" Step 7 Connect Water Check to be sure that refrigerator power cord is not plugged into the wall outlet. Supply • Locate and bring copper tubing to the front of the cabinet. • The copper tubing should be just long enough to reach the coupling. Excess tubing length could interfer with drawer closing or toekick installation. • Slip a 1/4-1/4 union nut (provided) over both ends of the copper tubing at the right front leg of the refrigerator and couple the lines.
Installation 36" Step 9 Connect power Step 10 Mount Top Grille Panel Bottom Mount ReJi'igerator • Connect refrigerator power cord plug to a properly grounded receptacle, accessible through the top lelt side of the grille opening. • Check to make sure power to refrigerator is on by opening refrigerator door to see if interior lights are on. If you are using 3/4" thick custom panels, SKIPTHIS STEP. See Dimensions and Specifications for grille panel sizes.
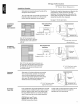
ZGC2 Trim Kit Grille panel.f_'ame adjustment This kit provides optional side trim pieces for the original grille panel frame to fit 83-1/2" and 84-1/2" installation heights. To change grille panel size: • Determine the installation height by measuring the enclosure from the floor to the underside of soffit. When there is no soffit, measure to the top of the adjacent cabinets. • Adjust refrigerator case trim to desired height. See Product installation.
ZKHCI Trim Support Tools and materials required: • #2 Phillipsscrewdriver • Drill and appropriate bits • Custom door panels • Custom Handles Kit (for 1/4" Jbr custom Panels) handles Right hand door swing models are illustrated in these instructions, Follow these instructions for left hand models, • Safety glasses Paris List." A, Fresh food door extrusion {for left hand models} B, Fresh food door extrusion {for right hand models} C.
ZKHC1 Trim Support Step 2 Locate handle positions Kit (for 1/4" Jbr custom Panels) handles !i!_iii!ii_i_iiii!_!_iiiiii!iii_i_i_!:!ij_ii!ii_!i!ii!i! \ \ \ Freshfood door: • Slide custom panel into the door trim.
ZKHCI Trim Kit (for Support,/or custom 1/4" Panels handles Step 3 Assemble panel, extrusion handle Screw and _Extrusion Decorator--/ DoorPanel Decorator Door_-/ Panel ! Handle_/ / _" ! 3/4" Min. _"Max. ÷1 Freshfood (leer: • Remove the door extrusion and custom panel. • Drill 1/16"pilot hole through extrusion. • Drill clearance holes through the panel and extrusion. • Assemble the door panel, extrusion and custom handle.
ZKTC36L/ZKTC36R 3/4" Kit Contents Right hand door swing models are illustrated in these instructions. Follow these instructions for left hand models. Custom Trim Kit Panels This kit provides for the installation of 3/4"thick custom door and grille pane]s. Handles are included and must replace the supplied handles, Toolsand materials required: • #2 Phillips screwdriver • Drill and appropriate bits • Custom door panels • Patty knife • Safety glasses Parts List A. Top trim B.
ZKTC36L/ZKTC36R 3/4" Step 1 Remove handles and trim Trim Custom Kit Panels Freshfood door: • Open door to 90° • Remove the Phillips head screws from the full length handle, remove handle. • Openthe door fully to stop. • Remove the screws from the aluminum trim, top bottom, hinge and handle side. • Retain screws. Discard original trim and handle. . Freezerdrawer: • Slide the drawer fully open.
ZKTC36L/ZKTC36R 3/4" Step 2 Install 3/4" trim Trim Custom Kit Panels FreshFoodDoor: • Attach the new 3/4" trim pieces on the top, hinge side and bottom using original screws. Freezer Drawer: • Attach the new 3/4" trim pieces on the bottom and both sides. Front Face Freezer Drawer L 1 Step 3 Apply panel support brackets • Position support bracket on the back side of the fresh food panel, 14-5/16"from the hinge side. Secure support bracket to panel with screws provided.
ZKTC36L/ZKTC36R 3/4" Custom Trim Kit Panels / /" Step 4 Install panels Fresh FoodPanel: • Place the 3/4" thick panel on the bottom trim with support bracket tabs inserted into slots. Push the panel back against the steel door, flush with hinge side trim. • Open the door fully. • Carefully drill 4 starter holes using a small drill bit, through the backside of the trim at the top. • Install original screws through the trim and into the panel to secure the panel to the door.
ZKTC36L/ZKTC36R 3/4" Step 5 Install handles Custom Trim Kit Panels • Install new fresh food door handle using original screws. • Place assembled drawer Install 4 Screws door onto freezer slides. • Tighten screws and snap on screw covers. • Install new freezer drawer handle with original screws. Step 6 Adjust grille panel height • For shipping purposes, the top case trim is secured at the 84"installation height.
ZKTC36L/ZKTC36R 3/4" Step 8 Install grille panel Custom Trim Kit Panels • Install four of the six larger undercut screw so that the top of the screws are 1/16"from the surface of the support. • Attach the assembled panel to the refrigerator by inserting the four protruding screws into the brackets on each side of the grille opening.
ZKHTC1 Trim Support,/or Kit Contents Kit (For Custom 3/4" Panels) Handles Right hand door swing models are illustrated in these instructions. Follow these instructions for left hand models. Toolsand materials required: • #2 Phillips screwdriver • Drill and appropriate bits • Custom door panels • Custom handles • Safety glasses Note: This kit must be used in combination with ZKTC36L or ZKTC36Rtrim kit for 3/4" panel trim. Part List: A. Fresh food handle extrusion (for left hand models) B.
ZKHTC1 Trim Kit (For Support,/or Custom 3/4" Panels) Handles Step 1 Temporarily mount door pane_ I Freshfood door: • Place the prepared 3/4" custom door panels on the bottom trim with support bracket tabs inserted into trim slots. • Pushthe panel back against the steel door, making sure the panel is flush with the hinge side trim. • Secure the panel to the trim temporarily by driving 2 screws through the backside of the trim atthe top.
ZKHTC1 Trim Support Step 2 Locate Freshfood door: • Determine the location of the custom handles position of handles and carefully mark centerlines of the screw holes. The handles must be located 3/4" to 1-1/Z from the edge of the extrusion. • Drill 1/16"pilot hole through the panel until it starts into the aluminum extrusion. This will mark the matching location for drilling a clearance hole when assembling the extrusion, panel and handle. Kit (For 3/4" jbr Custom Panels) Handles 3/4" Min.
ZKHTC1 Trim Support,/br Step 4 Mount assembled Kit (For Custom 3/4" Panels) Handles Install 4 Screws panels J_ _J Fresh food door: • Place assembled panel onto the bottom trim with support bracket tabs inserted into slots. • Pushthe panel back against the steel door with handle extrusion flush to handle side of the door. Freezer drawer: • Mount assembled door with panel onto freezer slides. • Install original screws along the top handle extrusion. • Open door fully to stop.
ZKHCSSI Trim Kit (For 1/4" Panels) Tubular Steel Handles Right hand door swing models are illustrated in these instructions. Follow these instructions for left hand models. This kit provides for the installation of Stainless Steel handles on 1/4"thick decorator door panels. The door extrusions allow these custom handles to be secured Note: It is best that 2 people install this kit, to the door structure, rather than to the custom panels.
ZKHCSSI Trim Kit (For 1/4" Panels) Tubular Step 2 Match handle extrusions to handle See Step 2A for Stainless Steel panels Stainless Steel Handles • Cut a piece of corrugated to use as a pad to protect the panel finish. Use 1/2" thick section of plywood to protect flooring when drilling. • Place custom panels on the pad, appearance side down. Freshfeed door: • Onthe back side of the panel - at the handle side, measure and mark 1/4" below the top edge of the panel with a pencil.
ZKHCSSI Trim Kit (For 1/4" Panels) Tubular Stop 2A If yon are installing those handlesonto Stainless Steel Panels: Use extreme caution if youare drilling through stainless steel panels. Stainless steel panels must be handled gently. Do not kneel on stainless steel panels. It will leave a permanent dent. Do not remove protective plastic covering until final installation. Freshfood door: • Place supplied filler panel (corrugated) on floor to use as a pad.
ZKHCSSI Trim Kit (For 1/4" Panels) Tubular Stainless Steel Handles Step 4A Install handles and panels Screw Stp_n,e;_iat_ SRP__ - Extrusi°n Handle_--; • Crimp top and bottom edges of corrugated. • Slide corrugated into door and drawer trim, Leave about 1/4" gap between edge of corrugated and hinge side trim of the door and 1/4"gap above bottom trim of the drawer, Note: Panels have a protective plastic covering.
ZKHTCSSI for 3/4" Tubular Kit Contents Right hand door swing models are illustrated in these instructions. Follow these instructions for left hand models. panels Stainless Steel Handles This kit must be used in combination with ZKTC36,trim kit. Note: It is best that 2 people install this kit. This kit provides for the installation of Stainless Steel handles on 3/4" thick decorator door panels.
ZKHTCSS1 for 3/4" Tubular Step 1 Match Handle Extrusions to Panels • Cut a piece of corrugated to use as a pad to protect the pane] finish. Additional material may be required to protect flooring when drilling. • Place custom panels onthe pad, appearance side down. Stainless Panels Steel Handles Align ExtrusionEven With Panel Nete: If panels are wood, be sure to note which end is the top so that wood grain is in the correct direction on both panels.
ZKHTCSS1 For 3/4" Tubular Step 3 Install mounting screws and handles Stainless Panels Steel Handles FreshFoodPanel: • Start mounting screws through the extrusion and iust through the custom panel. • Stand panel up on the hinge side and hold to access the appearance side. Place handle against mounting screws on the appearance side, drive top screw from the back of the extrusion partially into the standoff.
ZFC1 Trim Kit Side to Side Installation For the ultimate in convenience, side to side. install two refrigerators This trim kit includes 6 foam spacer pads to fill the gap between the refrigerator side case trims. For a finished appearance, a trim strip is provided to conceal the case trim of the two refrigerators. If you are installing into an enclosure, provide a 72" wide opening.
Note: While performing installationsdescribed in this book, safety glasses or goggles should be worn, "l_ obtain spec!fic i_zJbrmation cor_cernin E l_r_y Monogram product or service, caa GE Ar_sw_ Cente_ consumer b_lbrmatior_ service at 800.626.2000-a_y time, day or nik,ht. bbr Monogram '_' Ncal semice ir_ your area, caa 1-800-444-1845. Note: ProdHct improvement is a continuing endeavor at General Electric. Therefore, materials, appearance and specifications are su!_iect to change without notice.