Custom Options Guide and Installation Instructions With Custom Panel Dimensions and Trim Kit Installation Instructions These Monogram refrigerators and freezers are designed to be customized with decorator door and grille panels. Field installed panels are required. Factory installed trim will accommodate 1/4″ thick custom panels or optional Lexan® and stainless steel panel kits. Optional trim kits allow an even broader range of custom appearance options.
Before you begin – Read these instructions completely and carefully. IMPORTANT – Save these instructions for local inspector’s use. IMPORTANT – OBSERVE ALL GOVERNING CODES AND ORDINANCES. Note to Installer – Be sure to leave these instructions with the Consumer. Note to Consumer – Keep these instructions with your Owner’s Manual for future reference. CAUTION WARNING CAUTION ATTENTION This appliance must be properly grounded. See “Grounding the Refrigerator,” page 12.
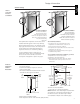
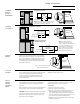
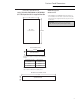
Design Information DESIGN INFORMATION 36″ Refrigerators, Freezers Advance Planning Flush or Semi-Flush Enclosure Installations 0" 3/4" True Flush Installation Semi-Flush Installation In a flush installation, These refrigerators the refrigerator doors can also be installed will align evenly with the semi-flush into an enclosure front face of adjacent cabinet using the minimum cutout doors. The refrigerator blends width. The case trim creates a into the surrounding frame around the opening. cabinetry.
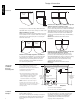
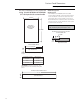
DESIGN INFORMATION Design Information 36″ Refrigerators, Freezers Clearances 130° Door Swing 25" Min. to Wall 2" 15" 90° Door Swing 36-3/4" 130° Clearances for two products installed side-by-side with the same (left or right) door swing Allow 2″ minimum clearance between the products to Factory set for a 130° door swing. Order WX14X99 prevent door swing interference. Order the WX14X99 adjustable door stop to reduce swing to as little as 90°.
Design Information 36″ Refrigerators, Freezers Installation Between Base and Wall Cabinets Refrigerator or Freezer 1/4" Thick Side Panels Finished Dim. Rough-In Dim. Refrigerator Cabinet 35-1/2" 36" NOTE: 1/4″ thick side panels can be inserted into the case trim, making the rough-in the same as the outside trim width, 36″. Installation At End-of-Run Door Cabinet Refrigerator or Freezer 1/2" Thick Side Panels Finished Dim. 36" Roughed-In Dim.
Design Information 36″ Refrigerators, Freezers Models available ZIR36N RH, Refrigerator ZIF36N RH, Freezer 36″ wide models with handle on left side, the door swings left to right. ZIR36N LH, Refrigerator ZIF36N LH, Freezer 36″ wide models with handle on right side, the door swings right to left. Trim kit descriptions ZGC2 – Provides 1/4″ grille panel frame side pieces for 83-1/2″ and 84-1/2″ installation heights. The supplied grille panel frame is factory set for 84″.
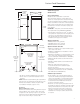
Custom Panel Dimensions 36″ Refrigerators, Freezers 10-3/4" Max. 10" Min. 24-3/4" ZIR36N Refrigerator ZIF36N Freezer 35" Case 36" Overall Design Information 26-3/4" 84-1/2" Max. 83-1/2" Min. 73-1/2" Designed to be installed flush or semi-flush with surrounding cabinetry. Cutout dimensions, clearances and side panel sizes are determined by the many installation options available. Side panels must be used whenever the sides of the refrigerator will be exposed.
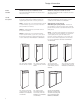
Custom Panel Dimensions 36″ Refrigerators, Freezers Custom Door Panel Dimensions Using Standard Trim CUSTOM PANEL DIMENSIONS 1/4″ thick panels or Panels secured to 1/4″ thick backing 35-1/16" ZIR36N Refrigerator ZIF36N Freezer •1/4″ Panel: Cut panels to size. •Custom handle with 1/4″ door panel requires Trim kits ZKHR1 or ZKHRSS1 for tubular stainless steel handles.
Custom Panel Dimensions 36″ Refrigerators, Freezers Custom Door Panel Dimensions Using Trim Kits ZKTR36LH or ZKTR36RH 3/4″ thick panel with kit supplied handle 35 -1/16" ZIR36N Refrigerator ZIF36N Freezer •The ZKTR36LH (or ZKTR36RH) trim kit provides for the installation of 3/4″ thick custom door and grille panels, using the supplied handle. Cut panel to size and install. IMPORTANT: Maximum door panel weight is 67 lbs., maximum grille panel weight is 9 lbs.
Custom Panel Dimensions 36″ Refrigerators, Freezers Custom Door Panel Dimensions Using Standard Trim Using Trim Kit ZKTR36LH or ZKTR36RH 3/4″ thick panel with custom handle 35 1/4 " 3/4" Thick Custom Panel With Custom Handle ZIR36N Refrigerator ZIF36N Freezer •The ZKTR36LH (or ZKTR36RH) trim kit installed together with a ZKHTR1 custom handle kit provides for the installation of 3/4″ thick custom door and grille panels with a custom handle of your choice.
Custom Panel Dimensions 36″ Refrigerators, Freezers Side Panel or Filler Options (Not to scale) 1/4″ Side Panels Insert end of side panel into trim. Use stick-on hook and loop fastener strips to secure the panel to the refrigerator. 23 9/16" Top View 1/2″ to 3/4″ Side Panels Leading Edge Flush with Cabinet Front. The front or leading edge must be finished to match cabinetry. CUSTOM PANEL DIMENSIONS Side panels must be used whenever the sides of the refrigerator or freezer will be exposed.
Installation 36″ Refrigerators, Freezers Tools Required • Tinsnips to cut banding • Stepladder • 1-1/4″ open-end wrench Materials Required • Water shut-off valve • Water filter WR97X0214 (optional but recommended) • Custom panel for door and grille panel • 1/4″ Copper water line tubing or GE SmartConnect™ Tubing Kit Hardware Supplied • 1/4-1/4 union with nuts • Anti-Tip Mounting Brackets Flooring For proper installation, the refrigerator or freezer must be placed on a level surface of hard material
Installation 36″ Refrigerators, Freezers Step 1 Remove Packaging CAUTION Refrigerator and freezer is much heavier at the top than at the bottom – be careful when moving. When using a hand truck, handle from side only. PRUDENCE Le réfrigérateur est beaucoup plus lourd en haut qu'en bas. Il faut être prudent lors des déplacements. Si un diable est utilisé, il faut soulever le réfrigérateur sur le côté seulement. • Remove outer carton. – Carefully cut banding at the top and bottom.
Installation 36″ Refrigerators, Freezers Step 2 Install Water Line • A cold water supply is required for automatic icemaker operation. The water pressure must be between 20 and 120 p.s.i. • Route 1/4″ OD copper or GE SmartConnect™ tubing between house cold water line and the water connection location. • Tubing should be long enough to extend to the front of the refrigerator. Allow enough to accommodate bend leading into the water valve.
Installation 36″ Refrigerators, Freezers Step 3 Install Side Panels • Side panels are not required when the refrigerator or freezer is installed into an enclosure. Skip this step if you are installing into an enclosure. • Side panels are required whenever the sides of the refrigerator or freezer will be exposed and when installed between frameless cabinets. See pages 3 and 4. • Side panel installation will be determined by the design of the side panel you have previously chosen.
Installation 36″ Refrigerators, Freezers Step 5 Level Refrigerator or Freezer All models have 4-point leveling. The front is supported by leveling legs, the rear is supported by wheels. •Adjust rear wheels beneath the product to just barely touch the 2x4 block. •Turn the 7/16″ hex nut located above the front wheels. Turn to raise or lower the refrigerator. •For front leveling legs, use a 1-1/4″ open-end wrench.
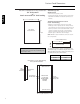
Installation 36″ Refrigerators, Freezers Step 8 Install 1/4″ door panels If you are using a 3/4″ thick custom panel, SKIP THIS STEP. See Custom Panel Dimensions pages for panel sizes with ZKTR36LH or ZKTR36RH trim kit and other kits. Refer to trim kit instructions in this booklet. • Open door to 90° stop. Remove the Phillips head screws from the aluminum trim door handle. • Remove handle. Retain all screws and handle. • Slide custom panel into the door trim.
Installation 36″ Refrigerators, Freezers Step 11 Adjust Door Alignment Check door alignment. The top of the door should be parallel with the grille panel. If the door appears to be too high or too low on the handle side, adjustments can be made by turning the hinge. Door Should be Parallel With Grille Panel Bushing • To raise the door, turn adjustable hinge pin towards the right. • To lower the door, turn hinge pin towards the left.
ZGC2 Trim Kit Grille Panel Frame Adjustment This kit provides optional side trim pieces for the original grille panel frame to fit 83-1/2″ and 84-1/2″ installation heights. To change grille panel size: • Determine the installation height by measuring the enclosure from the floor to the underside of soffit. When there is no soffit, measure to the top of the adjacent cabinets. • Adjust refrigerator case trim to desired height. See Product Installation.
ZKHR1 Trim Kit (For 1/4″ Panels) Support for Custom Handles Tools and materials required: • #2 Phillips screwdriver • Drill and appropriate bits • Custom door panel • Custom Handle • Safety glasses Parts List: A. Handle side door extrusion (for left hand models) B. Handle side door extrusion (for right hand models) This kit provides the necessary framework to install a custom handle, of your choice, onto a 1/4″ thick custom panel. (Handles not included.
ZKHR1 Trim Kit (For 1/4″ Panels) Support for Custom Handles Step 2 Locate handle position 3/4" Min. 1-1/2" Max. • Slide custom panel into the door trim. • Temporarily secure the new handle extrusion to the door using at least 2 screws. • The custom handles must be located 3/4″ to 1-1/2″ from the edge of the extrusion. Step 3 Assemble panel, extrusion and handle • Determine the desired location of the custom handle and mark centerlines of the screw holes.
ZKTR36LH/ZKTR36RH Trim Kit 3/4″ Custom Panels Kit Contents Right hand door swing models are illustrated in these instructions. Follow these instructions for left hand models. Tools and materials required: • #2 Phillips screwdriver • Drill and appropriate A bits • Custom door panels • Putty knife • Safety glasses • 7/16″ wrench Parts List A. Top trim B. Handle side trim C. Hinge side trim D Bottom trim E. Support bracket for custom panel F. 4-3/8″ screws for support brackets (20) G.
ZKTR36LH/ZKTR36RH Trim Kit 3/4″ Custom Panels Step 2 Install 3/4″ trim • Attach the new 3/4″ trim pieces on the top, hinge side and bottom using original screws. Step 3 Apply panel support brackets • Position support bracket on the back side of the custom panel, 14-5/16″ from the hinge side. Secure support bracket to panel with screws provided.
ZKTR36LH/ZKTR36RH Trim Kit 3/4″ Custom Panels Step 5 Install handles • Install new door handle using original screws. Step 6 Adjust grille panel height • For shipping purposes, the top case trim is secured at the 84″ installation height. • Loosen 2 screws on both sides of the case trim and raise or lower trim to meet soffit height, from 83-1/2″ to 84-1/2″. • Tighten all 4 screws. IMPORTANT: Maintain 1-1/2″ min. gap between top of door and bottom of grille panel.
ZKTR36LH/ZKTR36RH Trim Kit 3/4″ Custom Panels Step 8 Install grille panel • Install four of the six larger undercut screws so that the top of the screws are 1/16″ from the surface of the support. • Attach the assembled panel to the grille opening by inserting the four protruding screws into the brackets on each side.
ZKHTR1 Trim Kit (For 3/4″ Panels) Support for Custom Handles Kit Contents Right hand door swing models are illustrated in these instructions. Follow these instructions for left hand models. Tools and materials required: • #2 Phillips screwdriver • Drill and appropriate bits • Custom door panel • Custom handle • Safety glasses NOTE: This kit must be used in combination with ZKTR36LH or ZKTR36RH trim kit for 3/4″ panel trim. Part List: A. Handle extrusion (for left hand models) B.
ZKHTR1 Trim Kit (For 3/4″ Panels) Support for Custom Handles Step 1 Temporarily mount door panel • Place the prepared 3/4″ custom door panel on the bottom trim with support bracket tabs inserted into trim slots. • Push the panel back against the steel door, making sure the panel is flush with the hinge side trim. • Secure the panel to the trim temporarily by driving 2 screws through the backside of the trim at the top. • Slide the handle extrusion in between the panel and steel door.
ZKHTR1 Trim Kit (For 3/4″ Panels) Support for Custom Handles Step 4 Mount assembled panel • Place assembled panel onto the bottom trim with support bracket tabs inserted into slots. • Push the panel back against the steel door with handle extrusion flush to handle side of the door. • Open door fully to stop. • Install original screws at the top, hinge side and handle side.
ZKHRSS1 Trim Kit (For 1/4″ Panels) Tubular Stainless Steel Handles Right hand door swing models are illustrated in these instructions. Follow these instructions for left hand models. NOTE: It is best that 2 people install this kit. Tools and materials required: • #2 Phillips screwdriver • Drill and appropriate bits • Custom door panel • Safety glasses • Center punch • Masking tape • Hammer • Pencil • 1/2″ thick 12″ x 12″ min.
ZKHRSS1 Trim Kit (For 1/4″ Panels) Tubular Stainless Steel Handles Step 2 Match handle extrusions to handle FOR CUSTOM WOOD PANELS See Step 2A for Stainless Steel panels • Cut a piece of corrugated to use as a pad to protect the panel finish. Use 1/2″ thick section of plywood to protect flooring when drilling. • Place custom panel on the pad, appearance side down.
ZKHRSS1 Trim Kit (For 1/4″ Panels) Tubular Stainless Steel Handles Step 3 Install standoffs onto handles Step 4 Install handles and panels FOR CUSTOM WOOD PANELS See Step 4A for stainless steel panels • Place a handle standoff onto each attachment post along the handle. Position the set screw hole on the standoff to point to the floor. • Install set screws into the bottom of each standoff, using the Allen wrench provided. The standoff should be tight against the handle.
ZKHRSS1 Trim Kit (For 1/4″ Panels) Tubular Stainless Steel Handles Step 4A Install handles and panels FOR STAINLESS STEEL PANELS Screw Corrugated Spacer Ring Extrusion Stainless Panel Handle • Crimp top and bottom edges of corrugated. • Slide corrugated into door trim. Leave about 1/4″ gap between edge of corrugated and hinge side trim of the door. NOTE: Panels have a protective plastic covering. Peel away just enough to allow panel to slide into trim and to clear handle mounting screws.
ZKHTRSS1 (For 3/4″ Panels) Tubular Stainless Steel Handles Kit Contents Right hand door swing models are illustrated in these instructions. Follow these instructions for left hand models. This kit must be used in combination with ZKTR36RH or ZKTR36LH trim kit. NOTE: It is best that 2 people install this kit. This kit provides for the installation of a Tubular Stainless Steel handle on a 3/4″ thick decorator door panel.
ZKHTRSS1 (For 3/4″ Panels) Tubular Stainless Steel Handles Step 1 Match Handle Extrusion to Panel •Cut a piece of corrugated to use as a pad to protect the panel finish. Additional material may be required to protect flooring when drilling. •Place custom panel on the pad, appearance side down. •Select handle extrusion for your model, left or right side extrusion. •Place extrusion against the handle side of the panel. •Align the extrusion evenly with the top and bottom of the panel.
ZUG75 Trim Kit Unified 3/4″ Custom Grille Panel Kit This kit provides for the installation of a 3/4″ thick custom grille panel to span the combined width of a side by side installation. Use this kit in combination with 3/4″ custom panel kits, ZKTR36LH and ZKTR36RH.
ZUG75 Trim Kit Unified 3/4″ Custom Grille Panel Kit Step 2 Install Anti-Tip Brackets WARNING Brackets Required ANTI-TIP PRECAUTIONS These products are heavy at the top and must be secured to prevent the possibility of tipping over. Height From Floor to Bottom of Wood Block ATTENTION PRECAUTIONS CONTRE LES BASCULEMENTS Le réfrigérateur est beaucoup plus lourd en haut et il faut le maintenir en place pour éviter la possibilité de son basculement vers l’avant. • Cut a 2″x4″ block, 71″ long.
ZUG75 Trim Kit Unified 3/4″ Custom Grille Panel Kit Step 4 Secure Products To Sides NOTE: This step can be used as an alternative to Step 2, Anti-Tip bracket installation, whenever brackets cannot be used. Whenever possible, perform this step for additional anti-tip security. When using 1/2″ to 3/4″ thick side panels, the front flange of the case trim is attached to the side panel. • Open door to access case trim. • Drill hole in trim slightly below the interior opening.
ZUG75 Trim Kit Unified 3/4″ Custom Grille Panel Kit Step 7 Install Grille Base Cover Unified Base Cover Place Trim Over Hinges • Open doors fully. • Install the double width grille base cover by slipping the notched ends over the hinges. Install 3 Screws Install 3 Screws • Place wire fence over the grille base cover (textured side out). Drive original wire fence screws through the fence, the grille base cover and into the frame.
ZUG75 Trim Kit Unified 3/4″ Custom Grille Panel Kit Step 9 Install Soffit Vent Top Slip Dust Gasket Into Trim On One End Slip Second Dust Gasket Into Trim • Separate the top and hinge side trim pieces by removing side screws. Discard top piece, retain screws. • Install one end piece to unified top piece with 2 original screws. • Slip end of rubber dust gasket into end of top unified piece and slide trim towards the center.
ZUG75 Trim Kit Unified 3/4″ Custom Grille Panel Kit Step 11 Adjust Door Alignment Bushing Door Hin g e Case Hing e Raise Pin Shoulder 5/16" Wrench Check door alignment. The top of the door should be parallel with the grille panel. If the door appears to be too high or too low on the handle side, adjustments can be made. •Use a 5/16″ wrench to turn the hinge. •To raise the door, turn adjustable hinge pin towards the right. •To lower the door, turn hinge pin towards the left.