
Manual


14
49-80209-5
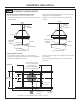
• Select the template for your hood size.
• Align the template with the marks on the ceiling
and tape in place.
– Be sure the template is oriented correctly,
with the front of the hood.
• Use a plumb to check to be sure the mount-
ing holes will provide parallel alignment with
the countertop below.
• Center punch all hole locations.
• Drill pilot holes in the 4 screw locations. Use a
3/16” bit and drill approximately 1-1/2” deep.
• Drive 4 Hex head wood screws (Screws A) into
the center of the ceiling joists and cross fram-
ing. Leave a 1/4” gap to allow the screw head
to engage the keyhole slots on the support
frames.
• Cut the 10-1/2” duct opening through the
sheet rock.
67(3 028177(03/$7(
Installation Instructions
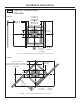
67(3 SIZE AND INSTALL DUCTWORK
• Measure from house duct flange to bottom of
support frame. Subtract 4-3/8” for clearance to the
bottom of the support frame.
• Cut the 10” duct length to size.
• Secure duct to house ducting with sheet metal
screws.
• Seal all connections with duct tape.
• Attach the duct collar loosely, about 1” from the
bottom of the duct using Screws B.
1/4" Gap
Screws B
Duct
Length
4-3/8" Clearance
to Bottom of Fra
m
Duct
Collar
House
Duct
Duct
Screws A