Safety Information BEFORE YOU BEGIN Rend these instructions completely und carefully. . | M Portmanteau these instructions for local inspector's use. * | M PORTENT Observe all governing codes and ordinances. « Note to Installer Be sure to leave these instructions with the Consumer. « Note to Consumer Keep these instructions with your Owner's Manual for future reference = Skill Level installation of this appliance requires basic mechanical and electrical skills. * Completion time hours.
Design Information CONTENTS Design Information Product Dimensions and Clearances. Optional Accessories installation Preparation Advance Planning, Duct work, Framing Power Supply. DICE FIRINGS on Tools and Materials Required Remove the Packaging Check Installation Hardware wo Duct work, Wiring Locations installation Instructions Step 1, Install Framing for Hood Support... Step 2, install Mounting Brackets Step 3, Install Duct Bracket Step 4, install the Hood... Step 5, Connect Duct work.
Design Information PRODUCT DIMENSIONS AND CLEARANCES (cont) Using Duct Cover Accessories A Duct Cover Accessory may be required for your goad installation height. Use this chart to determine installation height and accessory far your ceiling height. 2¥9505D5S Installation Heights Actual Calling * impassible stood Eight Installation sight Dust Cover 2h OPTIONAL ACCESSORIES 2ZX145DSS, optional stainless steel duct cover is available for ceiling heights greater than 10 ft.
Installation Preparation ADVANCE PLANNING Duct work Planning + Determine the exact lactation of the vent hood « Plan the route for venting exhaust to the outdoors. * Use the shortest and straightest duct route possible. For satisfactory performance, duct run should not exceed 100 equivalent length for uny duct configurations. + Refer to “Duct Fittings” chart to compute the maximum permissible length for duct runs to the outdoors.
Installation Preparation DUCT FITTINGS Git le ER ee LER kT Ts Use this chart to compute maximum permissible lengths for duct runs to outdoors. Note: Do not exceed maximum permissible equivalent lengths! Maximum duct length: 100 ft. for range hoods. Flexible ducting: if flexible metal ducting is used, all the equivalent feet values in the table should be doubled. The flexible metal duct should be straight and smooth and extended as much as possible Do NOT use flexible plastic ducting.
Installation Preparation TOOLS AND MATERIALS REQUIRED {NOT SUPPLIED} e gape measure + Duct pe * Knife «= Tape to mount template Spirit level « Gloves to protect against sharp edges «Wire cutter/stripper 120 60Hz. 15 or 20 Amp, 2 wire with ground. «Wire nuts raper ied branch undercut Electric drill with 1/8" and 3/8” bits * Strain relief for junction cover « Phillips end fiat blade screwdrivers « 8" round metal duct, length to suit installation.
Installation Preparation CHECK INSTALLATION HARDWARE Locate the hardware accessory box packed with the hood and check contents.
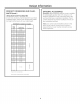
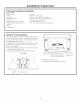
Installation Instructions INSTALL FRAMING FOR HOOD SUPPORT IMPORTANT: Framing must be capable of supporting 100 Ibs. few from Seer; Cleats 17% 6° Min Mounting Support Center line of instillation Space if drywall is present, mark the screw hole locations for the top mounting brackets. Remove the template. « Cutaway enough drywall to expose 2 vertical studs at the bracket location indicated on the template.
Installation Instructions bracket will hold the decorative duct cover in place at the Pr-J op ares Top top. Screw « Install the 2 small screws into the sides of the duct bracket. Remove the screws. Pr-tapping the holes will insure ease of final installation wen £23 crew [Z]INSTALL DUCT BRACKET Ae The duct bracket must be installed against the ceiling. This 2 T 2 Side : ¢ Secure the bracket to the ceiling and wall * Mark the 4 screw hole locations.
Installation Instructions CONNECT DUCT WORK « install duct work, making connections in direction of airflow as illustrated. « Push duct over the exhaust outlet until it reaches the duct stops. « Secure joints in duct work with sheet metal screws. = Wrap all duct joints with duct tape for an airtight seal. « Use duct tape to seal the flange connection. TITICACA 0 N: Da not use sheet metal screws at the hood flange connection. Doing so will prevent proper damper operations. Seal connection with tape only.
installation Instructions INSTALL FILTERS = Remove protective film on the filters. = Tip the filter into the slots at the rear of the opening. Lift * To remove the filters, grasp the knob, push the filter tithe Alter and pull the knob forward until the filter rests on wards the rear and tilt downwards. the slots.