
Owner manual

Step 3
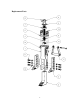
ALWAYS CHOCK YOUR WORK. Never leave the tool in the flanges while
performing maintenance. After the flange is spread to the desired amount, set a chock
between the flanges. Flip the direction switch on the ratchet handle to the right. With one
hand on the tool handle, turn the ratchet handle counter clockwise to close the flanges
onto the chock and remove the tool.
Step 4
Perform necessary flange maintenance.
Step 5
Insert the POP-IT® Tool beside the chock. Flip the direction switch on the ratchet back to
the left. While holding the tool handle, turn the ratchet handle clockwise until the chock
comes free. After removing the chock, flip the direction switch to the right. Turn the
ratchet handle counter clockwise until the flange is back to parallel.
Step 6
Remove the POP-IT® Tool from the flange. If necessary, remove the tool by tapping
lightly on the side of the tool with a hammer.
Operating Procedure – Lifting Work
Step 1
Before every use, clean the serrations on the toes with a wire brush. Make sure that all
toes are fully engaged under the equipment to be lifted. The first step or entry point of the
toes is a ½ inch thick. The next two steps are 1 inch and 1 ½ inch. The bulk of lifting
should be done at the 1 inch and 1 ½ inch steps. Do not try to reach maximum force of
30,000 lbs on the first step.
Step 2
Once the toes are in as far as possible, flip the direction switch on the ratchet to the left.
With one hand located on the handle of the tool, take your other hand and begin turning
the ratchet handle clockwise in a slow manner as the equipment begins to lift. DO NOT
USE A CHEATER BAR. The POP-IT
® Tool is designed to be operated with the
ratchet supplied. Do not jerk on the ratchet handle. A steady even pull insures smooth
operation. Approximately 300 lbs of force on the end of the ratchet handle will produce
30,000 lbs of force.
6