
User Manual


7
2. Resolution setting – Windows 7/ Windows 8.1/ Windows 10 system
● Click on icon
● Click on Control Panel > Appearance and Personalization
● Click on Display > Connect to an external display.
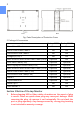
Normally Display ① is the laptop’s
monitor, Display ② is the external
monitor. Click on Detect if you are
unsure.
● At Display, select “2.HDMI”
(digital video) or “2. display
device: VGA” (analog video) for
Display
● Select Resoluton“1920x1080”
● Select "Landscape" or "Portrait"
for Orientation.
● Select "Extend these displays" for
Multiple display, and drag Display 2 to the right side of Display 1. For
Duplicated mode, select "Duplicate these displays".
● Select OK and exit after saving the settings.
Chapter 4 Hot Keys and OSD Instructions
Section 1 Hot Keys and LED Light Description
*Notice: If need to adjust “Increase/up” or “Decrease/down” continuously , press
the button and hold. Do not press two buttons at the same time, due it may cause no
response or fault response.
LED Lights Description :
It shows green light when turn on On-Lap Monitor and shows red light when
stand by.
Hot Keys Description
Power: Press the Power Button can power on/off the Monitor.
Exit/Auto Adjustment: In the OSD panel, press the Exit Button to exit and
back to the previous page. When there is no OSD menu, press this
Button will activate automatic adjustment function (only pertains to analog
VGA signal)
Menu/Select: Press the Menu Button to launch OSD panel.
Increase Volume/UP: Press this Button to increase the volume of speakers.
If the OSD menu is launched, press this button will move up or move left the
list. Press and hold for automatic continuous increase.
Decrease Volume/Down: Press this Button to decrease the volume of
speakers. If the OSD menu is launched, press this button will move down or
move right the list. Press and hold for automatic continuous decrease.