
User Guide


9
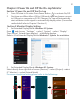
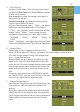
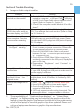
3. Set Extended Display Mode-Windows 7 System
● Click on icon
● Click on Control Panel > Appearance and Personalization
● Click on Display > Connect to an external display.
Normally Display ① is the laptop’s monitor, Display ② is the external mon-
itor. Click on Detect if you are unsure.
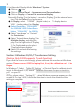
● At Display, select “2.HDMI” (digital video) or “2. display device:
VGA” (analog video) for Display
● Select Resoluton“1920x1080”
for 1303H& 1303I. Select Reso-
lution “1366x768” for 1303A.
● Select "Landscape" or "Portrait"
for Orientation.
● Select "Extend these displays" for
Multiple display, and drag Dis-
play 2 to the right side of Display
1. For Duplicated mode, select
"Duplicate these displays".
● Select OK and exit after saving
the settings.
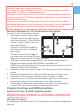
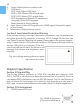
Section 3 Windows 10/8.1/7 Touchscreen Setting
(Notice: Only 1303I supports Touch Function)
If you find the cursor acts wrongly, please calibrate the monitors at Windows
system. Please connect 1303I to laptop first, if not, the calibration can’t be
begun.
In Windows 7, Select ‘Tablet PC Setting’of Control Panel to calibrate touch
input. In Windows 8.1/10, search”Calibrate the screen for pen or touch in-
put”on your PC.
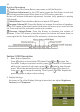
As Fig., please select “Setting (S)”, when Windows message appears on the
screen of On-Lap 1303I, follow the direction to touch the screen and the
setting is complete.