
User's Manual


Watkins Manufacturing Corp. FreePad Control System
Interface Module
Installation
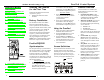
To install the Interface Module, the
following is required:
1. Disconnect the Main Power going
into the spa.
2. Remove the equipment
compartment door of the spa.
3. Attach the Module to the spa using
the two (2) existing screws on the
Interface Module label attached to
the spa wall inside the equipment
compartment).
4. Open the IQ2020 Control Box by
removing the two (2) front screws
and front cover.
5. Attached cable to the low voltage
connector as illustrated below.
6. Close IQ2020 Control Box by
attaching cover and fastening using
the two (2) screws.
7. Replace equipment compartment
door onto spa.
8. Connect Main Power to spa.
Starting The FreePad
for the First Time
Starting the FreePad for the first time
requires one (1) step:
1. Installing the batteries into the
FreePad.
Battery Installation
The FreePad uses three AA alkaline
batteries supplied with this packet.
Insert a quarter into the slot inside the
plug at the bottom of the FreePad, rotate
counter clockwise to open. Install the
batteries with the positive (+) end
towards the top of the FreePad and the
negative (-) end towards the bottom.
Once the batteries are installed, replace
the plug and tighten with a quarter.
NOTE: It is recommended that all three
batteries be replaced at the same time.
FreePad/IQ2020
Synchronization
The Freepad comes pre-synchronized to
the Interface Module. Since the IQ2020
will communicate with up to eight (8)
FreePad controllers, any additional
controllers will need to be manually
synchronized. The following is required
to synchronize a FreePad controller with
the Interface Module:
HotSpring models
1. Press and hold both the Light Plus
and the Light Minus buttons on the
spa’s Main control panel
simultaneously for two (2) seconds
to initiate synchronization.
2. Press any FreePad button to wake
the FreePad. When the display
illuminates, press the Plus button on
the FreePad to complete the process.
Tiger River models
1. Press and hold the Tiger Key for
two (2) seconds on the spa’s Main
control panel to initiate
synchronization.
2. Press any FreePad button to wake
the FreePad. When the display
illuminates, press the Plus button on
the FreePad to complete the process.
Using the FreePad
Press any button on the FreePad to
illuminate the FreePad screen.
Press the MODE button to scroll
throught the different screens.
Press the Plus (+) or Minus (-)
buttons to activate or deactivate the
function illustrated on the screen.
See Control Screens section for
more information.
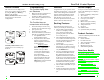
Screen Definitions
The illustration below shows the screen
elements and layout for the FreePad
LCD Display. You may notice that some
of these icons may not be present on
your screen; this is because your spa is
currently not equiped with that feature.
FreePad Overview
Once the batteries are installed, the
FreePad will always be in one of the
following modes:
1. Communication Mode: In this
mode, the FreePad is searching for
communication with the IQ2020.
The Comm Icon will flash.
2. Default Screen Mode: Upon power-
up from the Shutdown Mode, the
FreePad shall display the following
screen elements:
• READY Icon
• POWER Icon
• Current SET TEMP Icon
Other Icons will only be displayed if
the feature is installed and currently
active.
3. Control Mode: By pressing the
MODE button after viewing the
Default Screen, you will be able to
scroll through the available control
screens.
4. Sleep Mode: 10 seconds after any
button is pressed, the display will go
blank, placing the FreePad into a
sleep mode. The sleep mode will
continue for 30 minutes unless a
button is pressed which would start
the entire cycle over again.
5. Shutdown Mode: After 30 minutes
of non-operation by the user, the
FreePad will revert to the shutdown
be display when a FreePad button is
pressed.
COMM ICON
2
3