n e User guide p.2 Notice d’utilisation p.30 CAUTION :THIS TELEPHONE PRODUCT IS SPECIFICALLY DESIGNED FOR PEOPLE WITH HEARING DIFFICULTIES AND IS PROVIDED WITH A HANDSET EARPIECE WITH VOLUME CONTROL FOR INDIVIDUAL REQUIREMENTS. DUE CARE MUST BE TAKEN BY ALL USERS THAT THE HANDSET EARPIECE VOLUME CONTROL IS SET TO THE LOWEST LEVEL ACCEPTABLE BY EACH RESPECTIVE USER. CARE SHOULD THEREFORE BE EXERCISED TO ENSURE THAT ANY NEW USERS ARE FAMILIAR WITH THIS REQUIREMENT.
GB INDEX PAGE DESCRIPTION - Handset and base unit controls 6 GENERAL SETTINGS - How to connect the phone and set the batteries - Charging the batteries - Phone range - Clean the phone 10 10 11 11 BASE SETTINGS - Base ringer volume 12 HANDSET SETTINGS - General settings icons displayed - Ringer volume, melody and shaker - Handset registration - Handset dereigistration - Network features, Flash time, Dial pause 13 13 14 14 15 USING THE PHONE - Making a call - Answering a call - Use the call back fea
CALLER IDENTIFICATION - Caller ID features - Dial Caller ID numbers - Store numbers and names into the phone book - Delete stored names and numbers 21 21 21 22 ADDITIONAL HANDSETS - General settings - Using several handsets - Deregister all additional handsets from the base - Internal calls - Call transfer to another registered handset - Headset option 23 23 24 24 25 25 ADDITIONAL BASE UNIT - General settings - How to add a base unit 26 26 TROUBLE SHOOTING - Generality - A warning tone is heard during
F SOMMAIRE PAGE DESCRIPTION - Description du combiné et de la base 6 INSTALLATION - Raccordements du téléphone et mise en place des batteries Chargement des batteries Rayon d’action Entretien du téléphone 30 30 31 31 REGLAGE DE LA BASE - Réglage du volume de sonnerie de la base 32 REGLAGE DU COMBINE - Présentation des icônes - Volume, mélodie de la sonnerie et vibreur - Enregistrement d’un combiné sur la base - Annuler l’enregistrement d’un combiné de la base - Propiétés du réseau, touche R (Flash)
AFFICHAGE DU NUMERO DE L’APPELANT - Affichage des numéros d’appels - Sélectionner et appeler un numéro - Transfert de numéros dans le répertoire - Effacer un ou plusieurs numéros enregistrés 43 43 44 44 COMBINES ADDITIONNELS - Généralités - Utilisation de plusieurs combinés - Annuler l’enregistrement de tous les combinés de la base - Communications internes - Transfert d’appel vers un autre combiné enregistré - Option casque 45 45 46 46 47 47 BASE ADDITIONNELLE - Généralités - Ajouter une base supplémen
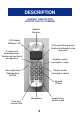
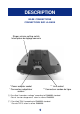
DESCRIPTION HANDSET DESCRIPTION DESCRIPTION DU COMBINE Speaker Ecouteur LCD display Afficheur LCD Pick up and hang up key Touche de décroché et de raccroché Function and phonebook keys Touches de fonction et de répertoire Amplifier switch Interrupteur ampli Tone adjustment Réglage de la tonalité Shaker switch Interrupteur vibreur Keypad Clavier Microphone Flash Key Touche flash 6 Amplifier key Touche ampli
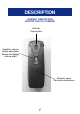
DESCRIPTION HANDSET DESCRIPTION DESCRIPTION DU COMBINE Belt clip Clip ceinture Amplifier volume button adjustment Bouton de réglage volume ampli Batteries cover Couvercle de batteries 7
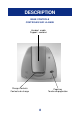
DESCRIPTION BASE CONTROLS CONTROLES SUR LA BASE Handset cradle Support combiné Charge contacts Contacts de charge Page key Touche de pagination 8
DESCRIPTION BASE CONNECTIONS CONNECTIONS SUR LA BASE Ringer volume setting switch Interrupteur de réglage sonnerie * Power adaptor socket * Connecteur adaptateur secteur ** Line socket ** Connecteur cordon de ligne (*) Classified “hazardous voltage” according to EN60950 standard. Classé “tension dangereuse” selon la norme EN60950. (**) Classified TNV-3 according to EN60950 standard.
GENERAL SETTINGS 1 - HOW TO CONNECT THE PHONE AND SET THE BATTERIES 1 - Plug the adaptor in the power wall socket and the power plug in the base socket (*). 2 - Connect the line cord plug to the base socket (**). 3 - Connect the line cord to the PTT socket. 4 - Insert the batteries with the correct polarity into the batteries compartment and replace the battery cover.
GENERAL SETTINGS 3 - PHONE RANGE The phone radio range can work up to 300 m and radio signal can be affected by many factors like a wall, obstacles...The maximum range if there are no obstacles between the phone and the base unit is around 300 m. If the range is restricted by walls in a house or in the office, the base unit should be in a slightly elevated position.
BASE SETTINGS BASE RINGER VOLUME The base ringer volume can be adjusted by using the slider switch located on the base rear panel. Remark: It is only possible to adjust the ring volume, the ring tone melody cannot be adjusted. The following settings are available: Switch position Pos 1 Pos 2 Pos 3 Pos 4 Symbol Function Off Min Med Max For product support and help visit our website at www.geemarc.
HANDSET SETTINGS 1 - GENERAL SETTINGS ICONS DIPSPLAYED There are three settings icons displayed on the handset: Ringer volume icon to set the ring volume and melody. Register handsets icon to register / deregister handsets. Network settings, Flash time and Dial Pause icon settings to set Network, Flash time and Pause. The whole menu is controlled by using the following keys: - To activate or deactivate the menu and programing mode use the key.
HANDSET SETTINGS IMPORTANT: If you connect several bases together, the handsets registered to the additional bases will ring for a few seconds during an incoming call even if you take the line with one of the first base handsets. 3 - HANDSET REGISTRATION How to register a handset to a base unit: 1 - Unplug the mains adaptor from the base unit during few seconds. 2 - Replace the adaptor to the power socket. 3 - Press the key. 4 - Press the ( ) or the ( ) key to select the icon shown on the display.
HANDSET SETTINGS 5 - NETWORK FEATURES, FLASH TIME, DIAL PAUSE key. 1 - Press the ( ) or the ( ) key to select the desired icon shown 2 - Press the on the display. The selected icon will flash on the display. 3 - Press the key to select the icon. 4 - You can choose from the menu below: 1/5 1/2 : 1 For UK, 2 for France (CID features). 2/5 Tone/Pulse for dialling must be set to Tone. 3/5 A,B,C,D (Telephone network settings) 4/5 Flash time R key 5/5 Dial pause to insert a pause in the mumber key.
USING THE PHONE 1 - MAKING A CALL 1 - Dial the phone number you want to call, you can press the key to cancel an incorrect entry. 2 - Press the , the number is automatically dialled. 3 - On completion of the call simply press the again to release the line or put the handset on the base. 2 - ANSWERING A CALL When an incoming call is received proceed by: 1 - Press the key to take the line and speak. 2 - On completion of the call simply press the again to release the line or put the handset on the base.
USING THE PHONE The following settings are available: 1 - The V switch set to and activated (key is lighting). The handset volume can be adjusted within the following values range : 4 dB / 8 dB / 12 dB / 16 dB. 2 - The V switch set to and activated (key is lighting). The handset volume can be adjusted within the following values range: 16 dB / 20 dB / 24 dB / 28 dB. In addition for both settings, you can use the tone control to increase treble and bass up to 10 dB.
PHONE BOOK 1 - ABOUT THE PHONE BOOK Names and phone numbers can be stored in the phone book. Each phone number stored in the phone book can be called by pressing only few buttons. If your Caller ID service is available, the name and the number of the caller will be displayed during the incoming call. This will be done only if the caller name and number have been stored in the phone book. The phone book is divided into two parts (2 x 10 entries).
PHONE BOOK 3 - STORING A NUMBER WITH A NAME Follow instructions below to store new entries in the phone book: 1 - Enter the phone number and dialling codes you wish to set in the phone book. or key, a beep 2 - Select one of the two phone books by pressing the will be heard and the phone book icon selected will flash. 3 - Enter the corresponding name and number by pressing the corresponding number key once or twice to select the desired letter (see the table below).
PHONE BOOK 5 - MODIFY A PHONE BOOK ENTRY or key. 1 - Select the desired phone book by pressing the ( ) or 2 - Select the desired number to modify by pressing the keys. key. 3 - Press the 4 - The number will be displayed and can be deleted by pressing the 5 - Enter the new number and press the key to store. ( ) key. 6 - DELETE A PHONE BOOK ENTRY or 1 - Select the desired phone book by pressing the ( 2 - Select the desired number to delete by pressing the keys. key. 3 - Press the key to delete the entry.
CALLER IDENTIFICATION 1 - CALLER ID FEATURES IMPORTANT: You need to subscribe to a Caller ID service from your local phone company if you wish to use this feature. Caller ID will show the caller name and phone number on the handset display. If the phone number is stored in the phone book, the corresponding name will be displayed with the correct ring tone (phone book ring tone). The display shows ****** for private call (caller does not want to show his or her name and number).
CALLER IDENTIFICATION 4 - DELETE STORED NAMES AND NUMBERS key. 1 - Press the ( ) or ( 2 - Select the desired number to delete by pressing the key. Two short beeps will be heard when you reach the end of the list. key to delete the entry, a short beep will be heard to confirm. 3 - Press the For product support and help visit our website at www.geemarc.
ADDITIONAL HANDSETS 1 - GENERAL SETTINGS With the DECT standard you have the possible settings below: - Register up to 4 handsets to one base unit. - Register up to 2 base units to each handset. - Make internal call handset to handset and transfer call between handsets registered to the same base unit. - You can increase the phone range by using 2 base units (move between the phone coverage areas).
ADDITIONAL HANDSETS Note: to get the maximum efficiency and maximum range you must put the handset near the base unit. The handset range will be the same for each handset. 3 - DEREGISTER ALL ADDITIONAL HANDSETS FROM THE BASE To deregister all handsets from the base unit follow the instructions below: 1 - Take one handset. key. 2 - Press the 3 - Press the and the keys to enter number 1/1 0000 will be dispalyed. 4 - Enter the base unit PIN code (factory setting to 1111), then press key.
ADDITIONAL HANDSETS 5 - CALL TRANSFER TO ANOTHER REGISTERED HANDSET External calls can be transfered to another registered handset from the answering handset (both handsets must be registered to the same base unit). During an incoming call: 1 - Press the key to answer the call. 1 - Press the key to transfer the call. 2 - All others handsets will ring. 3 - Press the key on the requested handsets to answer the call.
ADDITIONAL BASE UNIT 1 - GENERAL SETTINGS Several base units can be connected to the network in order to extend the range of the handsets. When several base units are registered to a handset, it can automatically search for the next base unit if you go outside the range of the first base unit. The transfer between base units is handled automatically, although this cannot be done whilst a call is in progress.
TROUBLE SHOOTING IF THE PHONE DOES NOT WORK Generality: Make sure that the phone line cord and adaptor are correctly plugged in and are not damaged. Make sure that the batteries are fully charged. Connect another phone on your phone socket or move your phone to another socket to check if the failure is coming from your phone or your PTT socket. A warning tone is heard during a call: The batteries are empty and the handset needs to be replaced in the base unit .
GUARANTEE GUARANTEE From the moment your Geemarc product is purchased, Geemarc guarantee the product for one year. During this time, all repairs or replacements (at our option) are free of charge. Should you experience a problem then contact our helpline or visit our website at www.geemarc.com. The guarantee does not cover accidents, negligence or breakages to any parts. The product must not be tampered with or taken apart by anyone who is not an authorised Geemarc representative.
GUARANTEE Electrical connection : The apparatus is designed to operate from a 230V 50Hz supply only. (Classified as «hazardous voltage» according to EN60950 standard). The apparatus does not incorporate an integral power on/off switch. To disconnect the power, either switch off supply at the mains power socket or unplug the AC adaptor. When installing the apparatus, ensure that the mains power socket is readily accessible.