AMPLICALLTM30/40 Portable Monitor English 0
CONTENTS CONTENTS INTRODUCTION TM Unpacking the AMPLICALL 30/40 DESCRIPTION General Description INSTALLATION Setting Up Mounting Range PAIRING Pairing Procedure Deregister the Pairing TM USING THE AMPLICALL 30 Delay Time Setting Sensor Sensitivity Setting AMPLICALLTM 30 Use USING THE AMPLICALLTM40 AMPLICALLTM 40 Use TROUBLESHOOTING SAFETY INFORMATION GUARANTEE RECYCLING DIRECTIVES 1 1 2 4 5 5 9 9 10 11 12 12 14 15 15 16 17 18 18 19 21 24 26
INTRODUCTION Congratulations on purchasing your Geemarc AMPLICALLTM30 or AMPLICALLTM40. The AMPLICALLTM 30 is the portable baby unit which listens to your baby and sends a signal to a receiving unit if your baby makes a noise. This enables you to ensure that your baby is comfortable and happy when you are in a different room to the baby. The TM AMPLICALL 40 has an addition piezo buzzer. When inserted, it will disconnect the internal microphone.
INTRODUCTION It’s is important that you read the instructions below in order to use your Geemarc AMPLICALLTM 30/40 its full potential. Keep this user guide in a safe place for future reference.
INTRODUCTION Unpacking the AMPLICALLTM 30/40 When unpacking the AMPLICALLTM 30, you should find the following in the box: • • • 1 AMPLICALLTM 30/40 Unit 3 AAA batteries (supplied) 1 External piezo buzzer (AMPLICALLTM 40 only) For product support and help visit our website at www.geemarc.
DESCRIPTION General Description Front Description Built in Power On/Off switch microphone Power On/Battery Low/Pairing LED indicator Alarm button Delay switch Sensitivity switch 5
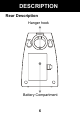
DESCRIPTION Rear Description Hanger hook Battery Compartment 6
DESCRIPTION Right Side Description Left Side Description Alarm Piezo Buzzer Power supply socket (optional) socket socket 7
DESCRIPTION External Piezo Buzzer (AMPLICALLTM 40 only) 8
INSTALLATION Setting Up For portable child monitoring by parent, remove the battery cover found on the rear of the unit, insert 3 alkaline batteries (AAA size, 1.5V type, these are supplied) into the battery compartment. Check the battery polarity diagrams in the battery compartment when inserting the batteries. Replace the battery cover – it will snap back into place. Slide the Power On/Off switch to On to activate. Note : When the LED indicator flashes red, it is time to replace the batteries.
INSTALLATION then into a convenient mains outlet. Switch on the mains outlet and slide the Power On/Off switch to On to activate. Mounting Place the AMPLICALLTM 30 in the room with the baby in order to pick up any noise made by the baby. The AMPLICALLTM30 can be hung on the wall using the hanger hook, placed on a table or wall mounted (see below). Wall Mounting 1. Knock two self-tapping screws (not supplied) into a wall at a distance of 42.5mm from each other and placed in a horizontal line. 2.
INSTALLATION Range Place the unit at least 1 metre away from your baby ensuring all parts are kept out of reach. Under no circumstance should you place any parts of the monitor in or on a cot. For best performance we recommend that the monitor is placed no further away than 4 metres from your baby.
PAIRING Pairing Procedure The AMPLICALLTM 30 can work with either TM TM the AMPLICALL 15, AMPLICALL 20 TM or the AMPLICALL 50. However, the devices must be paired before they can operate together. Pairing with the AMPLICALLTM15 Press and hold the Pairing/Test button of the AMPLICALLTM 15 and the ALARM TM button of AMPLICALL 30 until the strobe flashes. The unit makes a beep sound to confirm successful pairing.
PAIRING Press and hold the Pairing/Test button of the AMPLICALLTM 20, AMPLICALLTM 50 or CL2L and the ALARM button of AMPLICALLTM 30 at the same time until the strobe flasher flashes and the unit makes a beep sound to confirm pairing successfully. (For AMPLICALLTM 50, the middle LED lights up and the unit makes a long beep tone to confirm successful pairing) To check whether the devices are working properly and they have been paired correctly, press the ALARM button on the TM AMPLICALL 30 once.
PAIRING Deregister from the AMPLICALLTM 20, AMPLICALLTM 50 or CL2L 1. Press and hold the Pairing/Test button of the indoor unit/receiver (AMPLICALLTM20, AMPLICALLTM50 or CL2L) for 5 seconds until all the LED’s flash indicating you have entered the deregister mode. 2. Press Pairing/Test button of the indoor TM unit/receiver once (AMPLICALL 20, TM AMPLICALL 50 or CL2L), the 1st LED will flash. Press and hold the Pairing/Test button until the 1st LED turns off and beeps to confirm.
USING THE AMPLICALLTM30 Delay Time Setting You can select one of the 4 delay time settings by sliding the delay time setting switch. This is a very useful feature because you can set the time delay between when the monitor registers the sound and when you are actually notified. You might want to put a longer delay on for an older baby because you want to make sure that the baby is actually awake before you are made aware. 1.
USING THE AMPLICALLTM30 3. When the baby’s cry is intermittent and irregular and you are aware of this and relaxed enough to know that the baby is fine, you may want to set the delay time to 10s or 30s. The AMPLICALLTM 30 will transmit a signal at 10s/30s after detecting a cry to alert you. Sensor Sensitivity Setting For those quiet moments or when your baby is a little older you may not want to hear every sound in your baby’s room.
USING THE AMPLICALLTM30 2. When a baby’s cry is loud or the unit is installed close to the baby, adjust the sensitivity to a lower position to detect a cry. AMPLICALLTM30 Use When the AMPLICALLTM 30 detects a cry/voice or the ALARM button is pressed, the paired indoor unit will sound an alarm and/or flash to notify you of the noise made.
USING THE AMPLICALLTM40 AMPLICALLTM40 Use The AMPLICALLTM 40 has all the useful features and works in the same way as the AMPLICALLTM 30. However it is supplied with an additional accessory, an external piezo buzzer. If you plug the piezo TM buzzer into the AMPLICALL unit and attach the other end near to the sound source, it will disconnect the internal microphone of the AMPLICALLTM 40 and can be used to detect doorbell sound.
TROUBLESHOOTING The Monitor will not switch on • Make sure the batteries are inserted correctly and they have adequate power • Ensure mains power is connected properly The Receiver (AMPLICALLTM 50) is making a high pitched (feedback) noise • Ensure the AMPLICALLTM 30/40 and the AMPLICALLTM 50 are about 10ft apart • Switch the volume setting to low GB The Receiver (AMPLICALLTM 50) is only alerting me intermittently or not alerting me at all • Ensure the units are paired correctly.
TROUBLESHOOTING • Ensure the AMPLICALLTM 50 volume is not switched off • Make sure the batteries are inserted correctly and they have adequate power • Ensure mains power is connected properly • The units maybe too far apart, therefore out of range • Set time delay to low and sound sensitivity to high Sound quality has decreased • Make sure the batteries are inserted correctly and they have adequate power Red LED flashing • Replace the old batteries or use mains power 20
SAFETY INFORMATION General Do not open the unit (except to replace the batteries). Contact the helpline for all repairs. The AMPLICALLTM 30 is designed to help monitor your child and is not a substitute for adult supervision. This product is not a toy. Your monitor transmits over public airwaves. Your conversation maybe heard by another product that operates on the same frequency. Always keep electrically operated items and their cables out of reach of babies and younger children.
SAFETY INFORMATION Cleaning Clean the unit with a soft cloth. Never use polishes or cleaning agents - they could damage the finish or the electrics inside. If connected, please disconnect from power supply before cleaning. Environmental Do not expose to direct sunlight. Always ensure there is a free flow of air over the surfaces of the unit. Do not place any part of your product in water and do not use it in damp or humid conditions e.g. bathrooms.
SAFETY INFORMATION Take special care to ensure batteries are inserted correctly, observing (+) and (-) polarity marks on battery and product. Remove used batteries from the unit. Do not use rechargeable batteries. Do not mix old (used) and new batteries or batteries of different types Do not put batteries into the household rubbish, pay attention to battery regulations regarding battery disposal. Remove batteries if you will not be using the product for long periods.
GUARANTEE From the moment your Geemarc product is purchased, Geemarc guarantee it for one year. During this time, all repairs or replacements (at our discretion) are free of charge. Should you experience a problem then contact our help line or visit our website at www.geemarc.com. The guarantee does not cover accidents, negligence or breakages to any parts. The product must not be tampered with or taken apart by anyone who is not an authorised Geemarc representative.
GUARANTEE DECLARATION: Geemarc Telecom SA hereby declares that this product is in compliance with the essential requirements and other relevant provisions of the Radio and Telecommunications Terminal Equipment Directive 1999/5/EEC and in particular article 3 section 1a, 1b and section 3. La déclaration de conformité peut être consultée sur le site : www.geemarc.com Electrical connection: The apparatus is designed to operate from a 230V 50Hz supply only.
RECYCLING DIRECTIVES The WEEE (Waste Electrical and Electronic Equipment) has been put in place for the products at the end of their useful life are recycled in the best way. When this product is finished with, please do not put it in your domestic waste bin. Please use one of the following disposal options: - Remove the batteries and deposit them in an appropriate WEEE skip. Deposit the product in an appropriate WEEE skip. - Or, hand the old product to the retailer.
UGAmplicall30,40_En_Ver 1.