e n CL100 l e p h User guide / Notice d’utilisation o EASY-DIAL PHONE WITH VOLUME AND TONE ADJUSTMENT TELEPHONE MULTIFONCTIONS A GRANDES TOUCHES CALLY DESIGNED FOR PEOPLE WITH HEARING DIFFICULTIES AND IS PROVIDED WITH A HANDSET EARPIECE VOLUME CONTROL FOR INDIVIDUAL REQUIREMENTS. DUE CARE MUST BE TAKEN BY ALL USERS THAT THE HANDSET EARPIECE VOLUME CONTROL IS SET TO THE LOWEST LEVEL ACCEPTABLE BY EACH RESPECTIVE USER.
INDEX E Description 4 Setting up - Connecting the telephone - Ringer settings - Pulse/Tone switch - Time breack recall switch - Wall mounting 6 7 8 8 8 Using the phone - Answering incoming call - Volume and tone receiving adjustment - Making a call - Sending volume adjustment - Last number redial - Recall, * & # buttons - Mute button - Storing telephone numbers - Dialling stored number Guarantee 9 9 11 11 12 12 12 13 14 15 2
SOMMAIRE F Description 16 Installation - Raccordements - Sonnerie - Fréquence décimale/vocale (Interrupteur Pulse/Tone) - Interrupteur 300ms / 100ms - Position murale 18 19 20 20 20 Utilisation - Recevoir un appel - Réglage du volume et de la tonalité de réception - Appeler - Réglage du volume d’émission - Rappel du dernier numéro - Touches R, * & # - Fonction secret - Mémoriser un numéro de téléphone - Appel d’un numéro en mémoire Garantie 21 21 23 23 24 24 24 25 26 27 3
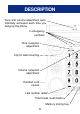
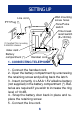
DESCRIPTION Tone and volume adjustment automatically activated each time you hang-up the phone OFF ON 3 emergency numbers Tone reception adjustment TONE Clip for wall mounting Volume reception adjustment Handset cord socket Last number redial Time break recall button Memory storing key 4
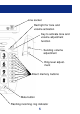
Line socket Red light for tone and volume activation Key to activate tone and volume adjustment function VOLUME Sending volume adjustment Ring level adjustment Direct memory buttons Mute button Flashing incoming ring indicator 5
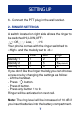
SETTING UP Wall mounting screw holes Line cord PTT Plug (*) 2 Tone/Pulse switch Time break recall switch (E=100ms) 3 (*) Classified TNV-3 according to EN60950 standard. index card Battery compartment (*) Handset cord 1 1 - CONNECTING TELEPHONE 1 - Connect the handset cord. 2 - Open the battery compartment by unscrewing the retaining screw and pulling back the latch. 3 - Insert correctly 4 x AAA 1.5V alkaline battery (not supplied) in the battery compartment (*).
SETTING UP 6 - Connect the PTT plug in the wall socket. 2 - RINGER SETTINGS A switch located on right side allows the ringer to be switched HI,LOW,OFF: : Off, : Low, : Hi Your phone comes with the ringer switched to «High» and the melody set to «6»: Melody 1 Melody 2 Melody 3 Low 1 4 7 Mid 2 5 8 High 3 6(by default) 9 If you don’t like the ringer melody,you can choose a new one by changing the settings as follow: - Lift the handset. - Press button. - Press # button. - Press any button 1 to 9.
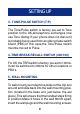
SETTING UP 3 - TONE/PULSE SWITCH (T/P) The Tone/Pulse switch is factory pre-set to Tone position.In the UK,all telephone exchanges now use Tone dialing.If your phone does not dial out it is probably being used from an older private switch board (PBX).In this case,the Tone/Pulse switch must be moved to Pulse. 4 -TIME BREAK RECALL SWITCH (300/100) For UK, the TBR switch is factory pre-set to 100ms. It can be switched to 300ms for other locations or PBX’s.
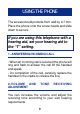
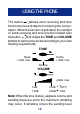
USING THE PHONE The screws should protrude from wall by 6-7 mm. Place the phone onto the screw-heads and slide down to secure. If you are using this telephone with a hearing aid, set your hearing aid to the “T” setting. 1 - ANSWERING INCOMING CALL - When an incoming call is received the phone will ring and flash,to answer the call lift the handset and speak. - On completion of the call, carefully replace the handset in the cradle to release the line.
USING THE PHONE The button allows extra receiving and tone functions to be activated or not during the conversation. When the function is activated, the red light of extra receiving and tone function located near the button is lit. Adjust the TONE and VOLUME buttons to remove the levels according to your own hearing requirements.
USING THE PHONE settings should be decreased with the switch . When the switch located behind the phone is ON, the extra-receiving and tone functions are automatically activated each time you use the phone.When this switch is switched OFF, you will need to activate the function by pressing the button . Tone and volume adjustment (15dB to 30dB) is only activated when the button is set to ON. When this button is set to OFF only the volume can be adjusted from 0dB to 15dB. 3 - MAKING A CALL - Lift the handset.
USING THE PHONE Min Normal Maxi 5 - LAST NUMBER REDIAL - Lift the handset. - Await the dial tone and press button. -The previously dialled number will be automaticaly redialled (not in use for memory numbers). 6 - RECALL, * & # BUTTONS These are used with the new services provided on digital exchanges.For details please contact your network operator.
USING THE PHONE hold the button.You will still be able to hear the callers but they cannot hear you during the mute operation.To resume normal conversation, release the button. 8 - STORING TELEPHONE NUMBERS Your phone can store12 direct memories including 3 emergency numbers (21 digits maximum for each memory).
USING THE PHONE your phone. Entering a new number in memory will automatically erase the previous number. 9 - DIALLING STORED NUMBER - Lift the handset and await the dial tone. - Press appropriate button M1, M2, ..., or M9 or one of the 3 special numbers,the stored number will be dialled automatically. To register your stored phones numbers, use the index located under the base. Use this table below to prepare the phone book: 1 2 3 4 5 6 7 8 9 Example : Bruce 1 01 64 57 .. ..
GUARANTEE GUARANTEE From the moment your Geemarc product is purchased, Geemarc guarantee it for the period of one year. During this time, all repairs or replacements (at our option) are free of charge.Should you experience a problem then contact our helpline or visit our website at www.geemarc.com.The guarantee does not cover accidents, negligence or breakages to any parts. The product must not be tampered with or taken apart by anyone who is not an authorised Geemarc representative.
DESCRIPTION Activation automatique de la correction d’écoute au décroché OFF ON 3 mémoires d’urgence Réglage de la tonalité de réception TONE Ergot à retourner pour maintenir le téléphone en position murale Réglage du volume de réception Connecteur du cordon combiné Rappel du dernier numéro composé Mise en mémoire 16
Connecteur de ligne Voyant du correcteur de tonalité et volume Activation de la correction de tonalité et de volume de réception VOLUME Réglage du volume d’émission Réglage du niveau de sonnerie Mémoires directes Secret d’appel Flash lumineux de sonnerie 17
INSTALLATION Ouvertures pour vis de position murale Prise téléphonique (*) 2 Interrupteur Tone / Pulse Interrupteur 300/100ms 3 Cordon de ligne Répertoire Compartiment piles (*) (*) Classée TRT-3 selon la norme EN60950 Cordon du combiné 1 1 - RACCORDEMENTS 1 - Branchez le cordon du combiné. 2 - Dévissez la vis et ouvrez le compartiment à piles situé en dessous de votre téléphone. 3 - Inserez correctement 4 x AAA 1.5V piles alkalines (non fournies) dans le compartiment (*).
INSTALLATION 6 - Branchez le conjoncteur téléphonique PTT dans votre prise téléphonique murale. 2 - SONNERIE Un commutateur situé sur le côté de l’appareil permet de régler la sonnerie: : désactivée, : faible, : forte Si la mélodie de sonnerie ne vous convient pas, sélectionnez un nouveau réglage parmi les 9 proposés ci-dessous: Faible Moyen Fort Mélodie 1 1 2 3 Mélodie 2 4 5 6 (par défaut) Mélodie 3 7 8 9 Suivez la procédure décrite ci-dessous pour changer le réglage : - Décrochez le combiné.
INSTALLATION 3 - FREQUENCE VOCALE OU DECIMALE? (T/ P) Au moment de sa livraison, votre téléphone est en mode fréquence vocale (T). Si le central téléphonique dont vous dépendez fonctionne en mode fréquence décimale (P), vos appels n’aboutiront pas, il vous suffira alors de commuter l’interrupteur T/P situé en dessous du téléphone sur la position P pour remédier à ce problème.
UTILISATION insérer 2 chevilles avec leurs vis. Laissez dépasser les vis de 6-7mm. Placez votre téléphone sur les têtes de vis et faites glisser ensuite votre téléphone dans les têtes de vis. 1 - RECEVOIR UN APPEL - Lorsque le téléphone sonne (flash lumineux de sonnerie de votre téléphone activé), décrochez le combiné pour parler à votre correspondant. - La conversation terminée, raccrochez le combiné pour libérer la ligne.
UTILISATION Les touches, TONE et VOLUME, vous permettent de corriger la tonalité et le volume de réception. TONE Graves +10db max Aigus +10db max Normal VOLUME +30db max 0dB 15dB 15dB OFF 30dB ON Note: Des sifflements dans l’écouteur peuvent apparaître dans certaines configurations de réglage (tonalité des aigus, volume de réception et volume d’émission au max), dans ce cas diminuez le niveau d’émission avec l’interrupteur .
UTILISATION Sur OFF, il faudra activer la fonction en appuyant sur la touche . Le réglage de la tonalité et du volume (de 15dB à 30 dB) n’est activé que lorsque la touche est sur ON. Lorsque cette touche est sur OFF seul le volume peut être réglé de 0dB à 15dB. 3 - APPELER - Décrochez le combiné. - Composez le numéro de votre correspondant. - La conversation terminée, raccrochez le combiné pour libérer la ligne.
UTILISATION Mini Normal Maxi 5 - RAPPEL DU DERNIER NUMERO - Décrochez le combiné. - Appuyez sur la touche le numéro de votre correspondant se recompose automatiquement (ne fonctionne pas pour les numéros en mémoire). 6 - TOUCHES R,* & # Touches d’accès aux Services de France Télécom (Signal d’Appel, Conversation à Trois). 7 - FONCTION SECRET Cette touche permet de couper ponctuellement le microphone en cours de communication. - Appuyez et maintenez enfoncé la touche .
UTILISATION 8 - MEMORISER UN NUMERO DE TELEPHONE Votre téléphone possède 12 mémoires directes dont 3 d’urgences, (21 chiffres maximum par mémoire). Les 3 mémoires spéciales permettent de mémoriser par exemple les 3 numéros suivants: - POMPIER : 18 Pensez à enregistrer ces numéros - POLICE : 17 lors de l’installation - VOTRE MEDECIN Suivez la procédure décrite ci-dessous pour mémoriser vos numéros: - Décrochez le combiné. - Appuyez sur la touche . - Appuyez sur une des touches M1, M2, ...
UTILISATION 9 - APPEL D’UN NUMERO EN MEMOIRE - Décrochez le combiné. - Appuyez sur une des touches M1, M2, ..., ou M9 ou sur une des trois touches spéciales, le numéro en mémoire se recompose automatiquement. Pour repérer vos numéros enregistrés, utilisez le répertoire situé en dessous de la base. Aidez vous du tableau ci-dessous pour le préparer: 1 2 3 4 5 6 7 8 9 Pierre 1 01 64 57 .. ..
GARANTIE GARANTIE Cet appareil est garanti 1 an pièces et main-d'oeuvre. La date d'achat figurant sur le ticket de caisse fera foi. Cette garantie s'exerce sous réserve d'une utilisation normale de l'appareil. Les dommages occasionnés par les surtensions électriques, la foudre ou par un choc sur l'appareil ne peuvent en aucun cas être couverts par la garantie.
EXTRA RECEIVING CORRECTION CORRECTION DE LA RECEPTION Correction treble max. aïgus max. Correction bass max. graves max. +30 CL100 dB Volume max. + 30 dB ON +20 Volume max. + 15 dB +10 OFF Telephone without correction Téléphone sans correction 300 1K 3.4K Hz www.geemarc.