CL330 MULTIFUNCTION TELEPHONE User guide P2 Notice D'utilisation P38 2LMC59YY 1
CONTENTS CONTENTS 1 INTRODUCTION Unpacking the Telephone 3 4 DESCRIPTION General Description LCD Screen Description Menu Navigation 5 5 7 7 INSTALLATION Setting Up Wall Mounting 8 8 10 SETTINGS Language Setting Screen Contrast Setting Time Setting Voice Function Setting Flash (Recall) Setting Dialling Mode (Tone/Pulse) Setting Ringer Volume Setting Ringer Tone Setting 11 11 12 13 14 15 15 16 16 USING THE TELEPHONE Making a Call Receiving a Call Last Number Redial Mute Function Handset Volume Setti
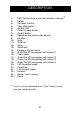
CONTENTS CALLER DISPLAY View Caller Display List Dial a Number from the Caller Display List Delete an Entry from the Caller Display List Delete all Entries from the Caller Display List Copying a Number to the Phone Book 22 23 23 24 24 25 PHONE BOOK Create a Phone Book Entry Store/Change a Name Recording Delete a Name Recording View Phone Book Entries Dialling using a Phone Book Entry Modify a Phone Book Entry Delete a Phone Book Entry Delete all Phone Book Entries 26 26 28 29 29 30 30 31 31 QUICK DIAL S
INTRODUCTION Congratulations on purchasing your Geemarc CL330 telephone. This is a multifunction telephone which offers features such as hands free use, phone book, caller display* and voice announcing. Its is important that you read the instructions below in order to use your Geemarc telephone to its full potential. Keep this user guide in a safe place for future reference.
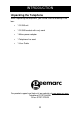
INTRODUCTION Unpacking the Telephone When unpacking the telephone, you should find the following in the box: • 1 CL330 unit • 1 CL330 handset with curly cord • 1 Mains power adaptor • 1 Telephone line cord • 1 User Guide For product support and help visit our website at www.geemarc.
DESCRIPTION General Description 1 CALL# CLIP 2 3 OK C 11 12 MENU 13 4 5 TONE 6 ? 14 VOLUME M1 15 16 M2 17 M3 18 M4 19 7 8 9 20 21 R 10 5 22 23 24 25 26
DESCRIPTION 1= 2= 3= 4= 5= 6= 7= 8= 9= 10= 11= 12= 13= 14= 15= 16= 17= 18= 19= 20= 21= 22 = 23 = 24 = 25 = LED (flashes when a new call has been received) Delete Call back, confirm Tone slide control Amplify LED Caller ID mode button Amplify button Speakerphone volume slide control Handset Mute Scroll left Menu Scroll right Earpiece volume control Quick Dial M1 (emergency call number 1) Phone book Quick Dial M2 (emergency call number 2) Quick Dial M3 (emergency call number 3) Quick Dial M4 (emergency call
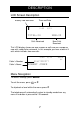
DESCRIPTION LCD Screen Description Time and Date Battery Low Icon level 9:52 9/12 TOTAL:04 NEW:02 New Calls Received Calls Received This LCD display shows the total number of calls and the number of new calls ready to be reviewed. In this example you have a total of 4 calls which includes two new calls. 9:52 Caller’s Number Caller’s Name 9/12 call# 02 01517222277 ROBERT JONES Menu Navigation To access settings, press MENU. To exit the menu, press .
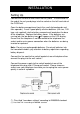
INSTALLATION Setting Up Connect the handset to one end of the curly cord. The connector at the end of the curly cord plugs into the socket on the left hand side of the CL330 unit. Open the battery compartment (push the small clip backwards and then upwards). Insert 4 good quality alkaline batteries (AA size, 1.5V type, not supplied) into the battery compartment located on the base of the telephone. Replace the battery cover.
INSTALLATION Note: Mains power is required to power the multifunction features of the telephone. Fit 4 x AA sized batteries in order to save and use stored numbers in case of mains power failure. Without mains or battery power, the telephone can still be used to answer calls or to manually dial out calls but all the multifunction features will not be available. If no batteries are inserted, the low battery icon will be displayed on the LCD display.
INSTALLATION Wall Mounting Drill two holes vertically one above the other, 83mm apart, and leave the screws protruding from the wall by 5mm. Caution: Ensure there are no electrical lines, water pipes etc. in the wall where the holes are drilled. Turn the hook in the receiver cradle so that the receiver can be placed on-hook.
SETTINGS Language Setting You can choose between 5 different languages. Each language has voice announcements available in that language.
SETTINGS Screen Contrast Setting Your screen has a backlight which automatically switches off after 15 seconds of inactivity. The contrast of the backlight against the text can be increased or decreased.
SETTINGS Time Setting If you subscribe to a Caller Display service, the date and time will be set whenever you receive a call. However, if you do not subscribe to this service, you will need to set the date and time manually. Press MENU Use ⊳ or to select TIME/DATE Press OK to confirm The HOUR digit will flash. Use ⊳ or to select the correct hour Press OK to confirm The MINUTE digits will flash. Use ⊳ or to select the correct minute Press OK to confirm The DAY digit will flash.
SETTINGS Voice Function Setting When the VOICE function is ON, in pre-dial mode numbers 0-9, numbers held in the call log, numbers held in the phone book and a caller’s name (if recorded, see Phonebook Chapter – Storing Name Recording) will be announced in the loudspeaker.
SETTINGS Flash (Recall) Setting Your phone works with a time break recall for United Kingdom (R=100ms). In France, flash time setting should be R=300ms. This value can be set to 100, 300 or 600. Press MENU Use ⊳ or to select FLASH Press OK to confirm Use ⊳ or to select 100/300/600 Press OK to confirm Press to exit Dialling Mode (Tone/Pulse) Settings In the UK, all telephone exchanges now use Tone dialing.
SETTINGS Ringer Volume Setting A switch located on the right side of the CL330 unit allows the ringer to be switched to LOW, MEDIUM or HIGH.
USING THE TELEPHONE Making a Call Pick up the handset. When you hear the dialling tone, dial the number on the keypad. The number will be displayed on the LCD display To end the call simply replace the handset in the cradle Pre-dialling If VOICE is activated, once you press the number keys 0-9 you will hear the number being dialled. Key in the required number without lifting the handset..
USING THE TELEPHONE Making a Call – Hands Free Dial the number on the keypad in the on-hook position Use C if necessary to cancel and correct a wrong digit Press and the number will be dialled automatically. The handsfree function (speaker) is now activated and the LED indicator next to the button will be illuminated. When the third party answers the call, you may speak with the telephone in the hands free mode ( handset in the cradle).
USING THE TELEPHONE Receiving a Call When an incoming call is received, the telephone rings. If the caller can be identified (due to subscription to a Caller Display service), the caller’s telephone number will be displayed. The caller’s name will also be displayed provided that the number and name stored are in the phone book.
USING THE TELEPHONE Mute Function If you wish, you can speak privately to someone else in the room without your caller overhearing. You will still be able to hear the caller but they cannot hear you during the mute operation. To switch on the mute mode during a call just press and hold button. Your caller will not be able to hear you anymore. Release to resume the conversation with your caller.
USING THE TELEPHONE Call Timer Your handset automatically times the duration of every external call. The time is shown during the call and for a few seconds after the call has ended. Hearing Aid Use This telephone is hearing aid compatible. Select the T mode on your hearing aid to enable this feature. Headset Use A headset can be connected at the rear side of the base ( jack 2.5mm) button then dial your number , the volume and tone Press the can be adjusted like described P20.
CALLER DISPLAY The features described in this section are only available if you subscribe to a Caller Display service from your network provider. Caller Display means you can see who is calling before you answer a call or see who has called in your absence (provided the number is not withheld, unavailable or is an international call). If the number is stored in the phonebook, the caller’s name is also displayed Whether you take a call or not, the caller’s details are stored in the Call log.
CALLER DISPLAY View Caller Display List If you are in "Phone book" mode ( displayed) press first "CLIP" will be displayed ( near the month) button Use ⊳ or to scroll through the caller display list Notes: At the end of the caller display list the LCD display will display END OF LIST.
CALLER DISPLAY Delete an Entry from the Caller Display List Use ⊳ or to scroll through the caller display list until you find the telephone number you wish to delete Press C, DELETE? will be shown on the LCD display Press and hold C until the telephone number disappears Press to exit Delete All Entries from the Caller Display List Use ⊳ or to scroll through the caller display list until you find the telephone number you wish to delete Press and hold C, DELETE ALL? will be shown on the LCD display Pres
CALLER DISPLAY Copying a Number to the Phone Book Use ⊳ or to scroll through the caller display list until you find the telephone number you wish to copy Press MENU until the display shows COPY TO MEMORY Press OK SAVED will displayed 25
PHONE BOOK Telephone numbers and associated names can be stored in the phone book. The phone book can contain 30 telephone numbers (maximum of 22 digits) with names (maximum of 16 letters). If you subscribe to a caller ID service the name in the phone book will be shown for incoming calls.
PHONE BOOK Say the desired name. Speak clearly and at a distance of 1520cm from the machine. The recording can be up to 3 seconds long Release OK Press when you are ready to exit 1.. [Space character] + & - / 1 2.. A B C 2 3.. D E F 3 4.. G H I 4 5.. J K L 5 6.. M N O 6 7.. P Q R S 7 8.. T U V 8 9.. W X Y Z 9 * .. ‘ @ ( ) * 0.. , . : ; ? 0 #.. $ _ % ! # Some telephone systems require a pause to be inserted when dialling a number.
PHONE BOOK Store/Change a Name Recording Press MENU Use ⊳ or to select NAME RECORDING Press OK to confirm Use ⊳ or to select the desired telephone number Press and hold OK until a tone is heard Say the desired name. Speak clearly and at a distance of 1520cm from the machine.
PHONE BOOK Delete a Name Recording Press MENU Use ⊳ or to select NAME RECORDING Press OK to confirm Use ⊳ or to select the desired telephone number to be deleted Press C while the recording is played back Press when you are ready to exit View Phone Book Entries Press Use ⊳ or to scroll through the phone book entries.
PHONE BOOK Dialling using a Phone Book Entry Locate the required telephone number as shown in one of the above methods (see View Phone Book Entries) Press OK. The number will be dialled automatically. If names have been recorded, they will be read aloud for the chosen entry. Modify a Phone Book Entry Locate the required telephone number as shown in one of the above methods (see View Phone Book Entries) Press and hold MENU until the LCD display shows EDIT?.
PHONE BOOK Delete a Phone Book Entry Locate the required telephone number as shown in one of the above methods (see View Phone Book Entries) Press C, DELETE? will be shown on the LCD display Press and hold C until the telephone number disappears Delete all Phone Book Entries Locate any telephone number as shown in one of the above methods (see View Phone Book Entries) Press and hold C, DELETE ALL? will be shown on the LCD display Press and hold C until the telephone number disappears Press to exit 31
QUICK QUICK DIAL DIAL M1, M2, M3 and M4 can also be used as quick dial locations.
TROUBLESHOOTING No display • Make sure that the power adaptor is plugged in correctly and is not damaged CL330 does not ring • Make sure that the telephone line cord is plugged in correctly and is not damaged • Connect another telephone to the telephone PTT socket or move your telephone to another socket to track if the failure is coming from your telephone or your PTT socket • There may be too many communication devices connected to a single telephone line e.g.
SAFETY INFORMATION General Only use the power supply included with the product. Do not open the unit (except to replace the batteries). Contact the helpline for all repairs. Never dispose of batteries in a fire. There is a serious risk of explosion and/ or the release of toxic chemicals. Cleaning Clean the telephone with a soft cloth. Keep the base and handset charging contacts clean. Never use polishes or cleaning agents they could damage the finish or the electrics inside.
GUARANTEE From the moment your Geemarc product is purchased, Geemarc guarantee it for the period of one year. During this time, all repairs or replacements (at our discretion) are free of charge. Should you experience a problem then contact our help line or visit our website at www.geemarc.com. The guarantee does not cover accidents, negligence or breakages to any parts. The product must not be tampered with or taken apart by anyone who is not an authorized Geemarc representative.
GUARANTEE Electrical connection: The apparatus is designed to operate from a 230V 50Hz supply only. (Classified as ‘hazardous voltage’ according to EN60950 standard). The apparatus does not incorporate an integral power on/off switch. To disconnect the power, either switch off supply at the mains power socket or unplug the AC adaptor. When installing the apparatus, ensure that the mains power socket is readily accessible.
RECYCLING DIRECTIVES The WEEE (Waste Electrical and Electronic Equipment) has been put in place for the products at the end of their useful life are recycled in the best way. When this product is finished with, please do not put it in your domestic waste bin. Please use one of the following disposal options: - Remove the batteries and deposit them in an appropriate WEEE skip. Deposit the product in an appropriate WEEE skip. - Or, hand the old product to the retailer.
SOMMAIRE SOMMAIRE 38 INTRODUCTION Composition 40 41 DESCRIPTION Général Afficheur Navigation menu 42 44 44 INSTALLATION Connection Installation murale 45 46 REGLAGES Sélection langage Contraste écran Réglage date/heure Guide vocal Temps de coupure (Flash) Mode de numérotation Volume sonnerie Mélodie sonnerie 47 48 49 50 51 51 52 52 UTILISATION DU TELEPHONE Appeler Pré-numérotation Mode mains libres Répondre à un appel Répondre en mode mains libres Rappel du dernier numéro composé ( bis ) Fonction
SOMMAIRE FONCTIONS AVANCEES ( présentation du numéro) Visualiser le journal d'appels Appeler depuis le journal Supprimer une entrée du journal Effacer tous les numéros du journal Copier un numéro du journal dans le répertoire 58 59 59 60 60 61 REPERTOIRE Enregistrer un numéro Enregistrer/Modifier une entrée vocale Effacer une entrée Recherche alphabétique Appeler à partir du répertoire Modifier une fiche Effacer une fiche Supprimer le répertoire 62 63 64 64 65 65 66 66 MEMOIRES DIRECTES Enregistrer un n
INTRODUCTION Merci d'avoir acheté notre modèle "CL330". Ce téléphone vous offre les avantages d'un téléphone multifonctions : main-libre, répertoire, affichage du nom et N° de l'appelant * , annonce vocale Il est important de bien lire les instructions décrites dans cette notice afin de profiter d'une utilisation maximale de votre téléphone.
INTRODUCTION Composition Lors du déballage vous devez trouver : • 1 Combiné • 1 Base CL330 • 1 Adaptateur secteur • 1 Cordon de ligne Visitez notre site sur www.geemarc.
DESCRIPTION Description Générale 1 CALL# CLIP 2 3 OK C 11 12 MENU 13 4 5 TONE 6 ? 14 VOLUME M1 15 16 M2 17 M3 18 M4 19 7 8 9 20 21 R 10 42 22 23 24 25 26
DESCRIPTION 1= LED (clignote lors d'un appel reçu en absence) 2= Correction, retour 3= Rappel ou confirmation 4= Réglage Tonalité 5= Voyant amplificateur 6= Mode "Présentation nom & numéro" 7= Touche amplificateur 8= Réglage volume "mains libres" 9= Combiné 10= Touche 'secret' 11,13= Touches de navigation dans le menu 12= Menu 14= Réglage volume écouteur 15= Mémoire directe M1 16= Accès répertoire 17= Mémoire directe M2 18= Mémoire directe M3 19= Mémoire directe M4 20= Voyant "mains libres" 21= Bouton "mai
DESCRIPTION Description de l'afficheur Niveau usure pile Date et heure 9:52 9/12 NVX NEW:02 TOTAL:04 Nouveaux appels Appels reçus L'affichage : TOTAL 4 inclus les 2 nouveaux appels 9:52 N° de l'appelant Nom de l'appelant 9/12 01517222277 ROBERT JONES Dumont Marc Navigation dans le Menu Appuyer sur la touche MENU pour accéder et sur pour en sortir Utiliser les touches ⊳ et pour naviguer dans le menu Sans aucune action sur les touches pendant 20 secondes, le retour en "standby" se fera automa
INSTALLATION Effectuer le branchement comme indiqué ci-dessous Connexion combiné Prise téléphonique Adaptateur 240V - Ouvrez le compartiment à piles (sous la base). - Insérez 4 piles alcalines sans mercure (type AA 1.5V) en respectant les polarités dans le compartiment situé en dessous de l’appareil. - Refermez le compartiment. - Branchez le cordon de ligne à l’arrière de votre téléphone puis dans votre prise murale(*). - Branchez l’adaptateur secteur (**).
INSTALLATION Montage mural 1) Percer 2 trous à la verticale espacés de 83mm , mettre 2 vis laissant dépasser la tête de 5mm 2) Positionner l'arrière de la base ( orifices centraux) sur les 2 têtes de vis , puis faire glisser le téléphone vers le bas afin de le fixer 3) Pour maintenir votre combiné en position verticale, faire pivoter d'un demi tour l'ergot situé sur la base sous le combiné Attention : Avant de percer dans le mur , assurez-vous de ne pas rencontrer de fils electriques, tuyaux ....
REGLAGES Langage 5 langues sont disponibles , avec aide vocale Appuyer sur MENU Utiliser ⊳ ou pour sélectionner Appuyer sur LANGUE OK Utiliser ⊳ ou pour sélectionner le langage Appuyer sur Appuyer sur 47 OK pour sortir
REGLAGES Contraste Vous pouvez faire varier la luminosité de l'écran ( retro-éclairage). Sans aucune action , l'écran s'éteindra au bout de 15 secondes.
REGLAGES Date et Heure Si vous êtes abonné au service "Présentation du nom et du N°" , la mise à jour et l'heure se fera automatiquement.
REGLAGES Aide Vocale Lorsque la fonction "AIDE VOCALE" est activée (Parole Marche) les chiffres de 0 à 9 , ainsi que tous les N° en mé moire (répertoire, journal d'appels, mémoires M1-M4 ) seront annoncés oralement Appuyer sur MENU Utiliser ⊳ ou pour sélectionner GUIDE VOCAL Appuyer sur OK Utiliser ⊳ ou pour sélectionner Parole Marche ou Parole Arrêt Appuyer sur Appuyer sur 50 OK pour sortir
REGLAGES Temps de coupure (Flash) Pour la France le temps de "Flash" est R=300ms, mais peut être réglée à 100, 300 ou 600ms pour d'autres pays Appuyer sur MENU Utiliser ⊳ ou pour sélectionner TOUCHE Appuyer sur OK Utiliser ⊳ ou pour sélectionner Appuyer sur Appuyer sur R 100/300/600 OK pour sortir Mode Numérotation Tous les centraux téléphoniques acceptent la numérotation en fréquences vocales.
REGLAGES Volume Sonnerie Un interrupteur sur le côté droit vous permet d'ajuster le niveau FAIBLE, MOYEN, ELEVE Mélodie Sonnerie 3 choix sont possibles Appuyer sur MENU Utiliser ⊳ ou pour sélectionner MEL.
UTILISATION Appeler Décrocher le combiné Lorsque vous entendez la tonalité, vous pouvez numéroter En fin de conversation , reposer le combiné Pre-numérotation Si le mode "Aide vocale" est activé les chiffres numérotés seront énoncés Composer le numéro sans décrocher le combiné La touche C permet de corriger une erreur Décrocher le combiné OU appuyer sur OK OU appuyer sur , votre numéro se compose En fin de conversation , reposer le combiné OU appuyer sur 53
UTILISATION Appeler en mode mains libres Composer le numéro sans décrocher le combiné La touche C permet de corriger une erreur appuyer sur , votre numéro se compose. La lampe rouge sur la touche est allumée.
UTILISATION Répondre à un appel Lors d'un appel entrant , le téléphone sonne , lesvoyants rouges du bas clignotent. Si le mode vocal est validé et que l'appelant correspond à une personne enregistrée vocalement dans le répertoire, votre CL330 sonnera et annoncera le nom, et cela 3 fois Ensuite le CL330 repassera en mode sonnerie standard . ( Pour plus de détails, voir chapître "Répertoire" , Créer une entrée ).
UTILISATION Fonction Secret Cette touche permet de couper ponctuellement le microphone en cours de communication. - Maintenez appuyé cette touche, votre correspondant ne vous entend plus. - Relâchez-la pour rétablir la conversation. Volume du combiné Vous pouvez ajuster le niveau sonore de réception dans le combiné.Utilisez le bouton situé sur la face avant pour régler le niveau.
UTILISATION Chronomètre Dès que vous décrochez le combiné , le chronomètre s'active à l'écran et s'efface quelques secondes après le raccrochage Appareil auditif Le CL330 est compatible avec la plupart des appareils auditifs Pour cela , passez en mode "T" sur votre appareil Utilisation d'un casque Vous pouvez connecter un casque ( prise jack 2.5mm) à l'arrière de la base. Appuyez sur la touche , puis numérotez . Le volume ( partie combiné) ainsi que la tonalité peuvent réglés comme décrit P56.
Présentation du nom et du numéro* * Ces services sont accessibles seulement par abonnement. Contactez votre opérateur pour plus de renseignements. Grâce à ce service, le nom et le numéro de la ligne à partir de laquelle votre correspondant vous appelle peuvent s’afficher sur votre écran. Les numéros de vos correspondants sont mémorisés dans le «journal des appels reçus», 64 numéros maximums peuvent être mémorisés. Si des noms ont été affectés aux numéros , moins de 64 fiches seront mémorisées.
Présentation du nom et du numéro Visualiser le journal d'appels Si vous êtes en mode "Répertoire" ( la touche , "CLIP" s'affiche affiché) , appuyez d'abord sur Utiliser ⊳ ou pour sélectionner l'appel dans la liste Notes: Après avoir parcouru toute la liste , l'afficheur indiquera "FIN DE LISTE" .
Présentation du nom et du numéro Supprimer une entrée du journal d'appels Utiliser ⊳ ou pour sélectionner le numéro à effacer Appuyer sur C, EFFACER? s'affichera Maintenez appuyé C jusquà ce que le numéro s'efface Appuyer sur pour sortir Effacer le journal d'appels Utiliser ⊳ ou pour entrer dans la liste Maintenez appuyé C, "TOUT EFFACER ?" s'affiche Maintenez appuyé C, le numéro s'efface, toute la liste est aussi effacée, PAS D'APPEL s'affiche 60
Présentation du nom et du numéro Copier un numéro du journal dans le répertoire Utiliser ⊳ ou pour sélectionner le numéro à copier Appuyer sur MENU jusqu'à ce que COPIER EN MEM s'affiche Appuyer sur OK , ENREGISTRE s'affiche 61
REPERTOIRE Vous pouvez mémoriser 30 numéros ( 22 chiffres maximum) et noms ( 16 lettres maxi) dans le répertoire. Si vous avez souscrit au service "Présentation du numéro et du nom" ( identification de l'appelant ), les noms et numéros enregistrés s'afficheront lors d'un appel en provenance de ces personnes.
REPERTOIRE Enregistrer/Modifier une entrée vocale Chaque entrée du répertoire peut être associée à une séquence vocale ( nom), qui sera annoncée lors de la sélection de cette entrée si le mode "vocal" a été validé ( ON) . Appuyez sur Utilisez les touches MENU ⊳ ou pour selectionner ENREGISTRER NOM Appuyez sur OK Utilisez les touches ⊳ ou pour selectionner le numéro Maintenez appuyé OK jusqu'à entendre une tonalité.
REPERTOIRE Effacer une séquence vocale Appuyez sur MENU Utilisez les touches ⊳ ou pour selectionner ENREGISTRER NOM Appuyez sur OK Utilisez les touches ⊳ ou pour selectionner le numéro et effacer la séquence vocale associée Appuyer sur C pendant l'annonce, le symbole "Voice" disparaît Appuyer sur pour sortir Rechercher une entrée Appuyer sur Utilisez les touches ⊳ ou pour lister les numéros.
REPERTOIRE Appeler à partir du répertoire Selectionner une entrée comme précedemment (§ rechercher une entrée) Appuyer sur OK, votre numéro se compose. Si une séquence vocale a été enregistrée et que le mode "Vocal" est validé, l'annonce sera émise Modifier une fiche du répertoire Selectionner une entrée comme précedemment ( § rechercher une entrée) Maintenez appuyé MENU jusqu'à l'affichage EDITER?.
REPERTOIRE Effacer une fiche du répertoire Selectionner une entrée comme précedemment ( § rechercher une entrée Appuyer sur C, EFFACER? s'affiche Maintenez appuyé C jusqu'à l'effacement Appuyer sur pour sortir Effacer tout le répertoire Selectionner une entrée comme précedemment (§rechercher une entrée) Maintenez appuyé C, EFFACER TOUT? s'affiche Maintenez appuyé C jusqu'à l'effacement , toutes les fiches du répertoire sont détruites , VIDE s'affiche Appuyer sur pour sortir 66
MEMOIRES DIRECTES M1 à M4 peuvent être aussi utilisées comme mémoires simples à accès direct Enregistrer un numéro Appuyez sur MENU Utilisez ⊳ ou pour selectionner ENREGISTRER NUM Appuyer sur OK Entrer votre numéro , utiliser la touche C pour corriger si necessaire Appuyer sur OK Appuyer sur la touche mémoire désirée ( M1 à M4 ) ENREGISTRE s'affiche Effectuer un appel depuis M1- M4 - Appuyer sur une des 4 touches M1, M2, M3 ou M4 - Décrochez le combiné , ou appuyez sur la touche le numéro se comp
EN CAS DE PROBLEME Pas d'affichage Assurez-vous que le cordon et l'adaptateur sont bien connectés. Pas de sonnerie, pas de tonalité - Vérifier votre connexion téléphonique ( cordon + prise) Brancher un autre téléphone dans la même prise murale, afin de vous assurez que cela ne provient pas de votre ligne Pas d'affichage du nom et du numéro - Vérifier auprès de votre opérateur que vous avez bien souscrit à ce service .
SECURITE / ENVIRONNEMENT General Utiliser seulement l'adaptateur secteur fourni Ne jamais ouvrir le combiné ou la base. Ne pas jeter les piles dans un feu ou dans une poubelle, ramenez les à un centre de collecte. Nettoyage Nettoyez le téléphone à l’aide d’un linge doux. N’utilisez jamais de crèmes à polir ou de produits d’entretien car cela pourrait endommager le plastique ou les circuits électriques intérieurs.
GARANTIE Cet appareil est garanti 1 an pièces et main-d'oeuvre. La date d'achat figurant sur le ticket de caisse fera foi. Cette garantie s'exerce sous réserve d'une utilisation normale de l'appareil. Les dommages occasionnés par les surtensions électriques, la foudre ou par un choc sur l'appareil ne peuvent en aucun cas être couverts par la garantie.