CAUTION: THIS TELEPHONE PRODUCT IS SPECIFICALLY DESIGNED FOR PEOPLE WITH HEARING DIFFICULTIES AND IS PROVIDED WITH A HANDSET EARPIECE WITH VOLUME CONTROLFOR INDIVIDUAL REQUIREMENTS. DUE CARE MUST BE TAKEN BY ALL USERS THAT THE HANDSET EARPIECE VOLUME CONTROL IS SET TO THE LOWEST LEVEL ACCEPTABLE BY EACH RESPECTIVE USER. CARE SHOULD THEREFORE BE EXERCISE TO ENSURE THAT ANY NEW USERS ARE FAMILIAR WITH THIS REQUIREMENT.
3 4 5 5 12 12 13 13 14 14 15 15 17 17 18 20 20 20 21 21 22 24 24 INTRODUCTION Unpacking the Telephone DESCRIPTION General Description INSTALLATION Location Setting Up Battery Use BASE SETTINGS Base Ringer Volume HANDSET SETTINGS Ringer Settings Shaker Settings Handset Registration Technical Settings USING THE TELEPHONE Making a Call Receiving a Call Recalling Recent Numbers Deleting Recent Numbers Receiving Volume and Tone Adjustment Paging the Handset Call Timer 1 1 CONTENTS CONTENTS 32 32 37 40
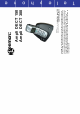
✑ Mains power adaptor ✑ Telephone line cord 2 x AAA rechargeable batteries 1 Battery compartment cover • • • • • Its is important that you read the instructions below in order to use your Geemarc telephone to its full potential. Keep this user guide in a safe place for future reference. This guide explains how to use the following telephones: Ampli DECT150 Ampli DECT300 3 This guide applies to single and multiple handset systems.
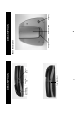
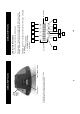
Menu Key Phonebook keys Confirm/Scroll key LCD display Incoming Call /New Message Indicator Handset Description General Description 5 Microphone DESCRIPTION Amplifier key Keypad 1 and 3 used to scroll through the menu options Call List key Cancel key Receive and end call key Speaker Battery compartment cover Volume button adjustment 6 DESCRIPTION Belt clip
Answering Machine key 7 Tone adjustment Amplifier key DESCRIPTION Shaker switch Charge contacts Base Description 8 Handset cradle DESCRIPTION Page key
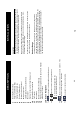
*Power adaptor socket 9 (*)Classified “hazardous voltage” according to EN60950 standard (**) Classified TNV-3 according to EN60950 standard **Line socket Base Ringer volume setting DESCRIPTION 6 Icon area 1 7 8 2 9 10 11 3 12 4 13 5 14 10 Main area The main area. This is found across the centre of the screen. It displays the following: • number being dialled • call display information • phonebook The icon area. This is found around the outside of the screen.
Flashing= Handset not registered to the base, Fixed= Handset registered to the base (New) Answering Machine Message keys are used to scroll through the menu. : move backward through the menu : move forward through the menu and key is used to activate and deactivate the menu. The 11 key is used to cancel an action/entry. key is used to confirm an action or choice on a screen. This The key is also used to scroll through some submenus. The The 12 The telephone has a range of up to 300 metres.
13 (*) Classified “hazardous voltage” according to EN60950 standard (**) Classified TNV-3 according to EN60950 standard. If the handset battery symbol is empty and flashing and you hear a warning beep you will need to recharge your handset before you can use it. If the phone does not have enough power or is not completely recharged, it will switch itself off automatically until it is returned to the base .
and 15 There is a choice of seven handset ringer melodies for phone book 2. The selected melody will notify you that the incoming call is from a telephone number stored in phone book 2. This setting is only relevant if you have subscribed to a Caller Display service. Phone Book Two Ringer Settings There is a choice of seven handset ringer melodies for phone book 1. The selected melody will notify you that the incoming call is from a telephone number stored in phone book 1.
17 (factory setting). The icon will be fixed on the display. If this icon is flashing, the handset is not registered to the base and you will need to register it. (See Additional Handsets and Bases section). The handset that came with your base is already registered to the base Handset Registration Shaker Off 18 This setting enables you to insert a 3 second pause after the first digit dialed. The rest of the telephone number is dialed normally.
icon - and .
Press and Press Press Use to scroll through the list in order to find the number you wish to delete 21 to exit the menu and return to the standby position and the number will be deleted. A short beep will be heard as a means of confirmation and Press Deleting Recent Numbers . and the number will be dialled automatically to scroll through the list in order to find the number you wish to dial NOTE: To exit this menu at any time, press Use .
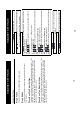
20db TONE 24db 28db Treble +10db max Bass +10db Max 4db 8db TONE 12db VOLUME 23 16db Treble +10db max during a call will turn off the tone controls. Pressing the Amplify key However, you can still adjust the handset receive volume with the Volume button at the rear of the handset. The additional amplification is deactivated each time you use the will be lit. The tone controls and telephone. The Amplify key is not lit, press it to activate the volume button are still activated.
Key 1 2 3 4 5 Key 6 7 8 9 0 25 Characters (space) - 1 ABC2 DEF3 GHI4 JKL5 Characters MNO6 PQRS7 TUV8 WXYZ9 0 IMPORTANT: Even if a caller is stored in a phone book, the normal ring tone may be triggered as the caller may have used the private number function. See Ringer Settings section to change the ringer melodies for either phone book. 3. Calls from names and phone numbers in the second phone book It is possible to have a different ring tone for each of the phone books.
Press and and Press to scroll through the phonebook to find the number you wish to dial 27 Enter the new number and press to store The number will be displayed.Digits can be deleted pressing Use . Select the desired phonebook by pressing or Modify a Phone Book Entry or .
Press Press Press 29 to exit and to return to standby to display the date and time of the call to display the telephone number Use and to scroll through the call list. Name will be displayed if present in the phone book, otherwise number will be displayed.
and to scroll through the call list to find the number you wish to store Press Use 31 to store the entry. A beep will be heard to confirm storage to correct an incorrect character Select the desired letter by pressing on the corresponding key on the numerical keypad Enter a name corresponding to the telephone number.
33 This icon will be displayed, however, not flashing when you have messages that you have listend to but not deleted. This icon will flash when you have a new message. The new message indicator will also be lit. Listening to Messages ANSWERING MACHINE 1-10:53 Press 34 to exit Whilst listening to messges: = toggle between earpiece and speaker mode = Start the message again = Skip to the next message = Stop = Start at the beginning of all the messages If you have old messages.
. A beep will be heard Record your outgoing message and then Press to exit to stop recording. A second tone will be heard Press button located on the right side of your telephone 35 NOTE: The outgoing message can only be recorded whilst there are no messages being read. Press Press The answering machine has a default outgoing message “ Please leave your message after the tone”.
and 37 The telephone can record up to 4 min. 40 secs of top quality messages or 7 min. of standard quality messages. The default is top quality. Recording Quality A confidential ID code is required to activate/deactivate the answering machine or read your messages from a remote external telephone. The default code is 1111.
icon - and to select the icon and enter the answering machine menu .The selected icon will flash on the display to scroll through the menu to find the desired ringer to activate the menu to exit the menu and return to the standby position Press 39 to confirm the settings and exit the volume menu 1/1 ++++ Press ++++ is maximum volume + is minimum volume Use and to scroll through the 4 volume options available in the volume menu to find the desired volume.
* key 41 Hang up the telephone when all the messages have been read 2 = Start at the beginning of all the messages 6 = Delete the message 8 = Stop 1 = Start the message again 3 = Skip to the next message The answering machine will announce the number of messages received.
43 If you buy new handsets to use with your Ampli DECT telephone, they will have to be registered to the base before you can use them. Using Several Handsets The additional handsets will not be equipped with the answering machine function. This function is only assigned to the main handset (Ampli DECT 300 only). You can also register up to 2 bases to each handset. This will increase the phone range, allowing you to move between the telephone coverage areas.
followed by to activate the menu 1/1 0000 followed by to activate the menu 1/1 0000 45 The current handset will be deregisterd from the base Use the keypad to type in the base PIN (default 1111) Press Press Handset Deregistration for Current Handsets All additional handsets will be deregisterd from the base Use the keypad to type in the base PIN (default 1111) Press Press Handset Deregistration for All Additional Handsets ADDITIONAL HANDSETS & BASES to answer the call Press to transfer t
button on the new base, all 47 IMPORTANT: If you connect several bases together, the handsets registered to the additional bases will ring for a few seconds during an incoming call even if you take the line with one of the first base handsets. actually registered, simply press the handsets registered to this base will ring. To check if your handset or all handsets registered to this new base are Remark: The first registered handset has priority on the first base.
49 icon must be fixed. If it is flashing, you must register the handset (see Handset Registration section) A warning tone is heard during a call: • The batteries are empty. The handset needs to be replaced in the base in order to recharge. • You are over the base coverage area. • General Checks • Make sure that the telephone line cord and adaptor are correctly plugged in and they are not damaged. • Make sure the batteries are inserted correctly. • Make sure that the batteries are fully charged.
51 Factory settings will have been restored Use the keypad to type the following code The display will clear Use the keypad to type the following code once pressed down) All the icons will be displayed on thescreen Release has stopped flashing Replace the battery (keeping Press Remove one of the batteries icon The factory settings can be restored to the telephone. This is very useful if you forget the secret PIN code you set up. The factory PIN code is 1111.
53 DECLARATION: Geemarc Telecom SA hereby declares that this product is in compliance with the essential requirements and other relevant provisions of the Radio and Telecommunications Terminal Equipment Directive 1999/5/EEC and in particular article 3 section 1a, 1b and section 3. The telephone does not operate if the line current is lower than 18 mA.