SCREENPHONE English
CONTENTS CONTENTS 1 INTRODUCTION Unpacking the Telephone 3 4 DESCRIPTION General Description 5 5 INSTALLATION Connection/Setting Up Wall Mounting Desktop 12 12 14 14 SETTINGS Ringer and Alert Setting LCD Screen Settings Amplify MainText Font Size Adjustment Message Waiting 15 15 15 16 17 18 USING THE TELEPHONE Making a Call Receiving a Call Text Only Calls Alernative Dialling Call Time Counter Last Number Redial Mute Function R, * and Hash Keys Emergency Button Receive Volume and Tone Adjustment S
CONTENTS Saving Answerphone Messages Deleting Answerphone Messages 37 38 CALLER DISPLAY Viewing the Call Log Saving a Call Log Record Deleting a Call Log Record Dialling a Number from a Call Log Record Store a Number from a Call Log Record 39 41 42 43 44 46 PHONEBOOK Create a Quick Dial Entry Create a Phonebook Entry Edit a Quick Dial or Phonebook Entry Delete a Quick Dial or Phonebook Entry Dial a Quick Dial or Phonebook Entry 50 50 53 55 56 57 FACTORY DEFAULT Restore to Factory Default 58 58 OPTIO
INTRODUCTION Congratulations on purchasing your Geemarc SCREENPHONE telephone. This telephone allows hard of hearing people to communicate with other people via the telephone network with the assistance of a Text Relay operator. You can use this phone to speak directly to the other caller, while reading their response as text on the screen.
INTRODUCTION Unpacking the Telephone When unpacking the telephone, you should find the following in the box: • 1 SCREENPHONE unit • 1 SCREENPHONE handset • 1 handset curly cord • 1 Telephone line cord • 1 Mains power adaptor • 1 User Guide • 1 Quick Guide NOTE: The telephone lead supplied must be used and the ScreenPhone cannot be used with the 1571 service.
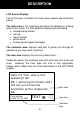
DESCRIPTION General Description Front Description LCD Display Additional Amplify Key Tone Adjustment for Incoming Calls New Message Indicator Volume Adjustment for Incoming Calls Phonebook Emergency Key Answer Phone Screen Navigation Keys Numerical Keypad Mode Key Voice/Text Flashing Incoming Call Indicator (strobe light) Last Number Redial Time Break Recall 5 Mute Quick Dial for Typetalk Service
DESCRIPTION Left Side Description Handset cord Handset cord socket Handset clip for wall mounting 6
DESCRIPTION Right Side Description Screen Tilt Ringer Level Adjustment Screen Contrast Adjustment Voice Announcement Validation Key Switch Base Description Wall Mounting Holes Message Waiting Setting Battery Compartment Cover 7
DESCRIPTION Rear Description DC 9V Keyboard Socket Headset Socket Strobe Switch Mains Adaptor Socket** Amplify Switch * Classified TNV-3 according to EN60950 standard ** Classified “hazardous voltage” according to EN60950 standard 8 Line Cord Socket*
DESCRIPTION LCD Screen Display The LCD screen is divided into three areas, please see illustration below: The main area is for displaying text when the telephone is being used in text mode. It is also used for displaying the following: • number being dialled • call log • menu system • phone book • answer phone typed messages The comment area displays help text to guide you through all operations you may need to perform. The icon area displays the various system icons.
DESCRIPTION Screen Navigation The buttons on the righthand side of the phone are used to navigate through screen menus. The S and T keys are used to scroll through the menu. S: move backward through the menu T : move forward through the menu The SELECT key is used to confirm an action or select a menu item. The C key is used to cancel an action/entry. If you press C from any menu (except whilst in number input mode), the telephone returns to the previous screen.
DESCRIPTION Icons on your screen display All the icons below are displayed in the ‘Icon Area’ (bottom right hand corner) on the screen. TEXT This shows that the the telephone is in text mode VOICE This shows that the the telephone is in voice mode Note: The phone can only be in one mode at any time. Mute is activated One or more voice messages have been received (relayed to text). When the telephone is operating under battery power, the full icon is shown if the battery is full.
INSTALLATION Connecting/Setting Up Connect the handset cord. Insert one end of the cord into the handset, the other into the telephone base – left side. Open the battery compartment. Insert 4 good quality alkaline batteries (AA size, 1.5V type, not supplied) into the battery compartment located on the base of the telephone. Replace the battery cover. Note: Do not use rechargeable batteries. Do not put batteries into the household rubbish, pay attention to battery regulations regarding battery disposal.
INSTALLATION Insert the mains adaptor into the socket located at the rear of the telephone DC 9V then plug the other end of the cable into a 13 amp wall socket. Please choose a socket which is easily accessible and near to your telephone socket. This means you can unplug the mains power quickly in case of a problem. NOTE: Fit 4 x AA sized batteries in order to save and use stored numbers in case of power failure.
INSTALLATION Wall Mounting Make 2 holes in the wall, 80mm apart (use the wall mount template, on page 64, as a guide). Insert the wall plugs and the wall mounting screws. The screws should protrude from the wall by 6-7mm. Place the telephone onto the screw-heads and slide down to secure. Handset clip To ensure that the handset stays firmly in position when the telephone is mounted, slide out the clip, turn it around and slide it back into the wall mounting position.
SETTINGS Ringer and Alert Settings Ringer Volume A switch located on right side allows the ringer to be switched OFF, LOW or HIGH. Your telephone is pre-set with the ringer switched to HIGH. HIGH OFF LOW Strobe A switch located at the rear allows the flash strobe to be switched ON or OFF. Your telephone is pre-set with the strobe switched to ON. When switched ON, the bright strobe light flashes when you receive a telephone call.
SETTINGS Amplify A switch located at the rear allows the amplification facility to be switched ON or OFF. Your telephone is pre-set with the Amplify switch at the OFF Postion. Amplify Switch at ON Position The additional amplification and tone controls are automatically activated each time you use the telephone. The LED light next to the amplify button will be lit. You can still turn the amplify feature off at any time, simply press the amplify button on the front of the telephone.
SETTINGS Main text font size adjustment You can adjust the font size while the telephone is in standby mode . ACTIONS Press Select or Sor T Use S and T to scroll through the menu to select ‘Font size’ Press Select Use S and T to select size of text S key –increases the main area font size by 1mm each time it is pressed. T key - decreases the main area font size by 1mm each time it is pressed The font size range is 5 – 12 mm.
SETTINGS Message Waiting A switch located on the base allows the telephone to be switched between different networks to receive message waiting signals. Position 1 and 2 are used with new services provided on hotel networks. 1 – The new call light will light when a new call is received. 2 – When you receive a message, the message-waiting indicator is lit to inform you that you have a message (e.g. from the hotel switchboard) 3 – This is used when using BT or another network messaging service.
USING THE TELEPHONE This telephone can operate in two modes: • Text mode – the telephone can be used to send* and receive typed messages • Voice mode - the telephone functions as a standard voice telephone allowing you to make voice calls to other voice telephone users Using a combination of these modes together with the help of a Text Relay operator, this telephone enables you to have two-way communication with a mixture of text and voice.
USING THE TELEPHONE Making a Call Standard Voice Call Pre-dial the Number, the number will appear on the screen Pick up the handset, the number will be dialled automatically To end the call simply replace the handset in the cradle Combination of Voice and Text call A Textphone user simply dials 18001 followed by the full telephone number of the person they wish to call. Once the call is answered by a hearing person, a Text Relay Operator will join the line to relay the call.
USING THE TELEPHONE ON SCREEN DISPLAY ACTIONS Pre-dial the number, with the handset in the cradle. You must use the prefix 18001 if you require the Text Relay operator. This can be entered using one of the following methods: manually using the keypad pressing the “18001” button on the telephone base. Pulling a number from the phonebook with 18001 already added. The telephone number must include full area code. Lift the handset The telephone automatically switches to Text mode as 18001 has been dialled.
USING THE TELEPHONE receive the following messages in the main area: Note: GA = Go Ahead A Press V/T key once you have received GA on screen B Telephone is now in Voice mode. You can speak directly to Caller X using the handset.
USING THE TELEPHONE Receiving a Call Standard Voice Call When an incoming call is received the telephone rings and the strobe light will flash (if set to flash). If the caller can be identified (due to subscription to a Caller Display service), the caller’s telephone number will be displayed.
USING THE TELEPHONE ACTIONS Caller X dials the SCREENPHONE User telephone number. This number must be prefixed with 18002.
USING THE TELEPHONE C Press V/T key Once you have given GA D Telephone is now in TEXT mode SCREENPHONE User awaits response.
USING THE TELEPHONE Text Only Calls You can also use this telephone to send typed messages (as well as receive them) via the Text Relay operator with an optional Geemarc keyboard. This plugs into the keyboard socket at the rear of the telephone. Making a Text Only Call ACTIONS Pre-dial the number, with the handset in the cradle. You must use the prefix 18001 if you require the Text Relay operator.
USING THE TELEPHONE The Text Relay operator has established Call connection with Caller X.You will receive GA the following messages in the main area: Note: GA = Go Ahead A The SCREENPHONE User can type text to the Operator once you have received GA The Operator will relay the text to speech for Caller X. When you have finished type GA. B SCREENPHONE User awaits response. GA This will appear in the form of a typed message on the screen.
USING THE TELEPHONE Receiving a Text Only Call ACTIONS Caller X dials the SCREENPHONE User telephone number. This number must be prefixed with 18002. The telephone number must include full area code ON SCREEN DISPLAY The 18002 prefix calls the Text Relay operator The SCREENPHONE telephone rings The SCREENPHONE User picks up handset Press V/T Mode key to enter TEXT mode SCREENPHONE user receives the following messages in the main area: A SCREENPHONE User can type text to the Operator.
USING THE TELEPHONE B SCREENPHONE User awaits response. This will appear in the form of a typed message on the screen. When GA appears it is your turn to type your response.
USING THE TELEPHONE Alternative dialling You can dial with the handset in an off-hook position, similar to a standard telephone. This is not as reliable as pre-dialling, however, it may be helpful to those used to dialling in this manner. Pick up handset. Dial the number on the keypad. To end the call simply place the handset on the cradle Call Time Counter When making a call the call time counter will be displayed 20 seconds after the last digit is dialled.
USING THE TELEPHONE Mute Function If you wish, you can speak privately to someone else is the room without your caller overhearing. You will still be able to hear the caller but they cannot hear you during the mute operation. During a call, press MUTE The LCD display will show which indicates that your voice is muted to the call and the caller cannot hear you speaking Press MUTE again to resume the conversation.
USING THE TELEPHONE Receiving Volume and Tone Adjustment You can alter the receiving volume and tone according to your hearing requirements. Use the Volume slide switch on the telephone base to adjust the level according to your hearing requirements. The Amplify button on the telephone base provides additional amplification and tone control in an ad hoc fashion. Use the Tone slide switch on the telephone base to adjust the level according to your hearing requirements.
USING THE TELEPHONE VOLUME (with amplify switched on) 15 db 30db TONE Bass +10db Max Treble +10db max Amplify Switch at OFF Position The additional amplification and tone controls are turned off each time you use the telephone. The LED light next to the amplify button will be off. Pressing the Amplify button once during a call will enable tone control and additional amplification. The LED light next to the amplify button will turn on to reflect this change.
USING THE TELEPHONE Standby Mode When the telephone is idle, the display may show the following type of information: 01 New Message 02 New Calls This informs you that there is one new answerphone message and details of two unanswered calls. This information is held in the call log. See Answerphone chapter about accessing Answerphone messages.
ANSWERPHONE If you are not available to answer a telephone call, the telephone can receive and save a typed message from the caller (via the Text Relay operator), provided they have used the 18002 prefix. The answer phone will be activated if a call is not answered after 8 rings. When someone leaves a message on your Answer phone, the new message indicator will light up and the New Message count seen in standby mode will increase by one.
ANSWERPHONE Viewing Answerphone Messages ON SCREEN DISPLAY ACTIONS Press Select or Sor T Use S and T to scroll through the menu to select‘Messages’ 01 New Messages 02 New Calls > Messages Font Size Phonebook Press Select >!#01 Message Message and call logs are held in ! #02 Missed Call chronological order. ! #01 Missed Call The most recent is at the top of the list. ! indicates a message is new.
ANSWERPHONE Saving Answerphone Messages ACTIONS Press Select or Sor T Use S and T to scroll through the menu to select‘Messages’ ON SCREEN DISPLAY 01 New Messages 02 New Calls > Messages Font Size Phonebook Press Select Message and call logs are held in chronological order. The most recent is at the top of the list. ! indicates a message is new.
ANSWERPHONE Deleting Answerphone Messages ACTIONS Press Select or Sor T Use S and T to scroll through the menu to select‘Messages’ ON SCREEN DISPLAY 01 New Messages 02 New Calls > Messages Font Size Phonebook Press Select >!#01 Message Message and call logs are held in ! #02 Missed Call chronological order. ! #01 Missed Call The most recent is at the top of the list. ! indicates a message is new.
CALLER DISPLAY The features described in this section are only available if you subscribe to a Caller Display service from your network provider. Caller Display means you can see who is calling on your LCD display (provided the number is not withheld, unavailable or is an international call). When your telephone rings the following will be displayed in the main area of the LCD Display.
CALLER DISPLAY Record number in the call log New Call Log record #02 NEW R01 05/04 Number of attempts from the same caller 14:12 LEE MOBILE 07771 123456 Telephone Number received (up to 24 digits) Date and Time of last call from this number If the telephone number matches an entry in the Phonebook or Quickdial memory, the name will be displayed (up to 20 characters) When the call log memory is full, a new call will take the place of the oldest call.
CALLER DISPLAY Viewing the Call Log ACTIONS Press Select or Sor T Use S and T to scroll through the menu to select‘Messages’ ON SCREEN DISPLAY 03 New Calls > Messages Font Size Phonebook Press Select !#04 Missed Call Message and call logs are held in >!#03 Missed Call chronological order. !#02 Missed Call The most recent is at the top of the #01 Missed Call list. ! indicates a message is new.
CALLER DISPLAY Saving a Call Log Record ACTIONS Press Select or Sor T Use S and T to scroll through the menu to select‘Messages’ ON SCREEN DISPLAY 03 New Calls >Messages Font Size Phonebook Press Select !#04 Missed Call Message and call logs are held in >!#03 Missed Call chronological order. ! #02 Missed Call The most recent is at the top of the #01 Missed Call list. ! indicates a message is new.
CALLER DISPLAY Deleting a Call Log Record ACTIONS Press Select or Sor T Use S and T to scroll through the menu to select‘Messages’ ON SCREEN DISPLAY 03 New Calls > Messages Font Size Phonebook Press Select Message and call logs are held in chronological order. The most recent is at the top of the list. ! indicates a message is new.
CALLER DISPLAY Dial a Number from a Call Log Record ACTIONS Press Select or Sor T Use S and T to scroll through the menu to select ‘Messages’ ON SCREEN DISPLAY 03 New Calls > Messages Font Size Phonebook Press Select !#04 Missed Call Message and call logs are held in >!#03 Missed Call chronological order. !#02 Missed Call The most recent is at the top of the list. #01 Missed Call ! indicates a message is new.
CALLER DISPLAY S and T to scroll through the menu to Return as: > Voice/Text select Voice only ‘Voice/Text’ if you want 18001 inserted before the telephone number. This will route your call via the Text Relay operator.
CALLER DISPLAY Store a Number from a Call Log Record ON SCREEN DISPLAY ACTIONS Press Select or Sor T 03 New Calls Use S and T to scroll through the menu to select‘Messages’ > Messages Font Size Phonebook Press Select Message and call logs are held in chronological order. The most recent is at the top of the list. ! indicates a message is new.
CALLER DISPLAY S and T to scroll through the menu to select Store with 18001?: > Yes No ‘Yes’ the telephone number wil be saved with 18001 inserted before the number.
CALLER DISPLAY Use the numerical keypad to enter the correct digits (See Phonebook Chapter for more detail) Press Select Save as: >Quick Dial Phonebook To save in Quick dial EITHER Using the keypad enter a quick dial location between 0 and 9 The name and number has been stored in the specified quick dial location Entry added Use S and T to scroll through the menu to select ‘Quick Dial’ >Quick Dial Phonebook OR Press Select Using the keypad enter a quick dial location between 0 and 9 The name and numbe
CALLER DISPLAY Save as: >Quick Dial Phonebook To save in the Phonebook EITHER Press Phonebook The name and number has been stored in the phonebook Entry added Use S and T to scroll through the menu to select ‘Phonebook’ Quick Dial >Phonebook The name and number has been stored in the phonebook Entry added OR Press and hold C or do not touch the keypad for 30 seconds to return to standby 49
PHONE BOOK Names and phone numbers can be stored in the quick dial memory or phone books available on the telephone. If you have subscribed to a Caller Display service and if the caller name and number have been stored in the phonebook, the name of the caller will be displayed alongside the number during the incoming call. The Quick Dial memory can hold 10 telephone numbers. The phone book can contain 50 entries. Each name can contain up to 20 characters and each phone number can contain up to 24 digits.
PHONE BOOK Press Select Enter the telephone number (and code) you wish to store – up to 24 digits.
PHONE BOOK >Replace Go back If you replace the original quick dial information will be overwritten. If you go back you will get the option to choose another quick dial location between 0 an 9. Lettering on the Numerical Keypad Key Characters Key Characters 1 1 6 MNO6 2 ABC2 7 PQRS7 3 DEF3 8 TUV8 4 GHI4 9 XYZ9 5 JKL5 0 Space 0 Press each key the relevant number of times to get the letter you need e..g.
PHONE BOOK Create a Phonebook Entry ACTIONS In standby, press and hold Phonebook for 3 seconds Use S and T to scroll through the menu to select ‘Add entry’ Press Select Enter a name - select the desired letter by pressing on the corresponding key on the numerical keypad You can use the table below or the letters printed on the keypad to help you. Pause between each key entry. The pause allows you to enter the next character.
PHONE BOOK The name and number has been stored Entry added in the phonebook OR Use S and T to scroll through the menu to select ‘Phonebook’ Quick Dial >Phonebook The name and number has been stored Entry added in the phonebook Press and hold C or do not touch the keypad for 20 seconds to return to standby If the Phonebook is full (50 entries), you will be informed ‘DIRECTORY FULL’ will be displayed on the LCD display.
PHONE BOOK Edit a Quick Dial or Phonebook Entry ON SCREEN DISPLAY ACTIONS In standby, press and hold Phonebook for 2 seconds Use S and T to scroll through the menu to select ‘Edit entry’ Add Entry >Edit Entry Delete Entry Press Select Find the entry to be edited using one of the following three methods: -enter the quick dial location to be dialled e.g.
PHONE BOOK Delete a Quick Dial or Phonebook Entry In standby, press and hold Phonebook for 3 seconds Use S and T to scroll through the menu to select ‘Delete entry’ Add Entry Edit Entry >Delete Entry Press Select Find the entry to be deleted using one of >0 Lee Mobile the following three methods: 1 Andrew Gant -enter the quick dial location to be dialled 2 Rob Smith e.g.
PHONE BOOK Dial a Quick Dial or Phonebook Entry Press Phonebook Find the entry to be dialled using one of Add, Edit, Delete >0 Lee Mobile the following three methods: 1 Andrew Gant -enter the quick dial location to be 2 Rob Smith dialled e.g. press 2 key Mum Home -useS and T to scroll through the Mum Mobile quick dial and phonebook list -press and hold the digit corresponding to the first character of the name of the entry. e.g.
FACTORY DEFAULT Restore to Factory Default Power on the telephone (unplug then plug in the mains power lead to the mains power wall socket) whilst holding S VXX will be displayed on the LCD display – this is the software version number Release S Press * - to erase all answerphone messages Press # - to erase the call log of missed calls Press 0 – to erase all phonebook entries (including quick dial entries) Press C to exit 58
OPTIONAL ACCESSORIES Headset Option You can also use this telephone in hands free mode with an optional Geemarc headset. This plugs into the headset socket found at the rear of the telephone. Keyboard You can use this telephone as a textphone with an optional Geemarc keyboard. This plugs into the keyboard socket at the rear of the telephone.
TROUBLESHOOTING No display • Make sure that the power adaptor is plugged in correctly and is not damaged • Make sure the batteries are inserted correctly • Make sure that the batteries are fully charged SCREENPHONE does not ring • Make sure that the telephone line cord is plugged in correctly and is not damaged • Connect another telephone to the telephone PTT socket or move your telephone to another socket to track if the failure is coming from your telephone or your PTT socket • There may be too many commu
SAFETY INFORMATION General Only use the correct Geemarc authorised power supplies as listed below with the product. 1. Sino-American model no. A30950BC 2. Ten Pao model no. G090050A31 3. Helms – Man model no. SEE0901000PB Do not open the unit (except to replace the batteries). Contact the helpline for all repairs. Never dispose of batteries in a fire. There is a serious risk of explosion and/ or the release of toxic chemicals. Cleaning Clean the telephone with a soft cloth.
GUARANTEE From the moment your Geemarc product is purchased, Geemarc guarantee it for the period of one year. During this time, all repairs or replacements (at our discretion) are free of charge. Should you experience a problem then contact our help line or visit our website at www.geemarc.com. The guarantee does not cover accidents, negligence or breakages to any parts. The product must not be tampered with or taken apart by anyone who is not an authorized Geemarc representative.
RECYCLING DIRECTIVES The WEEE (Waste Electrical and Electronic Equipment) has been put in place for the products at the end of their useful life are recycled in the best way. When this product is finished with, please do not put it in your domestic waste bin. Please use one of the following disposal options: - Remove the batteries and deposit them in an appropriate WEEE skip. Deposit the product in an appropriate WEEE skip. - Or, hand the old product to the retailer.
Wall Mounting Template 80mm WALL MOUNTING TEMPLATE 64
UGSTP_Ver: 3.