n e User guide p.2 Notice d’utilisation p.31 CAUTION :THIS TELEPHONE PRODUCT IS SPECIFICALLY DESIGNED FOR PEOPLE WITH HEARING DIFFICULTIES AND IS PROVIDED WITH A HANDSET EARPIECE WITH VOLUME CONTROL FOR INDIVIDUAL REQUIREMENTS. DUE CARE MUST BE TAKEN BY ALL USERS THAT THE HANDSET EARPIECE VOLUME CONTROL IS SET TO THE LOWEST LEVEL ACCEPTABLE BY EACH RESPECTIVE USER. CARE SHOULD THEREFORE BE EXERCISED TO ENSURE THAT ANY NEW USERS ARE FAMILIAR WITH THIS REQUIREMENT.
GB INDEX PAGE DESCRIPTION - Handset and base unit controls 4 GENERAL SETTINGS - How to connect the phone and set the batteries - Charging the batteries - Phone range - Clean the phone 8 8 9 9 BASE SETTINGS - Base ringer volume 10 HANDSET SETTINGS - Menu access - Settings icons displayed on the handset - Handset registration - Handset deregistration - Handset ringer volume, melody and shaker - Earpiece volume setting and tone adjust - Network features, Flash time, Dial pause 11 11 11 11 12 12 13 US
ANSWERING MACHINE - Answering machine programming option - How to use the answering machine - Answering machine remote control 20 21 23 ADDITIONAL HANDSETS - General settings - Using several handsets ( registration ) - Deregister all additional handsets from the base - Internal calls - Call transfer to another registered handset - Headset- Neck loop option 24 24 25 25 26 26 ADDITIONAL BASE UNIT - General settings - How to add a base unit 27 27 TROUBLE SHOOTING 28 GUARANTEE - NORMS 30 3
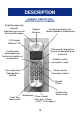
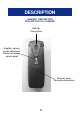
DESCRIPTION HANDSET DESCRIPTION DESCRIPTION DU COMBINE Ring/Messages light indicator Indicateur lumineux de Sonnerie/Messages Speaker Ecouteur Answering machine key Touche répondeur téléphonique LCD display Afficheur LCD Pick up and hang up key Touche de décroché et de raccroché Function and phonebook keys Touches de fonction et de répertoire Amplifier switch Interrupteur ampli Tone adjustment Réglage de la tonalité Shaker switch Interrupteur vibreur Keypad Clavier Microphone Flash Key Touche flash
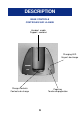
DESCRIPTION HANDSET DESCRIPTION DESCRIPTION DU COMBINE Belt clip Clip ceinture Amplifier volume button adjustment Bouton de réglage volume ampli Batteries cover Couvercle de batteries 5
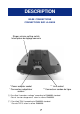
DESCRIPTION BASE CONTROLS CONTROLES SUR LA BASE Handset cradle Support combiné Charging LED Voyant de charge Charge contacts Contacts de charge Page key Touche de pagination 6
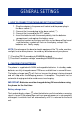
DESCRIPTION BASE CONNECTIONS CONNECTIONS SUR LA BASE Ringer volume setting switch Interrupteur de réglage sonnerie * Power adaptor socket * Connecteur adaptateur secteur ** Line socket ** Connecteur cordon de ligne (*) Classified “hazardous voltage” according to EN60950 standard. Classé “tension dangereuse” selon la norme EN60950. (**) Classified TNV-3 according to EN60950 standard.
GENERAL SETTINGS 1 - HOW TO CONNECT THE PHONE AND SET THE BATTERIES 1 - Plug the adaptor in the power wall socket and the power plug in the base socket (*). 2 - Connect the line cord plug to the base socket (**). 3 - Connect the line cord to the PTT socket. 4 - Insert the batteries with the correct polarity into the batteries compartment and replace the battery cover.
GENERAL SETTINGS 3 - PHONE RANGE The phone radio range can work up to 300 m and radio signal can be affected by many factors like a wall, obstacles...The maximum range if there are no obstacles between the phone and the base unit is around 300 m. If the range is restricted by walls in a house or in the office, the base unit should be in a slightly elevated position.
BASE SETTINGS BASE RINGER VOLUME The base ringer volume can be adjusted by using the slider switch located on the base rear panel. The following settings are available: Symbol Function Off Low Normal High For product support and help visit our website at www.geemarc.
HANDSET SETTINGS 1 - MENU ACCESS : To activate or deactivate the menu : To move backward in the menu : To move forward in the menu : To confirm a selection 2 -SETTING ICONS DISPLAYED ON THE HANDSET 1 2 6 7 8 3 4 1 2 3 4 5 9 10 11 12 13 14 Answering Machine programmin Set ring volume and melod Handset programming Network, flash time and dial pause settings 5 Earpiece volume adjust 6 Battery charge level 7 CID numbers 8 Phone book Nbr 1 9 ON/OFF line 10 Call transfer 11 Answering machine 12 Phone bo
HANDSET SETTINGS 5 - HANDSET RINGER VOLUME, MELODY AND SHAKER To set the volume and melody please follow instructions below: 1 - Press the 2 - Press the key. or the key to select the icon 3 - Press the key to select 4 - Now you can select one of the possibilities below: to scroll through the menu. If you want to modify entries Press the press and keys. 1/4 ++++ for the Ringer volume. 2/4 for the Normal calls ringer melody. 3/4 for the Phone book ringer melody. 4/4 for the Phone book ringer melody.
HANDSET SETTINGS 6-2 Normal listening Hearing volume can be adjusted in 4 steps on using the button on the handset rear, press on it successively . This will modify the setting done for the answering machine . It also can be more amplified with the , then press button ( on the right side ), set it on key: lit ( if not, you lose the amplification ) In both cases the button on the left side allows adjustment to the tone Hi : treble , Lo : bass , but only for the earpiece.
USING THE PHONE 1 - MAKING A CALL From the keypad : - Dial the phone number you want to call, you can press the cancel an incorrect entry. key to - Press the , the number is automatically dialled. - On completion of the call simply press the again to release the line or put the handset on the base. You may first press the will be without effect .
USING THE PHONE 3 - USE THE CALL BACK FEATURES You can display the last 5 numbers you dialed key and scroll through the list by pressing the - Press the keys until you select the number you want. - Press the key to dial the number. or : Exit : Delete the displayed entry 4 - DELETE STORED NAMES AND NUMBERS Only if you subscrided to the “Caller ID” service, otherwise the list will be empty . - Press the key.
PHONE BOOK (*) You must be subscrided to the “ Caller ID” service from your local phone company to enjoy principal features of phone books. 1 - ABOUT THE PHONE BOOK Names and phone numbers can be stored in both phone books. Each phone number stored in the phone books can be called by pressing only few buttons. The name and the number of the caller will be displayed (*) during the incoming call. The caller name will be displayed if it has been stored in one of the phone books.
PHONE BOOK 3 - STORING A NUMBER WITH A NAME Follow instructions below to store new entries in the phone book: - Enter the phone number you wish to set in the phone book. or key, a - Select one of the two phone books by pressing the beep will be heard and the phone book icon selected will flash. - Enter the corresponding name and number by pressing the corresponding number key once or twice to select the desired letter (see the table below).
PHONE BOOK 4 - DIALLING USING THE PHONE BOOK or 1 - Select the desired phone book by pressing the 2 - Select the desired entry in the list by using the 3 - Press the . or key . key then the number will be automatically dialled. Note: To leave the menu press the or key. 5 - MODIFY A PHONE BOOK ENTRY 1 - Select the desired phone book by pressing the or or 2 - Select the desired number to modify by pressing the 3 - Press the key. keys. key.
PHONE BOOK 7 - STORE NUMBERS AND NAMES INTO THE PHONE BOOK Only available if you subscrided to the “Callaer ID” service from your local phone company, otherwise the list will be empty 1 - Press the key. 2 - Select the desired number to store in the phone book by pressing the or keys. Two short beeps will be heard if you reach the end of the list. 3 - Select the desired phone book in which you want to store the number by pressing the or key.
ANSWERING MACHINE 1 - ANSWERING MACHINE PROGRAMMING OPTIONS key then press the To access to the menu press the use the or keys to select key or .
ANSWERING MACHINE 2 - HOW TO USE THE ANSWERING MACHINE The answering machine is activated by default. The phone can record up to 4 mins and 40 secs for top quality messages or 7 minutes for standard quality messages (see Programming options about explanation to change the telephone answering machine recording quality). When you have a new message, the light indicator will flashes. On pressing the button ( handset rear ) you switch between earpiece and speaker mode and vice-versa .
ANSWERING MACHINE - Press key and then , a tone will be heard. - Record your outgoing messsage ( speak at 20/30cm from the microphone ) - Press the key to stop recording, a second tone will be heard, then your outgoing message is repeated . - Press key to exit. Record an Incoming Message : With this function, you can leave a local message to your family members follow instructions below: - Press the key to enter in answering machine mode. - Press the key and then , a tone will be heard.
ANSWERING MACHINE 3 - ANSWERING MACHINE REMOTE CONTROL You can get access to your answering machine via a simple phone call. The 4 digit remote access is factory set by default to “1111”. If you wish to change this code, see programing options page 20. To remotely activate the answering machine Follow instructions below: 1 - Dial your phone number. key. 2 - After 9 rings press the 3 - Enter the remote code (1111 or your new code). 4 - Press the 7 key on the phone to activate the answering machine.
ADDITIONAL HANDSETS 1 - GENERAL SETTINGS With the DECT standard you have the possible settings below: - Register up to 4 handsets to one base unit. - Register up to 2 base units to each handset. - Make internal call handset to handset and transfer call between handsets registered to the same base unit. - You can increase the phone range by using 2 base units (move between the phone coverage areas).
ADDITIONAL HANDSETS 3 - DEREGISTER ALL ADDITIONAL HANDSETS FROM THE BASE To deregister all handsets from the base unit follow the instructions below: 1 - Take one handset. 2 - Press the 3 - Press the displayed. key. and the keys to enter number 1/1 0000 will be 4 - Enter the base unit PIN code (factory setting to 1111), then press All additional handsets are deregistered from the base unit. Note: handset used to deregister the additional handsets is not deregistered.
ADDITIONAL HANDSETS 5 - CALL TRANSFER TO ANOTHER REGISTERED HANDSET External calls can be transfered to another registered handset from the answering handset (both handsets must be registered to the same base unit). During an incoming call: 1 - Press the key to answer the call. 2 - Press the key to transfer the call. 3 - All others handsets will ring. 4 - Press the key on the requested handsets to answer the call.
ADDITIONAL BASE UNIT 1 - GENERAL SETTINGS A second base unit can be connected to the network in order to extend the range of the handsets. When an other base unit is registered to a handset, it can automatically search for the next base unit if you go outside the range of the first base unit. The transfer between base units is handled automatically, although this cannot be done whilst a call is in progress.
TROUBLE SHOOTING IF THE PHONE DOES NOT WORK Generality: Make sure that the phone line cord and adaptor are correctly plugged in and are not damaged. Make sure that the batteries are fully charged. Connect another phone on your phone socket or move your phone to another socket to check if the failure is coming from your phone or your PTT socket. The phone does not work: Make sure that the line cord and the power adaptor are correctly connected to the base unit or to the PTT plug and wall power socket.
TROUBLE SHOOTING You lost some messages : Your vocal box was full and the oldest messages have been cleaned automaticaly to allow the recording of new messages . Clean regularly your messages off.
GUARANTEE-NORMS GUARANTEE From the moment your Geemarc product is purchased, Geemarc guarantee the product for one year. During this time, all repairs or replacements (at our option) are free of charge. Should you experience a problem then contact our helpline or visit our website at www.geemarc.com. The guarantee does not cover accidents, negligence or breakages to any parts. The product must not be tampered with or taken apart by anyone who is not an authorised Geemarc representative.
SOMMAIRE PAGE DESCRIPTION - Description du combiné et de la base 4 INSTALLATION - Raccordements du téléphone et mise en place des batteries - Chargement des batteries - Rayon d’action - Entretien du téléphone 33 33 34 34 REGLAGE DE LA BASE - Réglage du volume de sonnerie de la base 35 REGLAGE DU COMBINE - Accès au menu, déplacement - Présentation des symboles - Enregistrement du combiné sur la base - Annuler l’enregistrement d’un combiné de la base - Volume, mélodie de la sonnerie et vibreur - Réglage
- Modifier un numéro du répertoire - Effacer un numéro du répertoire et son numéro - Transfert de numéros du journal d’appels vers le répertoire 45 45 46 REPONDEUR TELEPHONIQUE - Programmation du répondeur - Utilisation du répondeur - Activer- désactiver le répondeur à distance - Interroger votre répondeur à distance 47 48 50 51 COMBINES ADDITIONNELS - Généralités - Utilisation de plusieurs combinés - Annuler l’enregistrement de tous les combinés de la base - Communications internes - Transfert d’appel
INSTALLATION 1 - RACCORDEMENT DU TELEPHONE ET MISE EN PLACE DES BATTERIES - Branchez l’adaptateur entre la prise secteur et la prise sous la base (*) voir page 7. - Raccordez le cordon téléphonique entre la prise France Télécom(**) et la prise sous la base, voir page 7. - Insérez les batteries dans le compartiment à piles du combiné en respectant la polarité et replacez le couvercle, voir page 5.
INSTALLATION 3 - RAYON D’ACTION La portée du téléphone peut atteindre 300 m en champ libre. Celle-ci peut être réduite à cause d’obstacles comme par exemple: arbres, mur, une structure métallique... La base doit être placée à un endroit légèrement plus élevé pour obtenir des conditions optimales d’utilisation. Un signal retentit quand le combiné est hors de portée et, la communication sera interrompue après quelques bips sauf si on se rapproche de la base.
REGLAGE DE LA BASE REGLAGE DU VOLUME DE SONNERIE Le volume de sonnerie de la base peut être réglé avec l’interrupteur situé à l’arrière de la base. En positionnant l’interrupteur en face du symbole vous obtiendrez le niveau décrit ci-dessous : Symbole Niveau Coupé Faible Normal Fort TEL. SERVICE APRES VENTE : 03 28 58 75 99 Pour tout renseignement technique ou toute commande visitez notre site web sur www.geemarc.com.
REGLAGE DU COMBINE 1 - ACCES AU MENU, DEPLACEMENT : Touche permettant d’accéder au menu ou de le quitter : Touche permettant de revenir en arrière dans le menu : Touche permettant d’avancer dans le menu : Validation des choix 2 - PRESENTATION DES SYMBOLES 1 6 2 7 8 3 9 10 4 5 11 12 1 2 3 4 Programmation répondeur Choix mélodie et volume Programmation du combiné Réglages réseaux, temps du flash et de pause 5 Réglage du volume de l’écouteur 6 Témoin de charge de la batterie 7 Carnet des appels e
REGLAGE DU COMBINE 4 - ANNULER L’ENREGISTREMENT D’UN COMBINE SUR LA BASE Pour déprogrammer un combiné de sa base procédez comme suit : - Appuyez sir la touche - Appuyez sur les touches et - Entrez le code PIN de la base (1111) , validez en appuyant sur L’icône clignote, le combiné est dévalidé de la base 4 - VOLUME, MELODIE DE LA SONNERIE ET VIBREUR Pour régler le volume et la mélodie, veuillez effectuer la démarche suivante : 1 - Appuyez sur la touche .
REGLAGE DU COMBINE 5 - REGLAGE DU VOLUME DE L’ECOUTEUR ET DE LA TONALITE 5-1 Pour le mode Répondeur En effectuant le réglage décrit ci-dessous, vous ajusterez le volume d’écoute de vos messages ( uniquement par l’écouteur) - Appuyez sur la touche - Appuyez sur la touche - Appuyez sur la touche ou la touche pour sélectionner l’icône pour valider.
REGLAGE DU COMBINE 6 - PROPRIETES DU RESEAU, TOUCHE R (FLASH), INSERTION D’UNE PAUSE 1 - Appuyez sur la touche 2 - Appuyez sur la touche 3 - Appuyez sur la touche . ou la touche pour sélectionner l’icône . pour confirmer . 4 - Dans ce menu, 3 choix sont disponibles : Pour passer d’un réglage à un autre, appuyez sur la touche Appuyez sur la touche Appuyez sur la touche ou la touche . pour modifier les réglages pour confirmer. 1/3 A/B/C/D (réglages réseaux , il est conseillé de garder A).
UTILISATION DU TELEPHONE 1 - APPELER Depuis le clavier : - Composez le numéro de téléphone souhaité. En cas d’erreur, appuyez sur pour corriger le chiffre précédent. la touche - Appuyez sur la touche , le numéro se compose automatiquement. - Pour terminer la communication, appuyez une nouvelle fois sur la touche ou reposez le combiné sur la base. Vous pouvez aussi d’abord appuyer sur la touche et composer votre numéro, mais la touche sera inefficace.
UTILISATION DU TELEPHONE 2 - REPONDRE A UN APPEL Lorsque votre téléphone sonne, pour répondre : pour prendre la ligne et parler. - Appuyez sur la touche - En fin de communication, appuyez une nouvelle fois sur la touche ou reposez le combiné sur la base. Affichage du nom et du numéro Si vous êtes abonné au service “Présentation du numéro” chez votre opérateur, alors le numéro de votre correspondant s’affichera.
UTILISATION DU TELEPHONE 4- EFFACER UN OU PLUSIEURS NUMEROS DU JOURNAL D’APPELS A condition d’être abonné chez votre opérateur au service “Présentation du numéro”, sinon le journal sera vide. - Appuyez sur la touche . - Sélectionnez le numéro souhaité en appuyant sur la touche ou Deux bips retentissent quand vous arrivez en fin ou début de liste. - Utilisez la touche pour effacer l’enregistrement souhaité.
UTILISATION DU REPERTOIRE Vous devez être abonné au service “Présentation du numéro” chez votre opérateur, pour bénéficier des principales fonctions du répertoire : affichage du nom, du numéro, mélodie différente 1 - DESCRIPTION Vous pouvez enregistrer dans les 2 répertoires disponibles des noms et des numéros de téléphone. Le nom de votre correspondant appelant s’affichera si celui-ci est mémorisé dans un des répertoires. Chaque répertoire comporte 10 entrées maximum.
UTILISATION DU REPERTOIRE 3 - ENREGISTREMENT D’UN NUMERO ET D’UN NOM Votre téléphone dispose de 2 répertoires qui vous permettront de différencier des groupes de personnes lors de leurs appels ( mélodie différente ). Pour enregistrer un numéro et un nom dans un des deux répertoires : - Entrez le numéro de téléphone souhaité. - Sélectionnez l’un des deux répertoires en appuyant sur la touche ou . - Entrez le nom correspondant au numéro.
UTILISATION DU REPERTOIRE 4 - APPELER EN UTILISANT LE REPERTOIRE Permet d’appeler votre correspondant à partir d’un nom et d’un numéro que vous avez enregistré dans un des répertoires. ou - Sélectionnez le répertoire en appuyant sur la touche - A l’aide des touches ou - Appuyez sur la touche . sélectionnez le nom dans la liste. : le numéro affecté au nom se compose. Remarque : Pour quitter le répertoire avant l’envoi appuyez de nouveau sur la touche ou .
UTILISATION DU REPERTOIRE 7 - TRANSFERT DE NUMEROS DU JOURNAL D’APPELS VERS LE REPERTOIRE - Appuyez sur la touche . - Sélectionnez le numéro à transférer en appuyant sur la touche ou deux bips brefs retentissent quand vous arrivez en fin de liste. - Sélectionnez le répertoire dans lequel vous voulez enregistrer le numéro ou . en appuyant sur la touche - Entrez le nom correspondant (voir tableau d’explication page 45). - Appuyez sur la touche pour confirmer l’enregistrement.
REPONDEUR TELEPHONIQUE 1 - PROGRAMMATION DU REPONDEUR Accédez au menu en appuyant sur la touche l’icône puis sur la touche est affichée en haut à gauche Pour mettre à jour les paramètres du répondeur, utilisez le tableau suivant, appuyez sur la touche OK pour passer d’une fonction à une autre, utilisez les touches Numéro Fonction Fonctions programmables ou pour la selection : Sélection Par Defaut 1/5 Modification du jour Liste : 1 (Lundi) à 7 (Dimanche) 1 2/5 Modification de l’heure de 00:00
REPONDEUR TELEPHONIQUE 2 - UTILISATION DU REPONDEUR Le téléphone peut enregistrer jusqu’à 4 mins et 40 secs de messages en qualité élevée ou 7 minutes en qualité standard (voir la programmation du répondeur pour changer la qualité d’enregistrement). Lorsque vous avez un nouveau message ( non lu ), l’indicateur lumineux rouge clignote, ainsi que l’icône message.
REPONDEUR TELEPHONIQUE Enregistrer un message d’accueil : Un message d’accueil standard est pré-enregistré en usine. Vous pouvez puis sur la touche . Si vous l’écouter en appuyant sur la touche désirez changer ( personnaliser ) ce message, procédez comme suit : - Appuyez sur la touche ( mode répondeur ) - Appuyez sur la touche puis sur la touche - Enregistrez votre message ( max 2 minutes ) . , un bip sonore est émis.
REPONDEUR TELEPHONIQUE Effacer un message: Pour effacer un message, appuyez sur la touche bip sera émis pour confirmer l’effacement . pendant sa lecture, un Effacer tous les messages: Pour effacer tous les messages, appuyez et maintenez la touche pendant que le répondeur annonce le nombre de messages reçus, 00 sera affiché sur l’écran et un bip sonore sera émis pour confirmer.
REPONDEUR TELEPHONIQUE 4 - INTERROGER VOTRE REPONDEUR A DISTANCE Pour interroger à distance votre répondeur et écouter vos messages à partir d’un autre téléphone procédez comme ci-après : - Composez votre numéro de téléphone. . - Pendant la lecture du message d’accueil, appuyez sur la touche - Entrez le code RC (1111 ou votre nouveau code) . - Le répondeur annonce le nombre de messages reçus et les lit ( voir P50 : “lire les messages” pour l’utilisation des touches de sélection des messages ).
COMBINES ADDITIONNELS 1 - GENERALITES Avec le DECT 300 vous pouvez : - Enregistrer jusqu’à 4 combinés sur une base. - Enregistrer un combiné sur 2 bases au maximum. - Réaliser des communications internes et transférer des communications externes entre combinés enregistrés sur la même base. - Augmenter le rayon d’action en utilisant 2 bases (transfert automatique vers la prochaine station de base).
COMBINES ADDITIONNELS Remarque : Si vous utilisez plusieurs combinés sur une base, il est préférable que celle-ci soit placée au milieu de sorte que la zone de couverture soit à peu près la même pour tous les combinés. 3 - ANNULER L’ENREGISTREMENT DES COMBINES ADDITIONNELS DE LA BASE L’opération décrite ci-dessous entrainera la désactivation de tous les combinés supplémentaires affectés à la base ( hormis le principal ) : - Appuyez sur la touche .
COMBINES ADDITIONNELS 5 - TRANSFERT D’APPEL Vous pouvez transférer des appels externes d’un combiné à un autre (les deux combinés doivent être enregistrés sur la même base). Lors d’un appel entrant : - Appuyez sur la touche pour recevoir l’appel. - Utilisez la touche pour transférer l’appel. - Les autres combinés sonnent. - Appuyez sur la touche du combiné désiré pour recevoir l’appel transféré.
BASE ADDITIONNELLE 1 - GENERALITES Il est possible d’étendre le rayon d’action du téléphone en raccordant une base suppléméntaire au système. Lorsqu’un combiné enregistré sur plusieurs bases se trouve hors du rayon d’action de l’une d’entre elles, une recherche automatique se fera pour trouver la base la plus proche et conserver le contact téléphonique. Le transfert d’une base à une autre se fait automatiquement mais ne fonctionne pas pendant une communication en cours.
EN CAS DE PROBLEME PROBLEMES DE FONCTIONNEMENT Le téléphone ne fonctionne pas ( rien à l’écran ) Vérifiez que les batteries sont bien positionnées dans leur logement et dans le bon sens, placer le combiné sur la base ( branchée ) , le symbole doit clignoter indiquant la charge . Pas de tonalité - Assurez-vous que le câble du téléphone n’est pas endommagé et qu’il est correctement enfiché, et que ce soit celui livré avec l’appareil . - Assurez-vous que les batteries sont bien chargées ( symbole ).
EN CAS DE PROBLEME REINITIALISER VOTRE DECT300 AUX PARAMETRES USINE Cela ne ré-initialise que les paramètres du combiné Dans le cas de dysfonctionnement, ou si vous avez oubliez un code que vous avez modifié, il est possible de ré-initialiser votre téléphone. Pour se faire : - Retirer une batterie - Appuyer sur la touche - Remettre la batterie ( sans relacher la touche ) - Relâcher la touche - Entrez le code : # 7 3 3 7 # Votre téléphone a retrouvé ses paramètres d’origine usine .
GARANTIE - NORMES GARANTIE Cet appareil est garanti 1 an pièces et main-d'oeuvre. La date d'achat figurant sur le ticket de caisse fera foi. Cette garantie s'exerce sous réserve d'une utilisation normale de l'appareil. Les dommages occasionnés par les surtensions électriques, la foudre ou par un choc sur l'appareil ne peuvent en aucun cas être couverts par la garantie.