CONTENTS CONTENTS 2 INTRODUCTION Unpacking the Ampli500™ 3 DESCRIPTION 4-8 INSTALLATION Setting Up 9 SETTINGS Ringer Volume Ringer Tones Alarm & Ringer Settings Dialing Mode Date & Time Setting Language Setting Screen Contrast Adjustment Auto On Hook Auto screen Sizing Area & LDS Code Setting 10 10 10 10 11 11 12 13 13 14 15 USING THE TELEPHONE Answering a Call Making a Call Switching between Speakerphone and Handset Call Time Counter Last Number Redial Recalling Recent Numbers Deleting Recent Num
INTRODUCTION Congratulations on purchasing your Geemarc Ampli500™ telephone. This is a multifunction telephone which offers features such as hands free use, phonebook and caller display*. It also has the added benefits of outgoing voice amplification and receiving amplification. It is important that you read the instructions below in order to use your Geemarc Ampli500™ to its full potential. Keep this user guide in a safe place for future reference.
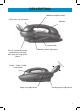
DESCRIPTION Priority memory P1 Priority memory P2 P3: CS Customer Service Key Tone reception adjustment Amplified mode key Volume reception adjustment Direct memory Memory storing key SPEAKER PHONE Hands free microphone Last number redial Headset button (Compatible with Geemarc CLA3 headset accessory) Time break recall button Flashing incoming call indicator (strobe light) 4 Mute Message waiting / new call LED
DESCRIPTION Additional amplifier button Clip to return to wall mount Speaker Handset cord Tone & volume adjustment automatically activated each time you hang-up the phone Speaker volume adjustment Sc Ringer / shaker / strobe select mode Ringer level adjustment re en tilt Sending volume adjustment 5
DESCRIPTION Screen example (On hook position) Minutes Power network icon Hours Day Month Cancel key Validation key Up/down keys OK button is used to confirm action or a choice on the screen. ▲ ▼ “UP / DOWN arrow” buttons are used to highlight or scroll through the menu. C button is used to cancel or confirm an action/entry or clear a stored Caller ID call.
DESCRIPTION Your Ampi500™ Phone has a screen with different icons, which help you to use the telephone The telephone is supplied by battery + battery indicator The telephone is powered by AC adapter. Memory storing is required. Screen contrast level. “Mute” is activated. Speakerphone is activated. Precede the CID call record number. To show new records.
DESCRIPTION Connection Shaker socket (Only Geemarc reference) Neckloop socket* (Only Geemarc reference) Headset socket* (Only Geemarc reference) Amplification over ride switch Adaptor socket** (Only Geemarc reference) Line cord socket* (*) Classified TNV-3 according to EN60950 standard. (**) Classified „hazardous voltage“ according to EN60950 standard. Important: Only Shaker, Neckloop, Headset and Adaptor with Geemarc reference can be connected to the sockets.
INSTALLATION Setting Up Connect the curly cord and the handset. Remove the screw of the battery compartment, using the screwdriver provided, and open the battery compartment. Insert 4 good quality alkaline batteries (AAA size, 1.5V type, not supplied) into the battery compartment located on the base of the telephone. Note : Do not use rechargeable batteries. Do not put batteries into the household rubbish, pay attention to battery regulations regarding battery disposal. Replace the battery cover.
SETTINGS Ringer Volume The ringer volume can be adjusted as high as 95 +dB. A switch located on right side allows the ringer to be switched to OFF, LOW, HIGH. Your telephone comes with the ringer switched to ‘High’. Ringer Tones Press MUTE Use ▲ or ▼ to select ‘SET PHONE’ Press OK Use ▲ or ▼ to select ‘SET RING’ Press OK Select desired ring tone.
SETTINGS Dialing Mode The Tone/Pulse switch is found on the base of the phone near the battery compartment. Set the switch to (T) if you have Touch Tone service. The Tone/Pulse switch is pre-set to Tone position (T). If your phone does not dial out, it is possibly being used from an older private switchboard. In this case, the Tone/Pulse switch must be moved to Pulse (P) Date & Time Setting If you subscribe to Caller I.D.
SETTINGS Hour Format You can choose between 12 hours or 24 hours. Press MUTE Use ▲ or ▼ to select ‘SET TIME’ Press OK Use ▲ or ▼ to select the desired digit Press OK to confirm and pass to next digit Press C twice to exit Language Setting You can choose between 16 different languages including English and French. The default is American English (English 1).
SETTINGS Screen Contrast Adjustment Your screen has a backlight that automatically switches off after 15 seconds of inactivity.
SETTINGS Auto Screen Sizing –DIM:X-->x The phone can show a maximum of 8 digits at full size. You can choose to see the complete number (up to a maximum of 18 digits) by selecting ‘Auto Screen Sizing’. When activated, the phone will display at full size but automatically switch to display small numbers when there is a number with more than 8 digits. The default on arrival is activated.
SETTINGS Area and Long Distance Code Setting When you use your phone for the first time or if you have moved to a different area code, you need to enter your area code into the phone. This assures that when dialing a call out of memory or your phonebook, the number is formatted properly. To set your area code & LDS Code: Press MUTE Use ▲ or ▼ to select ‘SET PHONE’ Press OK Use ▲ or ▼ to select ‘SET AREA & LDS’ Press OK Use ▲ or ▼ to enter your area code.
USING THE TELEPHONE Answering A Call During an incoming call, your phone will ring and then the number and/or the name of the caller will be displayed on the screen, if you have subscribed to a Caller I.D. service via your telephone provider. Using the handset ● Lift the handset and speak. ● To end the call, replace the handset. SPEAKER PHONE (hands free) ● Your Ampli500™ allows you to speak hands free. When the phone rings, press SPKR.
USING THE TELEPHONE Switching between Speakerphone and Handset To stop using speakerphone during a call, simply lift the handset. To activate speakerphone during a call, press SPKR and replace the headset on the cradle at the same time Hands free calls can also be made using an optional Geemarc headset –see Optional Accessories chapter Call Time Counter The call time counter will be displayed a few seconds after the phone number is connected and starts ringing.
USING THE TELEPHONE Deleting Recent Numbers Press OK Screen will display ‘DIALLED’, the last number dialled, total number of numbers dialled plus time and date of displayed number Use ▲ or ▼ to to select the number you wish to delete Press C, the screen will display ‘DEL?’ Press C to confirm Press OK to exit Mute Function If you wish, you can speak privately to someone else in the room without your caller overhearing.
USING THE TELEPHONE To store a number Lift the handset Press PROG Dial the number you wish to store, checking on the display that you have keyed it in correctly.(30 digits per telephone number allowed) Press the one touch key button (Priority or Memory dial) where you wish to store it. The screen will display ‘SAVE OK’ Note: Numbers will be lost after a few hours if you disconnect your phone.
OPTIONAL ACCESSORIES Headset You can also use your Ampli500™ in hands free mode with an optional Geemarc headset, this is ideal for use with a computer screen. To use the headset Connect the Geemarc headset into the headset socket located at the back of your telephone.
VOLUME AND TONE Sending Level Adjustment If your voice is quiet or the person you have called has difficulty hearing, you can increase the sending level volume with the switch located on the right side. You can also decrease the sending volume if required. There are three levels, Min, Normal and Max (outgoing volume up to 12dB). Receiving Volume and Tone Adjustment You can increase the receiving volume and adjust the receiving tone according to your own hearing requirements.
PHONEBOOK Create a Phonebook Entry You can store 99 entries into the phone book with the name and phone numbers of your correspondent. Press MUTE Use ▲ or ▼ to select ‘PHONEBOOK’ Press OK Use ▲ or ▼ to select ‘ADD’ Press OK Enter the number (30 digits max per memory) When the number is correct, press OK to confirm and enter the name corresponding to entered number.
PHONEBOOK Use the C key to delete a wrong number or letter. Note : If you wish to insert a pause in the stored number, press the REDIAL key whilst entering (a P will be displayed on the screen). Create an Entry from the Caller I.D. Display Log You can store 99 entries into the phone book with the name and phone numbers of your correspondent.
PHONEBOOK Delete a Phonebook Entry Press MUTE Use ▲ or ▼ to select ‘PHONEBOOK’ Press OK Use ▲ or ▼ to select ‘REVIEW’ Press OK Use ▲ or ▼ to select number you wish to delete Press C, the screen will display ‘DEL?’ Press C to confirm Press OK to exit Modify a Phonebook Entry Press MUTE Use ▲ or ▼ to select ‘PHONEBOOK’ Press OK Use ▲ or ▼ to select ‘REVIEW’ Press OK Use▲ or ▼ to select number you wish to modify Press and hold OK until the last number digit flashes Press C to modify the number and insert new
CALLER I.D. DISPLAY LOG The features described in this section are only available if you subscribe to a Caller Display service from your network provider. Caller Display means you can see who is calling on your LCD display (provided the number is not withheld, unavailable or is an international call). When your telephone rings, the time, date, the caller’s phone number and name and a count number (1-99) is displayed on the LCD display. The most recent call will have the highest count.
CALLER I.D. DISPLAY Delete a Number from the Caller I.D. Display Log Use or to access the log and scroll until you Þnd the required number for deleting Press C, the screen will display ‘DEL?’ Press C to conÞrm Press OK to exit Delete all Numbers from the Caller I.D.
CALLER I.D. DISPLAY Call Waiting in Practice When you are in conversation with caller no.1, their name and number will be displayed on the screen. A beep tone will be heard when a second call is incoming and their name and number will be displayed on the screen. If you chose to answer the call, press FLASH or the phone hook button to transfer. Note : If you don’t answer the second call, the number will be recorded into the incoming call log and you will be able to call them back later.
NEW CALL/MESSAGE LED The red LED on the front of the phone will flash to indicate missed calls. To cancel the flashing light, review your new calls. Simply use ▲ or ▼ to access the log and scroll through all the new calls. Alternatively, you can delete the log of unreviewed calls Use ▲ or ▼ to access the log Press and hold C until the screen displays ‘ALL DEL?’ Press C to confirm Press OK to exit If you do not subscribe to caller display or message waiting service simply press ▲ or ▼once.
TROUBLESHOOTING No display Make sure that the power adaptor is plugged in correctly and is not damaged Make sure the batteries are inserted correctly Make sure that the batteries are fully charged Telephone does not ring Make sure that the telephone line cord is plugged in correctly and is not damaged Connect another telephone to the telephone PTT socket or move your telephone to another socket to track if the failure is coming from your telephone or your PTT socket There may be too many communication devi
SAFETY INFORMATION General Only use the correct Geemarc authorized power supply with the product. Do not open the unit (except to replace the batteries). Contact the helpline for all repairs. Never dispose of batteries in a fire. There is a serious risk of explosion and/ or the release of toxic chemicals. Cleaning Clean the telephone with a soft cloth. Keep the base and handset charging contacts clean. Never use polishes or cleaning agents - they could damage the finish or the electrics inside.
REGULATORY COMPLIANCE Part 68 of FCC rules information - This equipment complies with Part 68 of the FCC rules and the requirements adopted by the ACTA. On the bottom of this equipment is a label that contains, among other information, a product identifier in the format US:AAAEQ##TXXXX. If requested, this number must be provided to the telephone company. - All applicable certification jacks Universal Service Order Codes (USOC) for the equipment is provided (i.e.
GUARANTEE Sonic Alert warrants the phone against any defect in materials or workmanship for the period of one year from the date of purchase. Should you experience a problem, contact our customer service department Be sure to save your sales receipt as proof of purchase date should you need warranty service. Within a period of one year from purchase date, Sonic Alert will repair or replace (our discretion) your phone at no cost, if a defect in materials or workmanship is found.