
User manual


12
How to O
p
erate the 4x CAT6 Extender for HDMI
(
usin
g
an 4x4 Matrix
)
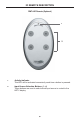
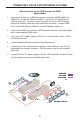
The
f
ront panel o
f
each Receiver unit
f
or the 4x
C
AT6 Extender
f
or HDMI
c
ontains a set o
f
LED indicators which corresponds to an input
(
source
)
on the
4x4 Matrix device. A blue LED indicates which input has been routed
f
rom the
4x4 Matrix.
O
n the top o
f
each Receiver unit there are a set o
f
4 push-buttons
which are used to control the switchin
g
o
f
the 4x4 Matrix.
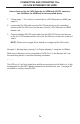
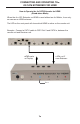
Example 1: Routing Input
(
source
)
3 to
O
utput
(
displa
y)
4.
1.
C
onnect an HDMI cable
f
rom HDMI
O
ut 4 on the 4x4 Matrix to HDMI In 4 on
the 4x
C
AT
6
Extender
f
or HDMI
S
ender unit.
2.
C
onnect an 4x
C
AT6 Extender Receiver unit to Displa
y
4.
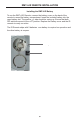
3
. Press button 3 on the top o
f
the Receiver unit. Button 3 is shown below.
The In 3 LED will turn bri
g
ht blue, indicatin
g
that Input 3 on the 4x4 Matrix
h
as been routed to Displa
y
4
(
Zone 4
)
.
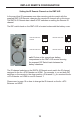
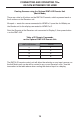
Example: HDMI input 3 is routed to HDMI
O
ut 4
(
a picture o
f
the 4x4 Matrix
displa
y
panel is shown below
)
. The ima
g
e shown on Displa
y
4 will be the
H
DMI source
(
3
)
connected to the 4x4 Matrix.
In
3
Button
3
H
DMI
cab
l
e
T
o Displa
y
4
C
AT-
6
f
rom
O
ut 4 on
Ext
e
n
de
r
CONNECTING AND OPERATING TH
E
4
X CAT6 EXTENDER FOR HDMI
In
p
ut 3
p