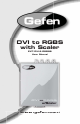
DVI to RGBS with Scaler EXT-DVI-2-RGBSS User Manual www.gefen.
ASKING FOR ASSISTANCE Technical Support: Telephone Fax (818) 772-9100 (800) 545-6900 (818) 772-9120 Technical Support Hours: 8:00 AM to 5:00 PM Monday thru Friday. Write To: Gefen Inc. c/o Customer Service 20600 Nordhoff St Chatsworth, CA 91311 www.gefen.com support@gefen.com Notice Gefen Inc. reserves the right to make changes in the hardware, packaging and any accompanying documentation without prior written notice. DVI to RGBS with Scaler is a trademark of Gefen Inc. © 2008 Gefen Inc.
CONTENTS 1 Introduction 2 Operation Notes 3 Features / Package Includes 4 Panel Layout 5 Panel Descriptions 6 Connecting and Operating the DVI to RGBS with Scaler 7 Operating the DVI to RGBS with Scaler 10 Output Signal Configuration 11 Specifications 12 Warranty
INTRODUCTION Congratulations on your purchase of the DVI to RGBS with Scaler. Your complete satisfaction is very important to us. The Gefen DVI to RGBS with Scaler The DVI to RGBS with Scaler takes your DVI-I computer video card/HDTV video signal and converts it to analog RGBS formats. Now you can display desktop or laptop computer and/or HDTV content on your analog RGBS display or projector. Available and selectable video formats include RGB, RGBS at sync 0.3V, RGBS at sync 5V, and YPbPr Component video.
OPERATION NOTES READ THESE NOTES BEFORE INSTALLING OR OPERATING THE DVI TO RGBS WITH SCALER • Output signal types are not configured through the on-screen GUI. To configure the output signal type of the DVI to RGBS with Scaler use the DIP switches located on the underside of the unit. Please see page 10 for output signal types and configuration options. • The DVI port is a DVI-I type input port and will accept either a DVI-D (digital), DVI-A (analog) type signal. • This device is DVI 1.0 compliant.
FEATURES Features • Connects computers with DVI-D/DVI-I connectors to analog RGBS monitors or projectors • The output is either in the form of RGB, RGBS at sync 0.3V, RGBS at sync 5V, or YPbPr Component Video • Operates by infrared remote control and friendly On-Screen Display (OSD) menu • The input resolution is automatically detected while the output resolution and refresh rate can be selected through the OSD menu.
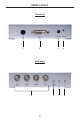
PANEL LAYOUT Front Panel 1 2 3 4 Back Panel 5 6 4 7 8
PANEL DESCRIPTIONS 1 IR Receiver This receiver will receive commands from an optional RMT-SR-IR remote control. This receiver requires line-of-sight to the IR remote control for successful operation. 2 DVI-I Input This receptacle will accept digital and analog signals. When using a analog VGA source use a VGA to DVI-A type cable. This receptacle will accept DVI-D, DVI-A or DVI-I cable types.
CONNECTING AND OPERATING THE DVI TO RGBS WITH SCALER How to Connect the DVI to RGBS with Scaler 1. Connect the DVI source to the DVI to RGBS with Scaler using the supplied DVI cable. NOTE: A VGA source may also be connected using a VGA to DVI-A cable. 2. Connect either a RGBS or component video device to the BNC output connectors using user supplied cables. NOTE: A BNC to RCA adapter/cable can be used for devices that accept RCA type connectors. 3.
OPERATING THE DVI TO RGBS WITH SCALER MAIN MENU This portion of the manual will be described using the front panel operation buttons. The following are the main menu options. Use the - and + buttons to choose your desired subcategory and press Menu to enter it. CONTRAST BRIGHTNESS FINE TUNE COLOR SIZE OUTPUT OSD FACTORY RESET INFORMATION CONTRAST Press the - and + buttons to select the CONTRAST option and press the MENU button to select it. Use the - and + buttons to adjust the CONTRAST setting.
OPERATING THE DVI TO RGBS WITH SCALER SIZE Press the - and + buttons to select the SIZE option and press the MENU button to select it.. There are several sub-categories that are available for adjustment. Select the desired option using the - and + buttons and press the MENU button to begin adjustment. Use the - and + buttons to adjust the selected option and press the MENU button when you are finished.
OPERATING THE DVI TO RGBS WITH SCALER OSD CONTINUED BACKGROUND Use this options to adjust the opacity of the on-screen display’s background. EXIT Pressing the MENU button when this option is selected will return you to the MAIN MENU. FACTORY RESET This option will reset the entire unit to factory settings. Press the MENU button to select the FACTORY RESET option. Press the MENU button once and a confirmation will appear with the word YES. Press the MENU button once more to confirm a FACTORY RESET.
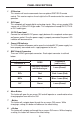
OUTPUT SIGNAL CONFIGURATION HOW TO CONFIGURE THE DVI TO RGBS WITH SCALER OUTPUT SIGNAL There is a bank of 2 dip switches on the underside of the DVI to RGBS with Scaler unit that controls which type of signal is output. Please remove the metallic tape on the underside of the unit to reveal this bank of switches. Use the guidelines below to output your desired signal type. Switch 1 Switch 2 Output Signal Type OFF OFF R/G/B/S 5V Sync OFF ON R/Gs/B/Gs Default ON OFF R/G/B/S 0.
SPECIFICATIONS Video Amplifier Bandwidth ........................................................................165 MHz Input Video Signal ...............................................................................1.2 volts p-p Input DDC Signal ..........................................................................5 volts p-p (TTL) Single Link Range .................................................................................1920x1200 DVI Connector ...........................................