
User manual


VIEWING AND CHANGING THE 802.11g RADIO CHANNEL
The following instructions are for advanced users only.
These instructions should only be executed if specifi cally required and if you are
comfortable with the operations. Under normal operating conditions, you should not
need to view or change the 802.11g Radio Channel.
Viewing the Current 802.11g Radio Channel
NOTE: Radio Channel viewing can be done on either the Wireless USB 2.0 Sender unit
or the Wireless USB 2.0 Receiver unit. The procedure is the same.
NOTE: Viewing the current 802.11g Radio Channel will not disrupt normal USB
communication between the Wireless USB 2.0 Sender unit and the Wireless USB 2.0
Receiver unit.
6
1.
2.
3.
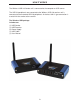
Power on either the Wireless USB 2.0 Sender unit or the Wireless USB 2.0 Receiver
unit and wait for approximately 20 seconds before proceeding to step 2. If the unit is
already on, proceed to step 2.
On the selected Wireless USB 2.0 Sender unit or Wireless USB 2.0 Receiver unit,
press and hold (do not release) the Pair/CH button for a minimum of 10 seconds.
The button can be released when the Host, Link and Activity LED’s start to blink
rapidly.
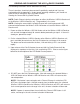
Upon release of the Pair/CH button the current 802.11g Radio Channel will be
displayed as a pattern on the Host, Link, and Activity LED’s. Please see the fi gure
below for the description of the LED Radio Channel patterns.
4.
DO NOT press the Pair/CH button again. After 60 seconds the selected Wireless
USB 2.0 Sender unit or Wireless USB 2.0 Receiver unit LED’s will return to their
normal operation.
NOTE: If the button is pressed again and a Channel Change is not desired, DO
NOT press the button again. After 60 seconds from last button press the selected
Wireless USB 2.0 Sender unit or Wireless USB 2.0 Receiver unit LED’s will return to
their normal operation and no change in the unit’s channel selection will be made.
NOTE: If power is removed from the unit while the Channel LED Pattern is still
active, no change in the units channel selection will be made.