
User manual


CONNECTING THE WIRELESS HUB
1.
2.
3.
4.
5.
6.
7.
8.
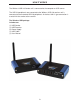
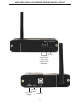
Place the sender unit near the host computer.
Plug the Type-B connector on the USB cable (included) into the Host port on the
sender unit.
Plug the Type-A connector on the USB cable into the USB port on the computer.
Plug the power adapter into a suitable AC outlet.
Connect the power adapter to the sender unit.
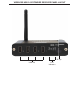
Place the receiver unit near the USB device(s), no more than 30m from the sender
unit.
Plug the power adapter into a suitable AC outlet.
Connect the power adapter to the receiver unit.
4
ESTABLISHING WIRELESS COMMUNICATION
The Wireless USB 2.0 Extender will automatically establish a wireless connection
between the Wireless USB 2.0 Sender unit and the Wireless USB 2.0 Receiver unit
once power is applied to both units and they are located within their operating range.
The Link LED on both units will turn on once the wireless connection has been made.
NOTE: It may take up to 30 seconds for the Wireless USB 2.0 Extender to establish
wireless communication. The Activity LED will fl ash during this time to indicate that the
radios are powering up.
1.
2.
3.
4.
Set up the host computer in an appropriate location.
Determine where you want to locate the USB device(s).
Determine suitable locations for the Wireless USB 2.0 Sender unit and the
Wireless USB 2.0 Receiver unit such that they will be able to maintain wireless
communication. Physical obstacles and other radio wave emitting devices can
cause interference that will reduce the maximum distance and data rate between the
Wireless USB 2.0 Sender unit and the Wireless USB 2.0 Receiver unit.
If other 802.11g based products will be in operation in the same area, determine
the optimal Radio Channel selection for all wireless products. See the Wireless
Operation section on Page 5 for more information on channel selection.
Plug the power adapter into a suitable AC outlet.
BEFORE YOU BEGIN