
User manual


5
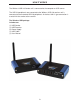
CHECKING THE INSTALLATION
Once the Activity LED’s on the Wireless USB 2.0 Sender unit and Wireless USB 2.0
1.
2.
3.
4.
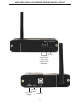
Check that the Power LED’s on the Wireless USB 2.0 Sender unit and Wireless USB
2.0 Receiver unit are both on.
Check that the Link LED’s on the Wireless USB 2.0 Sender unit and Wireless USB
2.0 Receiver unit are both on.
Check that the Host LED’s on the Wireless USB 2.0 Sender unit and Wireless USB
2.0 Receiver unit are both on.
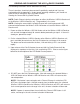
For Windows users (2000, XP, or Vista) open Device Manager to confi rm that the
Wireless USB 2.0 Extender has installed correctly. Expand the entry for Universal
Serial Bus controllers by clicking the + sign. If the Wireless USB 2.0 Extender has
been installed correctly you should fi nd it listed as a Generic USB Hub.
5.
For Mac OS X users open the System Profi ler to confi rm that the Wireless USB 2.0
Extender has installed correctly. In the left hand column under Hardware, select
“USB” and inspect the right hand panel. If the Wireless USB 2.0 Extender has been
installed correctly you should fi nd it listed as a Hub under the USB High-Speed Bus.
NOTE: To open System Profi ler in OS X: Open the Finder, select Applications, then
open the Utilities folder and double click on the System Profi ler icon.
CONNECTING A USB DEVICE
1.
2.
3.
4.
Install any software required to operate the USB device(s). Refer to the
documentation for the device(s), as required.
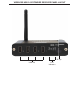
Connect the USB device(s) to the Device port(s) on the Wireless USB 2.0 Receiver
unit.
Check that the Device LED on the Wireless USB 2.0 Receiver unit is on.
Confi rm on the host PC that the each connected device operates as expected.
NOTE: To open Device Manager in Windows 2000 or XP: Right-click My Computer
then select Properties, select the Hardware tab and click the Device Manager button
NOTE: To open Device Manager in Windows Vista: Open the Start menu, right-click on
Computer, select Manage and fi nally click on “Device Manager” in the left-hand tree.