
User's Guide
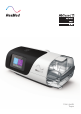


Table Of Contents
- 398001.pdf AirSense 11 User Guide AMER Eng Ref
- 398001 Spec
- 398001 Pacific Cover CMYK_Eng HiRes
- 398001_AirSense 11 User Guide Eng Ref FINAL
- Welcome
- At a glance
- Setting up your device
- Navigating the touch screen
- Starting/Stopping therapy
- About the heated tubing
- Therapy data
- Cleaning and caring for the device
- Traveling
- Troubleshooting
- General warnings
- Technical specifications
- Guidance and manufacturer’s declaration electromagnetic emissions and immunity
- Symbols
- Servicing
- Limited warranty
- Further information
- 398001 Pacific Cover CMYK_Eng HiRes
- DRAFT 398120 Airsense 11 FCC SAR (4G) Amer Eng Fre_v2

6
To set up the device:
1. Place the device on a stable level surface.
2. Connect the power cord into the power inlet at the rear of the device. Connect one end of the power
cord into the AC adaptor and the other end into the power outlet.
3. Connect the air tubing firmly to the outlet connector at the rear of the device.
4. Open the humidifier tub and fill it with distilled water under room temperature up to the maximum
water level mark. The humidifier tub must be removed from the device before adding water. The
humidifier tub has a maximum capacity of 380 mL.
5. Close the humidifier tub and insert it into the side of the device.
6. Connect the free end of the air tubing firmly onto the assembled mask.
See the mask user guide for detailed information.
Recommended masks for use with this device are listed on Resmed.com
Notes:
• Do not insert any USB cable into the AirSense 11 device or attempt to plug the AC adaptor into a USB
device. This may cause damage to the AirSense 11 device or USB device.
• The electrical connector end of the heated air tubing is only compatible with the air outlet at the device
end and should not be fitted to the mask.
• Do not use electrically conductive or anti-static air tubing.