M DJ - 5 0 0 PROFESSIONAL MEDIA CONTROLLER USER MANUAL Please read the manual carefully before operation! W W W. G E M I N I S O U N D .
PLEASE READ BEFORE USING APPLIANCE USING APPLIANCE IMPORTANT WARNING AND SAFETY INSTRUCTIONS! CAUTION: This product satisfies FCC regulations when shielded cables and connectors are used to connect the unit to other equipment. To prevent electromagnetic interference with electric appliances such as radios and televisions, use shielded cables and connectors for connections.
introduction Thank you for purchasing our Gemini MDJ-500. We are confident that the Gemini Family of products will not only make your life easier through the use of the latest technological advancements in cross-platform connectivity and sound reproduction but will raise the bar for DJ and pro audio products. With the proper care & maintenance, your unit will likely provide years of reliable, uninterrupted service. All Gemini products are backed by a 1-year limited warranty*.
introduction CLEANING THE UNIT To clean the MDJ-500, use only a dry soft cloth and/or compressed air. If the unit is soiled with stubborn dirt, we suggest using a 2:1 solution of distilled water and 30% isopropyl alcohol. Avoid using harsh cleaning chemicals such as benzene, paint thinner, bleach, or hydrochloric acid, which will damage the unit. O P E R AT I N G CONDITIONS For optimum performance, the temperature of the operating environment should be between +5º C to +35º C (+41º F - +95º F).
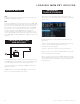
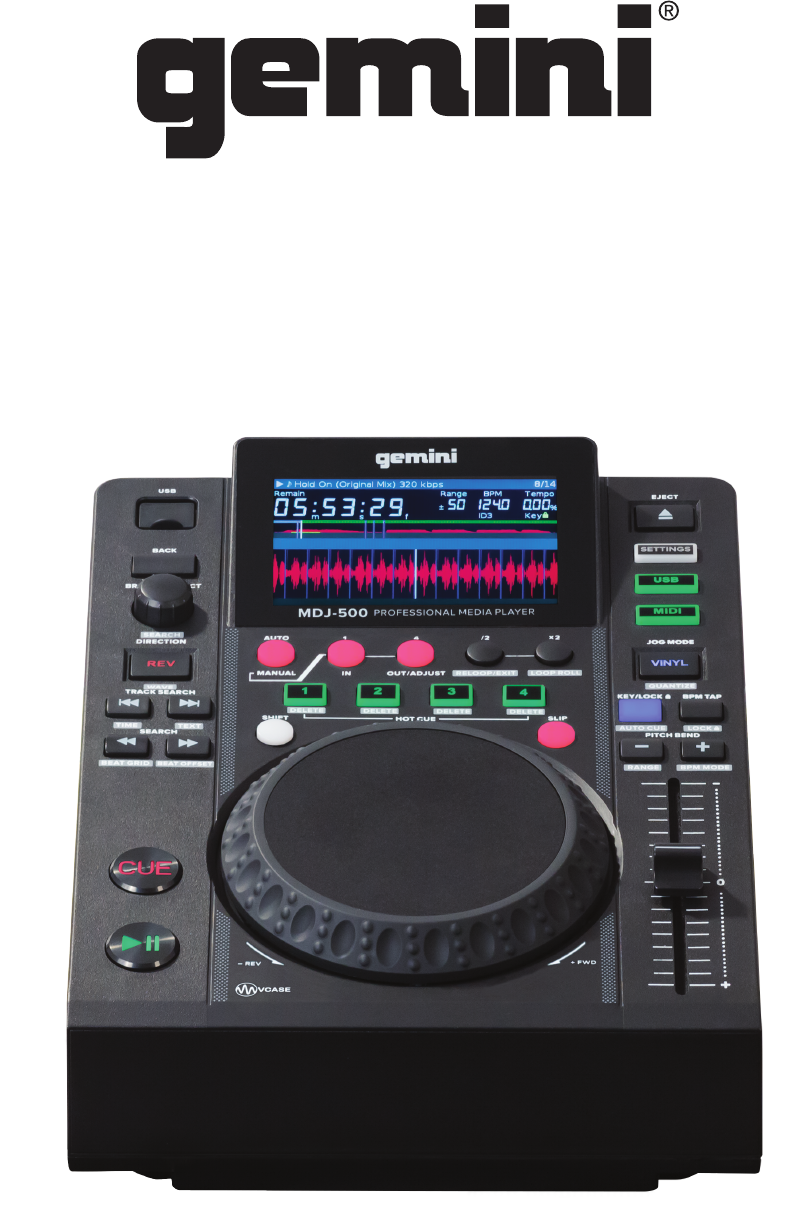
unit overview TO P V I E W REAR VIEW 13 14 15 16 17 18 10 28 27 9 26 8 25 7 24 A 1 B C 23 6 22 5 21 20 4 3 19 11 2 1 Power 2 Play/Pause 3 Cue / II 4 Shift 5 / Search (Beat Grid / Beat Offset) 6 Track Search (Time / Text) 7 Reverse (Wave) 8 Browse / Selec t (Search) 9 Back 10 USB 11 Jog Platter 12 Hot cues 1-4 (Delete Cue) m dj - 500 m a n ua l • / geminisound.
connections C O N N E C T I N G T H E M DJ - 5 0 0 POWER Plug the 2 prong power cable into the power input on the back of the MDJ-500 (A), and the other end into Mains power. LINE OUTPUT USB Plug one end of the included RCA cable into the LINE OUTPUT JACK (D) on the rear panel. Plug in the USB cable into the USB OUT (B) on the rear panel. Plug the other end of the USB cable into any available USB port on your computer.
d i s p l ay s D I S P L AYS 5 2 10 8 3 9 6 7 12 11 4 1 1 CUE Shows the position of hot cue points 2 AUTOCUE This appears when auto cue has been enabled in settings 3 TRACK NUMBER This indicates the track number, and the remaining tracks in the current folder 4 INFORMATION DISPLAY SECTION The large waveform, beat grid, and loop area is shown here.
loading memory devices SOURCE SELECT B R OW S I N G T R AC K S / F O L D E R S USB Pressing the USB source button allows you to play music from a USB device. (Default selection) Turning the browse knob (8) activates the browse screen. The browser shows the available files and folders on the USB storage device. MIDI Pressing the MIDI source button switches the unit to MIDI / HID mode with bi-directional support.
p l ay b ac k c o n t r o l s P L AY / PAU S E Pressing PLAY/PAUSE (2) will begin playback of the selected track. Pressing PLAY/PAUSE (2) again will pause playback and hold the track at the current position. M A ST E R C U E C O N T R O L S SETTING A MASTER CUE POINT While the unit is in playback, press PLAY/PAUSE / ll (2) to pause the track. While the track is paused, press CUE (3) to set the cue point at the current position.
p l ay b ac k c o n t r o l s H OTC U E S 1 - 4 S E T T ING HOT CU ES During playback or in pause mode, press HOT CUE 1, 2, 3 or 4 (12) at the point in the track where the HOT CUE is to be set. Once pressed, the programmed HOT CUE (1, 2, 3 or 4) should now be illuminated. To delete a hot cue, press shift (4) and select the hot cue to be deleted PL AYING HOT CUES During playback or in pause mode, press HOT CUE 1, 2, 3 or 4 (12) and playback starts instantaneously from the point recorded on that HOT CUE.
p l ay b ac k c o n t r o l s S L I P WIT H RE VER SE T I M E FORM AT To use SLIP with reverse playback, enable SLIP mode by pressing the SLIP (20) button. Press REVERSE (7) to begin playback in the reverse direction. The SLIP (20) button will begin flashing indicating SLIP mode is active and the position playing underneath is shown on the jogwheel display. Press REVERSE (7) again to exit reverse playback.
MIDI CONTROLS MI DI MODE The MDJ-500 has MIDI mode, which allows the data from the buttons and dials of the MDJ-500 to be encoded into MIDI format. If the unit is connected via a USB cable to a computer with MIDI-compatible DJ software, the DJ software can be operated from the unit. The computer audio can also be played from the MDJ-500’s audio outputs. It may not be possible to use some buttons to operate the DJ software.
SETTINGS 1 - Press the SETTINGS button (27) to see the settings screen. 2 - Use the browse knob (8) to select the settings item. 3 - Set the cursor to the item you want to change, then press the browse knob. 4 - Turn the browse knob to highlight the setting you want. 5 - Press the browse knob to enter the setting. Press the back button to abort the change. 6 - Press back to exit the settings menu.
T R O U B L E S H O O T I N G / S P E C I F I C AT I O N S T R O U B L E S H O OT I N G S P E C I F I C AT I O N S U S E STORAGE DEVI CE ER R OR S G E NE RAL Some USB devices may not operate properly with the MDJ-500. Gemini accepts no responsibility for any possible data loss that may occur. To ensure that data is not permanently lost, please make sure to backup any data prior to connecting the USB device to the unit. Type............................................…..
m dj - 500 m a n ua l • geminisound.
IN THE USA: IF YOU ARE EXPERIENCING PROBLEMS WITH THIS UNIT CALL 1-732-346-0061 FOR INNOVATIVE CONCEPTS AND DESIGN LLC CUSTOMER SERVICE. DO NO ATTEMPT TO RETURN THIS EQUIPMENT TO YOUR DEALER. Parts of the design of this product may be protected by worldwide patents. Information in this manual is subject to changes without notice and does not represent a commitment on the part of the vendor.