
User Manual


mdj-500 manual • geminisound.com
10
SETTING HOT CUES
During playback or in pause mode, press HOT CUE 1, 2, 3 or
4 (12) at the point in the track where the HOT CUE is to be set.
Once pressed, the programmed HOT CUE (1, 2, 3 or 4) should
now be illuminated. To delete a hot cue, press shift (4) and
select the hot cue to be deleted
PLAYING HOT CUES
During playback or in pause mode, press HOT CUE 1, 2, 3 or 4
(12) and playback starts instantaneously from the point recorded
on that HOT CUE.
SETTING A MANUAL LOOP
During playback, press LOOP IN (14) at the desired starting
position for the loop (loop in point). Press LOOP OUT / ADJUST
(15) at the desired ending position for the loop (loop out
position). The loop out point is now set, and loop playback
starts from the loop in point.
ADJUSTING A LOOP
To adjust the loop once the loop is set, press the IN (14) button
to adjust the in point or press the OUT / ADJUST button to
adjust the out point. The length of the loop can be adjusted by
rotating the jogwheel (11) to move the loop point. When the loop
points are correct, press the IN or OUT button to set and exit.
Press the /2 button to half the size of the loop, press the x2
button to double the size of the loop.
CANCELING A LOOP
While the loop is engaged, press RELOOP/EXIT (17) to
disengage the loop. Playback continues after the loop out point.
RETURNING TO A LOOP
After canceling a set loop, press RELOOP/EXIT (17)
during playback to reengage the last set loop. Loop playback
begins at the loop in point.
SHRINKING OR EXTENDING A LOOP
Once a loop is active, it is possible to double or halve its size
by using the “/2” and “x2” buttons (SHIFT + IN or OUT/ADJUST
buttons). This can be used (for instance) to create breakdowns
and drops in songs.
AUTO BEAT LOOP
Press any of the AUTO LOOP buttons (14 and 15) to set a 1 or 4
beat loop. The corresponding button will light up when the loop
is active. Auto beat loops are set based on current BPM of track.
AUTO LOOP ROLL
Press shift and the x2 button (18) to activate loop roll
mode. Press and hold any of the AUTO LOOP buttons
to set a loop to your desired length with slip mode
activated. Release to exit the loop and turn o slip mode.
VINYL MODE
Pressing the VINYL (24) button enables VINYL mode. Enabling
VINYL mode allows scratching when the JOGWHEEL (11) is
touched and rotated. When VINYL mode is disabled, the
JOGWHEEL (11) will be in SEARCH MODE and will allow
searching through the track.
PITCH NUDGE
It is possible to increase or decrease the pitch temporarily by up
to 8% by using the platter. If the platter is in VINYL mode, then a
pitch nudge can be done by turning the platter by touching only
the outer (rubber) edge. If VINYL MODE is o, then you can turn
the platter from anywhere (including the top) to nudge the pitch.
REVERSE MODE
Pressing the REV (7) button causes the playback to run in
reverse direction at the same speed as the forward playback.
SLIP MODE
When SLIP (20) is enabled, normal playback continues
inaudibly underneath SCRATCH, LOOP, and REVERSE eects.
When SCRATCH, LOOP, or REVERSE mode is exited, normal
playback resumes from the inaudible playback spot.
SLIP WITH SCRATCH
To use SLIP while scratching, enable VINYL mode by pressing
the VINYL (24) button. Enable SLIP mode by pressing the SLIP
(20) button. Using the jog dial will now create scratch eects
while normal track playback continues inaudibly underneath.
Once the jogwheel is released, track playback will continue
from the playback position playing underneath.
SLIP WITH LOOP
To use SLIP with loop playback, enable SLIP mode by pressing
the SLIP (20) button. Set a loop using the IN / OUT controls and
loop playback will begin. The SLIP (20) button will begin flashing
indicating SLIP mode is active and the position playing
underneath is shown on the jogwheel display. Upon exiting the
loop, track playback will continue from the playback position
playing underneath.
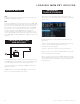
HOTCUES 1-4
LOOP CONTROLS
JOGWHEEL CONTROLS