Your Gemini User’s Manual Not Intended for Sale
Trademark Acknowledgement Gemini-10X, Gemini-15X: Star Mfg. Co., Ltd. grafstar, Universal/Atari Parallel Interface, Universal/Commodore Parallel Interface: Star Micronics, Inc. Apple, Apple II, Apple II + , Apple Ile, Apple Ill, Applesoft: Apple Computer Inc. Atari 400, Atari 800, Atari 850: Atari Inc., a Warner Communications Company Commodore, VIC-20, C-64: Commodore Business Machines, Inc.
Congratulations on having purchased a serial, impact dot matrix printer that offers you more quality, greater flexibility and convenience, and superior reliability than you could find in any other printer in the same price range. As you already know (or are about to learn), the Gemini-lox and Gemini-15X let you print both regular and italicized alphabets, as well as normal, elite (smaller), condensed, enlarged, emphasized, and double-strike characters.
This User’s Manual serves the operators of the Gemini-lox and Gemini-15X printers. The Gemini-lox accommodates paper up to 10 inches wide. The Gemini-15X can handle paper up to 15.5 inches wide, and can print more characters per line.
Table of Contents Chapter 1. Introduction Chapter 2. Paper and Ribbon Chapter 3. The Gemini Self-Test Interfacing Gemini with Your Computer Chapter 4. Putting Gemini to Work for You Chapter 5. The Fundamentals of Dot Matrix Printing Chapter 6. Chapter 7. The Full Range of Printing Capabilities Chapter 8. Downloadable Characters The Function Codes Chapter 9. Maintenance Chapter 10. Appendix A. Apple II Plus Appendix B. Atari 8001400 Appendix C. Commodore VIC-20, C-64 Appendix D.
_. ,?: .,^ .-.
INTRODUCTION a.“. Ir. c Allow us to introduce you to your Gemini printer: “Gemini, this is your new user:’ “User, this is the remarkable new Gemini - a versatile and dependable printer that lets you do tricks with the dot matrix and bit image capabilities? In this chapter, we’ll answer the question: What are the parts of the printer and how do they work together? We’ll define the operating environment for Gemini, and we’ll discuss its technical specifications.
- Gemini User’sManual set them. Other products call them “internal switches” because you must take their printers apart to get to them. The Gemini DIP switches are easy to set, which is explained in Chapter 4. Next to the DIP switches is the connector for the parallel interface. This is where you connect your Gemini to your personal computer, so they are “interfacing:’ and able to communicate with each other.
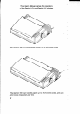
e Introduction DIP switches Connector for parallel Interface “Port hole” for serial Interface (optlonal) Grbund terminal Figure 1-2. The connectors back of the Gemini printers. -3% and DIP switches are located on the A SNEAK PREVIEW INSIDE GEMINI By referring to Figure 1-3 we can examine more closely the parts that make your Gemini printer work.
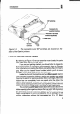
Gemini User’sManual Paper separator Paper gulde - 4 - Figure 1-3. For more information about how the paper guide, separator, and holder should be attached to the printer, please refer to Appendix G at the back of this manual. - Curve Between Failures). If you ever need to replace the print head, you can detach it yourself for replacement. The Gemini prints by means of pins that are thrust from the “working” side of the print head. These pins impact against the paper, which is backed by the platen.
Introduction onto the paper, with the dots arranged according to preset matrix patterns (imaginary grids). Because the characters are printed in a series (one after the other), Gemini is called a serial, impact dot matrix printer. Above and behind the platen is a device for bearing and propelling fanfold computer paper. The tractor unit is used with computer paper having perforated and punched paper guides on the sides.
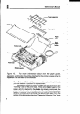
Gem/d User’sManual TME CONTROL . PANEL Let’s turn our attention to the buttons and status lamps on the control panel. Figure l-4 shows what the buttons and lamps can do for you. The two buttons in front are used to advance paper through the printer, to the next line on which you want to print. L-Fadvances the paper one line at a time, and F.F. moves the entire form (or page) forward.
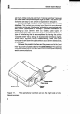
Introduction Connector for oarallel interface board Optional serial interface (punch-out tab) unit Lower casing - . Power switch Figure l-5. The main components of the Gemini printer are the power unit, the control board unit, and the printer mechanism (which features a detachable tractor). The control board also contains the buffer that allows your computer to send a batch of information to be printed, which Gemini then stores until it can get to it.
Gemini User’s Manual printer, computers communicate data even faster. The buffer can accommodate 816 characters of memory, with an optional buffer that can be expanded to 4K or 8K. Qu’est-ce que “K”? Computer memory is measured in terms of K, meaning ki/o&fes. A kilobyte is 1,024 bytes, and a byfe equals one letter of the alphabet (or a symbol, or a number). The print-out is accomplished by theprintermechanism, also shown in Figure l-5 and represented in Figure 1-6.
(. introduction GEMINI’S OPERATING ENVIRONMENT When you install your Gemini printer, you should use common sense and good judgment about where you place it. The following are worthy of consideration in evaluating a potential operating environment: Position Gemini horizontally on a level surface. Pick a place that does not have extremes in temperature (very hot or very cold) strong vibrations dusty atmosphere oil present metal particles nearby.
Gemini User’s Manual TECHNICAL .* SPECIFICATIONS The following table provides a summary of the technical specs for the Gemini-lox and the Gemini-15X. If you understand all of it, great! If you don’t, that’s okay, too. Either way, by the time you finish reading this manual, you should know more than enough to use your printer to its full potential. Note: The technical specifications subject to change without notice.
introduction Mean curve between failure (MCBF): 5 x lo8 lines (excluding Print head MCBF: 10 x 10’ characters Columns print head) GEMINI-10X 80 96 136 40, 48,68 (maximum): Normal Elite Condensed Enlarged GEMINI-15X 136 163 233 68,82,116 Line spacing: l/6, l/8, 7/72 plus programmable Paper slew: 10 lines/second spacing) GEMINI-10X width = 3-10 inches copies 3 sheets’ thickness = 0.07-0.1 mm (1 part) 0.28 (3 parts) width = 8.5 inches thick = 0.07-0.
; 1 -- - -.
PAPER AND RIBBON With Chapter 1 now “imprinted” in your memory, you’re almost ready to apply all these new discoveries about the Gemini printer. In this chapter, we’ll learn how to load paper into the printer, install the ribbon, and set the print head gap. Chapter 3 will give you a chance to print something; to see the results of what you’ve learned so far. But first, let’s explore the options for loading different types of paper.
Gemini User’s Manual Removing the Tractor Unit The tractor unit is only used with fanfolded computer paper. (That’s the paper that comes in perforated sheets, folded into stacks, with rows of holes along the right and left edges.) To print onto single sheets, you need to remove the tractor unit. To remove the tractor unit, follow these simple steps: -_ - 1. 2. Turn off the printer.
Paper and Ribbon The Gemini tractor unit is easy to remove for using single FigureZ-1. sheets or roll paper. Tractor frame - Release lever Tractor frames support the unit on the left and the right. Be Figure 2-2. sure to adjust the release lever when removing or mounting the tractor unit.
.4 Gem/n/ User’s Manual Note:After removing the tractor unit you’ll need to set the “release lever” when you are ready to print single sheets. The release lever is located on the left side of the printer (see Figure 2-2). This is somewhat like shifting an off-road vehicle from two-wheel to fourwheel drive. On the Gemini printers, you need to “shift” the release lever forward so it aligns with the ‘7” for “tractor” when the tractor unit is in use.
I_. .‘: : “. Paper and Ribbon 7. .Position the sheet of paper where you want the first line of text to start printing. (It may take you a little practice to get the placement consistently right, but you’ll master it quickly.) 6. Push the release lever back to the “closed” position, indicated by “F1’ 9. Return the paper press to the original position, flush against the paper. 10. Replace the cover and turn the power “on? Note: Never touch the printing head during printing.
Gemini User’s Manuai LOADING ROLL PAPER The Gemini printers also allow you to print from rolls of paper. The specifications are the same for both the Gemini-lox and the Gemini-15X. ,.: 2: .: : . . .. .. .’ :: .. ..) ,. ‘:jYy :.. > ” ‘. ‘. .: ,,: ., :::., Roll paper width: Roll paper thickness: Diameter of roll: 8.5 inches 0.07-0.
Paper and Ribbon Roll paper utilizes the metal racks, which come as accessories with every Gemini printer. As shown in Figure 2-4, these accessories include the paper guide, paper separator, roll-paper holder, and holder shaft. For information on how to attach these accessories, please refer to Appendix G. The steps for inserting roll paper are fairly simple and straightforward: 1. Turn the power “off:’ 2. Remove the tractor unit, if you haven’t already done so. 3.
Gemini User’s Manual paper separator guide inserting roll paper in the Gemini printer Figure 2-5. inserting sing/e sheets, with accessories to accommodate the “sing/e-sheet” in this case is quite long. 9. Insert the roll paper into the paper chute, then push the paper through so it goes around the platen. 10. When the paper has been pushed through so it’s above the paper press, push the press back so it’s in its operational position (that is, flush against the paper). 11.
Paper and Ribbon 13. Rotate the platen knob and check to see if the roll paper is feeding smoothly. If some adjustment is needed, pull the release lever forward to the “open” mode again, and adjust the placement of the paper before “closing” the release lever. 14. Set the print-start position to where you want to begin printing on the roll. 15. Turn the power switch position. . c to the “on” Figure 2-6.
Gemini User’s Manual LOADING SPROCKET-FED PAPER Sprocket paper is also known as “computer paper:’ fanfold paper, and “perf” paper (for “perforated”). Even if you call it “That funnylooking paper with rows of holes on the sides:’ your Gemini can still print on it. Sprocket Paper Speclflcations Parameter Gemini-lox Gemini-15X copy: minimum maxlmum 1 sheet 3-part form’ 1 sheet 3-part form’ Paper width: minimum maximum 3 inches 10 inches 5 inches 15.
E t Paper and Ribbon Left sprocket mechanlrm Right sprocket mechanism Figure 2-7. Mounting the tractor unit is a “glide and snap.” Glide the unit down until the A’s align, then snap the unit down so the B’s lock into place. Facing your Gemini, as depicted in Figure 2-7, you see the tractor’s driving gear-wheel that is on the right (protected by a “fender:’ complete with a “fender skirt”). To the left of this part is the right sprocket. On the other side of the spacer(s) is the left sprocket unit.
Gem/n/ User’s Manual Gemini-lox Loading Sprocket Paper The Gemini-lox should be loaded with sprocket-fed according to the following steps. 24 1. Turn the power switch “off? 2. Install the tractor unit. 3. Install the paper separator and paper guide, as described in Appendix G. 4. Pull the release lever, located on the left side of the printer, toward the “open” position (marked ‘IT”). 5. Lift up the paper press. 6. Pull the paper separator upright, as shown in Figure 2-8. 7.
Paper and Ribbon Feed the paper around the p/a ten (“roller’l) of the Gemini- 10X, Figure 243. then push the paper separator “downrightY(That’s the opposite of “upright” - not to be confused with “downwrongl’) 13. Flip the clamp levers forward on the sprocket mechanisms; adjust each mechanism (right and left) so that the sprockets (the nubby little “teeth” protruding from the sprocket wheel) align with the holes on the paper. 14. Adjust the sprockets so they are lined up with the sprocket holes. 15.
Gemini User’s Manual Clamp lever Tractor cover Figure 2-9. Expose the “teeth” of the sprockets, mechanisms so the paper “feeds” through them. and align the If the sprocket paper you just loaded in your Gemini-lox is Figure 2- 70. multilayer (non-carbon) forms, then refer to the end of this chapter to learn how to adjust the print-gap.
Paper and Ribbon Gemini-l 5X Loading Sprocket Paper * The Gemini-15X can be loaded with sprocket paper exactly the same as can the Gemini-lox, but with one important difference. The Gemini-15X is designed to accept paper either from the back of the printer or paper fed from beneath the printer. That’s right, there’s a slot in the undercarriage that lets you position the Gemini-15X above your stack of fanfold computer paper; this paper is fed up through the printer and out the back.
Gemini User’s Manual Paper separator, The first step is to prepare the Gemini-75X by putting the Figure 2-l 1. mechanical controls in the “open”position. Stepsg-12leadyoudown twoseparatepaths:Steps9A through 12A are for loading sprocket paper from “behind” the printer; steps 9B through 12B instruct you on loading paper from “beneath” the Gemini-15X. 26 9A. Place the stack of fanfolded paper behind the printer. computer 10A.
Paper and Ribbon The other option is to: 98. . Place the sprocket paper below the printer (ideally, on the second shelf of a specialpurpose printer table, with the printer above it on a shelf with a built-in slot). 1OB. Pick up the first sheet of the perforated stack of fanfolded pages, and lift it up and through the slot in the undercarriage of the Gemini-15X. 11B. Push the paper up toward the front of the platen. 12B.
- Gem/n/ A . . . . “Bottom Pass” loadlng User’s Manual “Back Pass” : : Figure 2-13. Whether you use the “bottom pass” (shown here) or the “back pass” option (also shown), you start and end with the same steps. 30 13. Adjust the paper so that it will feed through straight, and push the paper press back to its operational position. 14. Horizontally adjust the sprocket mechanisms right or left so they align with the sprocket holes on the paper. 15.
Paper and Ribbon . 17. Close the tractor covers. 18. Rotate the platen knob, and set the printstart position of the paper. 19. Turn the power “on” and put your Gemini to work for you. NoWThe best “start-position” (step 18) will vary according to the paper on which you are printing and the number of blank lines in your document. If you are a novice with dot matrix printers, you might try to position your paper just above the in-place paper press for your first attempts.
Geminl User’s Manual LOADING THE RIBBON . You already know that your Gemini printer is one of the best buys available today in terms of what you get for your initial investment. What’s more, Gemini’s sensible ribbon requirements are even more economical as time passes. That’s because Gemini uses ordinary typewriter ribbons on spools. When the ribbon has gone from one spool to the other, Gemini automatically reverses the ribbon direction.
Paper and Rlbbon How to Set the Ribbon * Telling you how to set the ribbon is like writing a narrative describing how to tie your shoelaces. Figure 2-14 and 2-15 show you the way to thread the ribbon on the Gemini-lox and Gemini-15X, respectively. But before you try it, you would do well to review the hints provided here. Hint PI: Turn the power “off:’ Hint #2: Slide the print head gently with your fingers to the approximate center of its pathway (Figures 2-14 and 2-15). A4 Ribbon guide .-._ .
Gemini User’s Manual Hint #3: Begin by setting either ribbon spool securely on a ribbon spool axle. Make sure you have the spool positioned so it will wind/unwind as shown in the figures. Place the spool securely on the axle, so that the “drive pins” engage the spool. - - Figure 2-16. You might want to use a ball point pen to lightly press the ribbon guide toward the platen while inserting the ribbon. Hint ++4: Then thread the ribbon, taking care around the print head.
Paper and Ribbon ink ribbon (incorrect) Print head (incorrect) Ribbon guide (Correct) Two wrongs don’t make a right, so try to be careful Figure 2- 17. when setting the ribbon near the print head (shown here). Release lever Eyelet grommet Ribbon spool The eyelet grommet (which signals Gemini to Figure 2- 18. automatically reverse the ribbon direction) is shown correctly placed on the ribbon-spool side of the changeover lever.
Gemini User’s Manual Hint #5: d Hint #6: The eyelet grommet (which signals Gemini to automatically reverse the ribbon direction) should be placed on the ribbonspool side of the changeover lever. --, Set the other ribbon spool on the opposite spool axle, making sure the “drive pins” are engaged. Hint #7: When the ribbon threading has been accomplished, turn the ink ribbon spools by hand, approximately four or five rotations of the spools.
1 i Paper and Ribbon ADJUSTING THE GAP BETWEEN THE PRINT HEAD AND PLATEN . Gemini printers can accommodate papers of varying thicknesses by allowing you to change the print-head gap. This “gap” is the distance between the print head and the platen. Gap adjustment is done by moving the “adjust lever:’ which is immediately in front of the “release lever” (see Figure 2-18). Pulling the “adjust lever” forward will widen the gap, and pushing it backward will make the print-head gap narrower.
-_& - ._s. - -M-u,“‘= M.
GEMINI SELF=TEST L L.. II. “Self-Test” is the name of the built-in program that prints out several sample lines of letters, numbers, and other characters to show you that everything is in good working order. You can print the Self-Test without hooking up your Gemini to a computer. The Gemini Self-Test is a special feature that allows you to check your installation of the paper and ribbon and the adjustment of the print head gap.
Gemini User’s Manual WHAT THE SELF-TEST LOOKS LIKE .- I I Figure 3-la. actual size). The left side of the Gemini-lox Self-Test printout (shown - Figure 3-2a. actual size).
-. Self- Test I I GHIJ~::LMNOF’QHSTlJVWXY%C\l.“‘_ ‘abc:defghi _il:lmno ,I 0 I The right side of the Gemini-lox Self-Test, which is a Figure 3- 1b. continuation of this two-part figure. Figure 32b. continuation The right side of the Gemini-15X Self-Test, which is a of this two-part figure.
Gemini User’s Manual WHAT THE SELF-TEST MEANS - The Gemini Self-Test allows you to test the printer’s performance before putting it to work. Beyond that, the Self-Test is a demonstration of some of the characters Gemini has stored in its permanent memory. On the following pages, groups of characters from the SelfTest are identified and discussed. Where a character has multiple meanings or uses, this manual provides the most common and generally used.
Se/f-Test In Figure 3-3, the letter “a” codes a character that’s as hard to see as the wind. That’s because the first line begins with a blank space. The “blank” character may not seem important, but without it: everythingwouldruntogetherlikethis The first character that appears in the lower line of Figure 3-3 is the “exclamation point” (coded “b”). This is also called the “factorial” sign in mathematical symbolism.
Gemini User’s Manual -_ a bcdef ARCDEFGHIJKLMNGPQRSTlJVWXYZC\l’.~-’ - -- Figure 3-4. The Self-Test prints the uppercase alphabet in the first line, 10 characters per inch. In Chapter 5, you’ll learn how to print larger and smaller letters (from 5 to 17 characters per inch). - _- In Figure 3-4, the characters coded “a” and “c” are “brackets:’ These are sometimes used in the same manner as parentheses. The character coded “b” is a “reverse slash” - the mirror-image of the “slash” in Figure 3-3.
Self-Test abed abc:def ghi iklmnopqrstuvwxyz.~ : 1” Figure 3-5. This segment of the Gemini Se/f-Test shows you what the lowercase letters look like, unless you command the printer to use another type sty/e or a different size. The 96 italic characters form the third line of the Figure 3-6. Gemini-15X Self-Test: the third and fourth lines with the Gemini-lox. These characters are the italic version of the characters individually identified in Figures 3-3, 3-4, and 3-5.
- ..
INTERFACING GEMINI WITH YOUR COMPUTER Your Gemini printer is a remarkable example of modern engineering. A few short years ago, the information-handling capability built into Gemini would qualify the “printer” to be considered a “computer” of sorts. When Gemini is interfaced (“hooked up to”) your microcomputer, the results can be dazzling. The characters identified in Chapter 3 are imbedded in Gemini’s mad-on/ymemory(ROM’chips.
Gemini User’s Manual INTERFACE OPTIONS Gemini provides a parallel interface as standard. Parallel interface is common to almost all popular microcomputers currently on the market. But some computers use serial processing transmission and require serial interface capability. As shown in Figure 4-1, Gemini is designed to accommodate either type of interface. -- .
lnferfacing Gemini with Your Compufer The DIP Switches ’ : L.. c The dual-in-line package (DIP) switch is a device that controls the printer’s “patterns of thought? Several functions can be selected by appropriately setting the two DIP switches located on the control logic board (Figure 4-2). DIP switch 2 can be set at the rear of the printer as shown in Figure 4-3. It is necessary to remove the upper casing to set DIP switch 1. Please refer to Chapter 10 for instructions to remove the upper case.
Gemini User’s Manual Ground Terminal \ DYS-4 / DIP Switch 2 Connector for Parallel Interface Port Hole for Serial Interface (optional) F Power Cord Figure 4-3. DIP switch 2 controls (1) detection of when your Gemini runs out of paper, (2) the effect of the CR codes on buffer-full printing, (3) 7-bit or 8-bit interface, and (4) automatic line feed. Dip Switch Pin No.
Interfacing Gemini with Your Computer if DIP Switch 1-l and l-4 are set as follows: l-1 l-4 on on off off on off on off Then, your Gemini will print the following character sets Standard ASCII Download italic ASCII italic ASCII Figure 4-5. The setting of DIPswitches l-l and 14 control the charactersets. l-6 on off on off on off on off DIP Switch Settings l-6 l-7 on on off off on on off off on on on on off off off off Country U.S.A.
Gemini User’s Manual ..::i >> ;:&j$ Swlt ch .: ...>>> ,.,. i;i;i;:;:>;:::: ii... :..:j. ‘ii)j;j:ii!i; 2-1 ::::::::+: ::.~:.:::.::::, :::j::j-;:y: ;:;;,.) :‘i::‘::\,$::: ::‘.::‘,:>j::: ::::::::‘::::::: .:,::::.:.::::y ...:.:.>>> ijis;;;;:; 2-2 :::::::::,::::.: ::::::;:;::i:;: ;.;:i;:z::.;:: ;g:‘:;;:::$ .;;;;g;i:i;i;i; ....:.: :.>> ::::.:.:.: >>: ;:f~;;;j;g;;; .......>:. :::::::j:.:.:.: :::::::j::::::: :::::::::::::.:: :::::::::,::.:: :::::y::.
Interfacing L. ; Gem/d with Your Computer Depending on the type of system you have, DIP switch number 2-3 is an important DIP switch that affects computer performance. For example, Apple operates on a 7-bit interface, and the IBM-PC requires an 8-bit interface. cr. I. L- c .. CONNECTING THE PARALLEL INTERFACE This section discusses hooking up your computer to Gemini, via the parallel interface.
Gem/n/ User’s Manual Interfacing Gemini with Your Computer Warning: Power to your computer and printer must be “off” before attaching the interface cable. The parallel interface connector on Gemini is a rounded trapezoid, with the top edge longer than the lower edge. The connecting plug must be complementary with the Gemini connector; otherwise, it won’t fit at all. Figure 4-8 shows the connection and the clamp pins for securing the union. - Figure 4-8.
lnferfacing Geminl with Your Computer SERIAL INTERFACE The serial interface requirementsvary with the type of connector and type of device to which Gemini is interfaced. The serial interface option can be purchased from your Gemini dealer and is accompanied by its own documentation. INITIALIZATION In Chapter 5, you’ll get a quick course in putting Gemini to work for you. But the first step is initialiling the printer for operation. This can be accomplished in three ways.
PUTTING GEMINI TO WORK FOR YOU Your Gemini printer is an extraordinary machine. You can use it as a “super” typewriter, a graphics terminal, and as a regular computer line printer. Using standard routines on your computer, you can produce hard copy of program listings, computer memory dumps, and program outputs (text and graphics).
Gemini User’s Manual The ASCII Code Every letter, numeral, and other character that is sent from the computer to Gemini is transmitted in the form of a number code. A standardcode was agreed upon to allow greater compatibility among the hundreds of different types of computers and peripherals.
Putting Gemini to Work Transmitting the Codes The easiest way to transmit functional control codes is to build them into the software program that sends the regular codes for letters and numerals. Sending the control codes to the printer by building them into the program allows you to change the printing instructions during the program. This gives you total control to print what you want, the way you want to print it.
j Gemini User’s Manual LPRINT “A” means the same as LPRINT CHR$ (65) The CHR$ function (pronounced “characterstring”) allows you to transmit special characters and ASCII control codes that are not directly available through your computer. The Problem with BASIC The “basic” problem with BASIC is similar to the problem with the ASCII code: While there are many program statements that are standard, there is no standardization of the BASIC language.
1 E 1 1 Putting Gemini to Work computer manual, try this exercise to “test the water:’ Enter this simple program: LPRINT CHR$(14); “BASIC” then, hit the return (sometimes called the “enter” key). That oneline program establishes communication between your computer and Gemini.
Gemini User’s Manual Turn your computer “on? Follow the set-up requirements, if any (such as the selection of the printer interface mode). Load BASIC and turn “on” your Gemini. The “Power;’ “Ready:’ and “Online” lamps should be lit on Gemini’s control panel. Type in the reference-program listing, Figure 5-l making the modifications outlined in the appendices for your computer system. Note:You should “proofread” each line you type in before entering it.
Putting Gemini to Work c L. L L. L..
Gemini User’s Manual Run the Reference Program Because we left the printer in the 17-CPI mode at the end of the sample program listing, we need to reset Gemini before running the program.
There it is, a reference sheet that summarizes the various type styles that Gemini can produce. If your printout looks like Figure 5-2, great! Turn your printer “off:’ advance the paper, and tear off the tables. We will now analyze the program and printout to learn how we managed to do what we did. On the Other Hand. . . If you made a typing error that caused the program to “belly flop:’ or if your printout looks strangely dissimilar to Figure 5-2, you should reset Gemini and try again.
Gemini User’s Manual Wait a minute. Didn’t we use the command code CHR$(15) to shift into compressed type? That’s right; there are two ways of shifting into compressed type: - the single-character command; CHR$(15), and the three-character command; ESC$ + “B” + 3. [Actually, that’s CHR$(27);CHR$(66);and CHR$(3), if you check the ASCII code table in Appendix I.] The command CHR$(18) can be used to shift the printer from compressed mode back to normal pica-size print.
Putting Gemini to Work Compressed 17 CPI Elite 12CPI Pica (normal) 10 CPI Double-width Compressed 8.5 CPI Double-width Elite 8CPI Double-width Pica 5CPI Line 70, the last line of our definitions, contains functional commands to control the way the type is printed. In emphasized printing, Gemini prints the characters once, then goes back and reprints them (with the dots offset by one-half dot).
-Gemini User’s Manual paper), then skip down 16 lines from the top of the next page. So where, you might ask, did the extra line come from? BASIC inserts a carriage return (CR) and line feed (LF) at the end of every LPRINT statement, unless the last character in LPRINT is a semicolon (;). Line 90 starts the major loop of the program, which causes the normal and italic tables to be printed. If the variable “I” is equal to the number 1, then the message on line 100 is printed.
Putting Gemini to Work italic type, respectively, in Figure 5-2. You might note that the decorative graphic characters are unaffected by the italic control, and the italic mode is resumed after 6 x 6 characters are printed. Line 140 is similar to line 120, and serves as one way of drawing a line across a page. Line 150 sets three character strings in preparation for the printing that follows. The first string, “ABC:’ is printed in normal script. The next string, “Xx”, is printed in superscript.
Gemini User’s Manual by of character EMPH$. J = 4, line 310 shifts Gemini into the double-strike and emphasized mode by sending both the DBL$ and EMPH$ commands. Line 320 is the heart of the program. This line prints out the entire table. The rest of the program prints the titles and headings, or sets the print size and style.
Putting Gemini to Work default spacing. If n is greater than 12, the spacing will be larger than normal. In line 350, we set n to equal 9, with the result that the line spacing is changed to 9172or ‘/Binch. A line feed is set to move down (or, to be more correct, “advance the paper”) 1/8inch, then return the print head to the first print column (it’s “home” position). The printer is shifted into the compressed mode because of COMP$, the ‘I+” is printed, followed by another carriage return and line feed.
Gemini User’s Manual characters. (“Alphanumeric” means all the characters that are the letters in the alphabet and numerical symbols for numbers.) The difference between Figures 5-2 and 5-3 is that the latter has had some of the superscripts and subscripts eliminated. The “supers” and “subs” are designed for normal and doublestrike type in IO, 12, and I7 CPI. Superscripts and subscripts were not intended for use in the emphasized mode. When you double the width of the characters (5,6, and 8.
Putting Gemini to Work the sloping in this sample program is the frequent use of superscripts and subscripts. When you print “supers” and “subs:’ Gemini executes the “scripts” in the double-strike mode. Double-striking involves printing the characters once, then reprinting them 11144th inch lower. One one-hundred-and-forty-fourth of an inch isn’t even detectable (unless you have the eyes of a hawk).
Gemini User’s Manual 1/12th) of an inch difference between the beginning and end of the line. By examining the lower table in Figure 5-3, you’ll see that the same options and parameters apply to italic type as to standard type. WORD PROCESSING SOFTWARE Word processing is the family of programs that package text in forms understandable by your microcomputer, its display monitor, and various printers.
Putting Gemini to Work Even without “mastering” BASIC, you’ll be able to work wonders with Gemini, a.s you’ve already learned in this chapter. User-Patching Your Software Program “Patching” is the term used to describe making changes in an existing word processing program so that it can make fuller use of Gemini’s capabilities. To accomplish patching, refer to your word processing software user’s manual.
Gemini User’s Manual 10 20 30 40 SO 50 70 SO CLS:KEY 3FF:DM AS(24,BO) cLs:X~l:Y:l SOSUB 1SO:LOCATE X,Y:PRINT “C” B$=INKEYI:IF B+“’ THEN 40 IF B$aCHR¶(S) THEN CL&END IF BI=CHRI!lB) THEN CLS:SOBUB 200:60TO 20 IF BJ=CHRl(lb) THEN 6010 220 IF B(=CHR%(13) THEN AJ(X,Y)=BhLOCATE X,Y:PRINT ’ “:X=X+l:Y~l:LOCRTE X,Y:PRINT “C”: : SOT0 40 90 IF BWHR((4) THEN SOSUB 130:GOT0 40 100 LOCATE X,Y:PRINT BJ;:RI(X,Y)+:Y=Y+l Y.
Putting Gemini to Work ..
Gemini User’s Manual After typing your text, you may go either to the second menu, which will permit you to print your text, or to the third menu where you may send Escape or control codes to the printer for special characters or effects. It is not necessary to type the entire ASCII codes. Instead, you have the option of selecting “ESC” or “CHR$“.
F 6:’ /1 Putting Gemini to Work WHERE DO WE GO FROM HERE? If you want to get to work, you may take your leave at this point. You’ve gotten a good idea of what Gemini is all about - how the parts fit together, how to add paper and ribbon, the Self-Test, interfacing with your computer, and various printing capabilities. That should be enough to get you started. To paraphrase an old saying: “A journey of a thousand pages begins with a single character.
v.,;. ..I ;. - -...,. .
THE FUNDAMENTALS OF DOT MATRIX PRINTING Understanding dot-matrix printing and Gemini’s graphics begins with knowing some details about the print head and the software that controls it. This chapter will provide you with those details. The print head, print matrix, and vertical spacing are described in understandable terms.
Gemini User’s Manual Paper “Needle” pin Sprlng ‘IL Platen Pln gulde r $- Iron core I Clapper I Ribbon guide Bobbin \’ Printer solenoid Figure 6-2. This side-view schematic of the print-head mechanism shows how electrical signals to the solenoid cause the clapper to “fire” the needle-like pin that impacts the ribbon/paper/p/a ten. After the solenoid releases the clapper, a spring returns the pin to its original position.
Fundamentals of Dot Matrix Printkg Figure 6-3. The nine rows of the matrix correspond to the nine pins on the print head. For this uppercase letter, only the top seven pins fire - all at once for each vertical line in this letter, and a single pin (firing repeatedly as the print head moves sideways) for the horizontal line. This printing technology is called impact, dot matrix printing. Dots are printed according to a predesigned matrix or grid system.
Gemini User’s Manual though there are only five boxes across, you have “9x9” printing positions. The uppercase letters are formed by the top seven pins. Some of the lowercase letters (“9:’ “j:’ “p:’ “q:’ and “y”) extend down to the eighth and ninth pins. This style of character generation, called “true descenders:’ makes these letters much more readable. The “underlining” character (ASCII code 95) is created by firing only the ninth pin. The ESC CHR$(48) control code can also be used for underlining.
fundamentals L b”. L.. t.. cr.. k.“. L.. L. 11. ot Dot Matrix Printing With emphasized type, the matrix is 18 by 9 because each column is fired twice, horizontally offset by one-half dot on the second firing. Double-strike printing is accomplished by an 18 by 18 matrix, with the second printing vertically and horizontally offset by one-half dot. Emphasized plus double-strike is a 36 by 27 matrix, with the additional printings offset both horizontally and vertically.
Geminl User’s Manual As if that weren’t enough, there’s ESC “J” n, which does the same work as ESC “3” n but doesn’t change the value for successive line feeds. Because each “dot” is l/72-inch in diameter, you have vertical spacing control as miniscule as half the thickness of a dot! Another way of expressing the same idea is that Gemini provides a high-resolution graphics pattern of 144 dots per vertical inch.
Fundamentals of Dot Matrix Printing Line 40 reveals that the variable M is used to control the number of times line 90 is executed. When I is small, M is large. When I is greater than 12, M is fixed to 2. Line 50 sets the vertical line spacing (you may recall that ESC = CHR$(27), “3” = CHR$(Sl)). So, in this program, line 50 sets the vertical spacing to 11144inches. Line 60 starts a loop that uses the value of M to count 25 times when I equals 1, and counts 3 times when I is greater than 12.
GeminiUser'sManual High-Resolution Vertical Spacing Using the ESC 3 n Control Code 11144 21144 31144 41144 - 51144 61144 - 71144 -- - -- --- -_I-- --__I- 81144 91144 --I_ --- -- --------------- ------- - -------1------------ 101144 111144 121144 141144 151144 161144 171144 - 181144 ------- ------- --I -- - -- 191144 - ---..-201144 --------- m---1_ ---------- --- -- 211144 221144 ----m-m- - -------- ------em ------__--_--------I- - Figure 6-5a.
Fundamentals Inch Spaclng of Dot Matrix Printing _------------------------------------ _----e--------m- 231144 1--e------------p -----------------------------~ ----__--------- 241144 --_ --a----- ----------_---_---_^______ -- 25/l 44 261144 ------ --- --- 27/l 44 -----m-----------w ---- ~~~~ ----I------_I_ -- -v----m -- 28/l 44 --- ---- LPRINT TAB(30);“High Resolution Vertical Spacing * LPRINT TbB(30)~“Using the ESC 3 n Control Cod@ ” FOR I * I TO 30 IF I = 13 THEN 6020 110 M * I
Gemini User’s Manual INTRODUCTION TO DOT GRAPHICS When we enter into the bit-graphics mode, we have complete control over the firing of each individual pin in the print head. The graphics mode opens up the full potential of the Gemini printer by allowing us to create any image we can imagine.
Fundamenta/sof Dot Matrix Printing Note: If we used ‘I” or CHR$(76) instead of “K:’ we would be asking Gemini for high-resolution graphics. If we used “y” or CHR$(121), we would be asking for high-resolution graphics with double speed, and if we used “2” or CHR$(122), we would be asking for ultra-high-resolution graphics at normal speed. nl and n2 represent the set of ASCII codes that define how many columns of graphics to print on a line.
Gemini User’s Manual Gemini requires that precisely the correct number of characters you specify with nl and n2 will follow immediately after the n2 control code. If there are too many (or too few) characters, unexpected and crazy things will happen. The high-resolution graphics mode is entered by sending Gemini the control code: ESC “L” nln2, which selects the 120 dotsper-inch column scan bit image graphics mode. But Gemini’s graphics capabilities don’t stop there.
Fundamentals of Dot Matrix Pfinting &Bit Interface 7.Bit Interface . 128 ns: used . 64 64 . 32 32 . 16 18 . 8 8 . 4 4 . 2 2 . 1 Print Head Print Head Pin Number (toIN 7 . 1 not used not used d Based on the chart presented above, if you had a 7-bit computer and wanted to fire pins number 1 and 4 simultaneously, you would send CHR$(64+8). In other words, you’d send CHR$(72): Therein is the pattern.
Gemini User’s Manual You computer aficionados may have already figured out that the high-order bit of the character controls the top pin, the next bit controls the number-two pin, etc. Okay, now that you know how to fire the pins, what code do you think will fire pins no.
Fundamentals of Dot Matrix Pflnting Next, you should construct the character you wish to “draw” and label the rows and columns. Figure 6-6 shows one such process, using two lines of seven rows each. ROUGH SKETCH c 9 a ‘; S A Flrlng Coder Pln No.
Gem/n/ User’s Manual In our example, we want to start printing in,dot column 100, and print to column 114. Therefore, the total number of characters we will send for each of the two rows is 114. Using our handy table, we know that nl = 114 and n2 = 0.
Fundamentals of Dot Matrix Prlntlng !O RESTORE 15 WIDTH “LPI!:“,255 20 LPRINT CHR$(??):“@“:CHR~(27):“~” 30 FORL - 1 TO 2 40 LPPINT CHRt~27):“K”:CHRS~114)1CHR((O!: 50 FOR SPACE * f TO 100: LPRJNT CHMIO):: NEXT SPACE 60 FOR COL!! = 1 TO !4 : RERD C : LPRINT CHRSX):: NEXT COLtf 70 LPSINT : NEXT L 80 DllTA 14,16,34,64,140,140,!2~,!28,!40,140,64,!4,16,14 90 DATt? 224,!6.232,68,34,18,1~~1~,18,34,6~,232,16,224 !.
- -_ -
GEMINI’S FULL RANGE OF PRINTING CAPABILITIES This chapter builds on the foundation of Chapters 5 and 6 and demonstrates how you can put Gemini to work for you. As with the other chapters, this one presents programs written in Microsoft BASIC for the IBM-PC. If you have an Apple, Atari, Commodore, Osborne, or TRS-80, you should consult the Appendices for those computers at the back of this manual.
Gemini User’s Manual For example, LPRINT “Plus”; CHR$(194); “a change plus c’est la me”; LPRINT CHR$(8); CHR$(94); “me chose:’ will print: Plus c,a change plus c’est la mQme chose. (“The more things change, the more they remain the same:‘) We used the CHR$(194) character to print the cedilla (“c,“). For the “5:’ type the letter “e” and then backspace - CHR$(8) - followed by CHR$(94) for the circumflex.
Printing Capabilities 2.
Gemini User’s Manual You can also combine characters, using the backspace command: LPRINT CHR$(126); CHR$(8); CHR$(95) produces: =, the symbol for “approximately equal to:’ Printing Equations Gemini provides three different types of “grouping” use in mathematical expressions: ( ) CHR$(40) CHR$(41) CHR$(91) CHkS(l23) CHdS(125) .
Printing Capabilities ASCII code 160,161,162, and 163 provide the four segments of a “two-line” circle: LPRINT CHR$(163); CHR!§(161);CHR$(27); “A” CH I%(6) LPRINT CHR$(l62); CHR$(l60); CHR$(27); “2” This little program will produce: 0 You can use two arcs from the circle to produce a different symbol: LPRINT TAB (2);CHR$(l63);CHR$(27);“A”;CHR$(6) LPRINT CHR$(l60) The result is a two-line symbol that serves as the scientific notation for the integration operation: The four directional CHR$(164) arrows:
Gemini User’s Manual LPRINT TAB (20); “N”; CHR$(13); TAB (20); CHR$(164); CHR$(13); TAB (16); “W”; CHR$(166); CHR$(32); TAB (22); CHR$(167); “E”; CHR$(13); TAB (20); CHR$(165); CHR$(13); TAB (20); “S” The result is: - - BLOCK GRAPHICS The block graphics, ASCII codes 225 to 255, are a series of squares, triangles, and intersecting lines. When they are put together, they form simple graphic designs and decorative embellishments.
Printing Capabilities 10 LPRINTCHR((27)iCHRl(bS):CHR)fJ) !5 LPRINTCHR$(27);CHR1(851:CHRJ(!): 20 RESTORE 30 FORJ * 1 TO 9 40 FOR f l 1 TO 12 50 REFlD R 50 L?R!NTCHRSi61: 70 NEXT I 80 LPRIN? 90 NEXTJ 100 DATA239,224,224,224,239,224, 224,224,224,224,224,22k 110 DRTA239,224,224,224,239,224! 224,224!224,224,224,224 120 DATA239,224,224,224,239,224, 239,224,224,224,239,224 130 DAM239,224,2!9!224,239,224,234,233,224,234,233,224 !40 Dh?P239,234,23?,?33,239,224, 224,239,224,239,224,224 150 DATA239,?39,224,239,239,
Geminl User’s Manual Line 50 reads the ASCII character codes stored in the data statement. Line 60 prints the data. Line 80 inserts a line feed after each line. The data statements on lines 100 to 180 are arranged so that the ASCII code for each 6 x 6 symbol used to create “WY” are in the correct location. CHR$(239) is a solid block of 6 x 6 graphics. CHR$(224) is a blank.
Prlntlng Caprblllties 10 LPRINTCHRI~Z?):CHR$(65):CHR)(b);CHR1(151 !5 LPRINTCHk$~27~:CHRt(85):CHR$~l~: 20 FOR K = ! TO I :O LPRINTCHR((27):CHPS(66);CHfi((K) 40 RESTORE 50 FORJ = 1 TO 9 $0 FOR I = 1 TO 1; 70 REkDA 80 LPRINTCHRS(A!: 90 NEXT 1 100 LPRINT 110 NEXTJ !?O DATA 224,224,224,224,224,224, 224,224,224,245,2?4,224 130 DATA224,224,?24,224,224,?2), 224,224,?5?,245,224,224 140 DATA224,2?4,224,245,224,224, 224,252,239,245,224,224 150 DATA?24,224,252,245,224,224, 252,239,239,245,224,224 lb0 DATA224,25?,239,
Gemini User’s Manual Upgrading Our Design Before our ship sails, let’s add some portholes. Replace line 190 with: 190 DATA 239,175,239,175,239,175,239,175,239,175,239,251 When you run the program again, you’ll produce the sailboats shown in Figure 7-3. The lesson learned is that you can mix the 6 x 6 graphics with standard 9 x 9 characters. These special characters in the block-graphics set can be very useful in creating bar graphs, your organization’s logo, even detailed drawings.
Printing Capabilities The Concept We are going to construct a bit-image “map” of the sheet of paper in the computer’s memory. Then we’re going to print that image on paper by selectively firing the dot-producing pins on the print head. As you know, the memory in your computer functions in terms of bits, which are represented as being either “0” or “1”. We’ll use each bit that’s part of our map to either be a dot (“1”) or a blank space (“0”).
Gemini User’s Manual extra wait is part of the price for BASIC’s simplicity. In addition, detailed graphics like this involves massive data manipulation. If for any reason you didn’t get an output that looks like it was supposed to look(compare with Figure 7-5),then turn Gemini “off:’ reset it by turning it back “on:’ enter LLIST, and compare the resultant printout to see where you went wrong. After you fix the problem, RUN the program.
Printing Capablllties 10 CLS:PRINT "':PRINT "":PRINT "":PRIN' I* 20 PRINT"THISPROGRAMTAKESABOUT3 MINUTESTO RUN" 30 PRINT'PLEASETURNON YOURPRINTERAND STAND BY" 100DIM E!TX(76,12) 110 MASKX(l)=l28:MASKX(41-16 !20MASKX(21=64 :MASKXWd 130MASKXt3)=32 :MASKX(6)=4 !40LX:20:LY=20 150 XFAC~72/LX:YFAC=?S/LY !OOOREM PLOTCURVE 1010RAD=9 1020Xl=l9:Yl=lO 1030FOR ANG=OTO 360 STEP 19 !040Rl=ANGt6,29/360 1050X2=RAD~COS(Rl!+lO:YZ=RAD:SIN(RI ,I+10 1060GCSUB3000 1070NEXTANG 1080FOR ANG=OTO 360 STEP 15 1090Rl=ANGtb,?fl/360 110
Gemini User’s Manual 3ClOXL=X?-Xl:YL=Y?-Y! 3020NX=ABS(XLtXFAC):NY=ASS(YLtYFAC! 3030IF NX:NYTgENNX=N" 7040YS%=INT(NX+!) 3050 !ObOFDR DX=XL/NSX:DY=Y!I~S' !=! TO NSY, ' 3070Xl=X!'DX:"!=Y!tDY 3OflO GOSUB4000 3090NCXT : 3100RETURN 4000REM PLOTA POINTA? Xl,Y! 4ClOXX-XltXFAC:YY=YltYFAC 4020COL-?NTtXX)+: 4030ROW~INTfYYI61 4040XITXrINTiYY-(btROW))+l 4OSOBITX(CttL,ROW)=BIT%(COL,ROW) OR ?lASKX!X:T%! 4060RETURK This continuation of Figure 7-4a is the rest of one Figure 74b. approach to using bit-image graphics.
Printing Capabilities Notes 713
- -
DOWNLOADABLE CHARACTERS AND CUSTOM COMMANDS DOWNLOADABLE CHARACTERS AND CUSTOM COMMANDS Beyond all the capabilities discussed so far in this manual, Gemini offers two more extremely flexible functions. If the Gemini doesn’t have the characters you need already built in, you can custom design your own. (In computer jargon, this is called downloadable characters). Up to 96 downloadable characters can be memorized by the RAM of the printer.
Gemini User’s Manual Figure 8-1. Downloadable design for paragraph symbols with each dot given a numerical value. - -- After we’ve placed all of the dots for our character, we need to turn them into numbers that the printer can understand. To do this, go down each column and add up the value of each dot. The numbers placed on the left-hand side are the value for each dot. Let’s take column one as an example. The first dot is in row two. Row two has a value of 2 on the left-hand side.
Downloadable and Custom Commands After defining a download character, we must activate the download characters in the printer. The code to perform this trick is: CHR$(27) CHR$(36) CHR$(l) let’s put all this together in an example and print out a few of our new paragraph symbols. Figure 8-2. Program listing to print: :/ ‘9‘1is,;I!‘CT, Not too bad for the first try.
Geminl User’s Manual This time we will use the downloadable feature to replace the @ symbol with the copyright symbol. 1’3QE!!Defi:e5ooyriptrvnSc!:n o!aceof 9 40 LPRIN?ESC~ICHR~(~?!~CHQ~!~)~~~RO~$~!~CHR~(O!~~HR~~~~~I~~R~~?~~I~HQ~~?~!: :HR~(??):CHR$(S~):CHR~(2O)rCHR~~6~)~C~R~(~4):CHR~(20)~ $0 RE!!Sc!ectdonn!ordrS!e chrractcrs SO LPR!N?ESCI:e~RI!36):eHP((!!: 70 QE!! Print our new svmbo: 30 LPRINT“Cowxght d 198:” Figure 8-4.
Downloadable and Custom Commands Descenders Earlier in this chapter we mentioned the descender information. When we left it as azero you probably thought this was easy. Well, it is! We only have two choices for descender data; it’s either a zero or a one. When it’s a zero, nothing happens. When it is a one, all the dots that make up our character are shifted down two rows.
I Gem/n/ User’s Manual MACRO-COMMANDS “Macro-Instruction” is the ability of a printer to accept a single control code to do the work of a multi-command series of codes. The Gemini’s macro command capability allows you to group printer commands together and execute them with a single command. Now, this might not appear very useful at first glance, but some of you just might be scheming on ways to tame a wayward spreadsheet program or to get some cooperation from an uncooperative word processor.
Downloadable and Custom Commands Now we’ll try an example on your own. and then you’re free to be creative 70 REM define MC?~ :a be eaahasirad and sxpauled 40 LPRIN? ESC¶:~HR~(43):ESCt:“~“:~SC$:~~“:C~R~!~!:~HR~ 50 REP!isstie 3acfo cmmand and trv text ($0): onntin~ 60 ?PRINf EW:CHRS”?‘* \tid#, 70 :PR!NT ‘EsohasizeC and Er!mCrd Empha5ized MacY-CB b5/ by ?acro” and Es-zpanded Figure 8-7. Program listing using macro instructions.
t /Y”/,,,