OPERATIONS MANUAL Bedienungsanleltung Manual de funcionamiento Manual de fonctionnement Manual del utente PT-1000 II HIGH-TORQUE DIRECT-DRIVE PROFESSIONAL TURNTABLE HOCHMOMENT-PROFI-DREHSCHEIBE MIT DIREKTANTRIEB GIRADISCOS PROFESIONAL DE ACCIONAMIENTO DIRECTO Y DE ALTO PAR MOTOR TABLE TOURNANTE PROFESSIONNELLE À ENTRAÎNEMENT DIRECT ET À COUPLE ÉLEVÉ GIRADISCHI PROFESSIONALE A COMANDO DIRETTO ED A ALTA COPPIA MOTRICE MULTI LANGUAGE INSTRUCTIONS English.......................................................
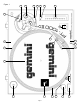
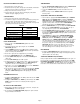
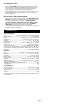
Figure 1 11 12 16 10 23 21 22 8 26 9 20 6 18 1 7 19 5 2 4 15 3 17 Page 2 24 25 13 14
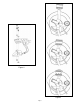
Figure 2 Figure 3 Page 3
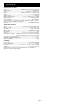
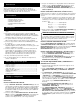
Introduction Congratulations on purchasing a Gemini PT-1000 II high-torque direct drive professional turntable. This state of the art turntable includes the latest features in modern direct drive turntable technology. Prior to use, we suggest that you carefully read all the instructions. 4. Put the NEOPRENE MAT (4) on the PLATTER (2). CARTRIDGE INSTALLATION: (SEE FIG. 2) Because all cartridges have their own designs, please refer to your particular cartridge’s instructions to insure proper installation.
INSTALLING THE DUSTCOVER: TARGET LIGHT: 1. Mount the hinges onto the dustcover. 1. Push the TARGET LIGHT SWITCH (18) firmly and the TARGET LIGHT (19) will raise into position and illuminate the stylus tip. 2. Hold the dustcover in position, directly above the turntable, and slide the hinge bases into the holders mounted on the rear panel. 3. Always raise the dustcover before removal. 2. To lower the TARGET LIGHT, push down on it until it locks in the casing. 4.
Specifications TURNTABLE SECTION: Type...................................................Quartz Direct Drive Manual Turntable Drive Method...............................................................................Direct Drive Motor.....................................................................Brushless DC Motor 18V Platter..................................................Aluminum Diecast 13” (332mm) Dia. Speed............................................................................
Einleitung Wir gratulieren Ihnen zum Kauf eines drehmomentstarken Gemini PT-1000 II Plattenspielers. Dieser moderne Plattenspieler enthält die neuesten Funktionen, die die Plattenspielertechnik mit Direktantrieb zu bieten hat. Vor Anwendung des Plattenspielers lesen Sie bitte alle Anweisungen sorgfältig durch. 4. Die NEOPRENAUFLAGE - NEOPRENE MAT (4) auf den PLATTENTELLER - PLATTER (2) legen.
6. Den TONARM erneut schwimmen lassen, um sicherzustellen, daß der horizontale Nullpunktabgleich (0) gleich geblieben ist. Wurde er nicht beibehalten, wiederholen Sie die Schritte 3 - 5. 7. Nach dem horizontalen NULLPUNKTABGLEICH das abgeglichene BALANCEGEWICHT - COUNTERWEIGHT (8) gegen den Uhrzeigersinn drehen, bis der vom Tonabnehmerhersteller empfohlene Auflagedruck auf dem AUFLAGEDRUCKRING - STYLUS PRESSURE RING (11) erscheint, wo er mit der Mittellinie des TONARMS - TONE ARM (6) zusammentrifft.
PITCH BEND-TASTEN: 1. Wenn die PITCH BEND (20) Tasten (Beschleunigung / Abbremsung) gedrückt werden, wird die Geschwindigkeit automatisch angehoben oder gesenkt, ohne die Reglereinstellung zu verändern. Wenn die Tasten freigegeben werden, kehrt die Geschwindigkeit zur Reglereinstellung zurück. Sie können diese Funktion benutzen, um die Geschwindigkeitsunterschiede beim Mischen von einem Titel zum anderen anzupassen. REGULIERUNG DER ARMLIFTHÖHE: 1.
3. Después de comprobar que se hayan quitado todos los materiales de embalaje, coloque el PLATO - PLATTER (2) suavemente en el huso central de la BASE DEL TOCADISCO - TURNTABLE BASE (1). Introducción Felicitaciones por su compra del giradiscos profesional de accionamiento directo y de alto par motor Gemini PT-1000 II. Este giradiscos ultramoderno está dotado de las características más avanzadas de tecnología de giradiscos de accionamiento directo.
6. Flote de nuevo el BRAZO FONOCAPTOR para asegurarse que se haya obtenido el equilibro horizontal en cero (0). Si no se ha mantenido este equilibrio, repita los pasos de contrapeso 3 al 5. 7.
AJUSTE DE ALTURA DEL ALZABRAZO: 1. Si la distancia preajustada que la PALANCA DE INDICACION - CUE LEVER (16) levanta la aguja arriba del disco no resulta adecuada, podrá ajustarse girando el TORNILLO DE AJUSTE DE ALTURA DEL ALZABRAZO - ARM-LIFT HEIGHT ADJUSTMENT SCREW (26) y presionando simultáneamente hacia abajo sobre el BRAZO DE FONOCAPTOR - ARM CLAMP (9). La rotación hacia la derecha del tornillo disminuirá la distancia, y la rotación hacia la izquierda la aumentará.
Introduction Nos félicitations à l’occasion de votre achat de la platine vinyle professionnelle Hi-Torque à entraînement direct pilotée par quartz PT-1000 II de Gemini. Cette platine vinyle très moderne inclut les dernières caractéristiques de la technologie de platines vinyles à entraînement direct. Avant son emploi, nous vous recommandons de lire soigneusement les instructions.
COUNTERWEIGHT (8) avec une main tout en tournant l’ANNEAU DE PRESSION DE L’AIGUILLE - STYLUS PRESSURE RING (11) jusqu’à ce que le numéro “0” sur l’anneau s’aligne avec la ligne médiane sur l’arbre arrière du BRAS DE LECTURE. L’équilibre zéro horizontal (0) devrait être complété. 8. Positionnez le bras de lecture au-dessus du sillon désiré du disque et poussez le LEVIER DE COMMANDE vers la position “DOWN” (Bas).
SPEED SELECTOR (15) pressé. La troisième rangée de points à partir du fond apparaîtra stationnaire quand le réglage de vitesse indique +3,3%. La rangée de points supérieure apparaîtra stationnaire quand le réglage de vitesse indique +7,2%. PITCH BEND BUTTONS (TOUCHES DE RATTRAPAGE): 1. Le fait d’appuyer sur les PITCH BEND (20) (touches de rattrapage) augmentera ou réduira automatiquement le ton sans changer le réglage du ton.
Introduzione Complimenti per l’acquisto di questo giradischi professionale a comando diretto ed a alta coppia motrice Gemini PT-1000 II. Questo giradischi d’avanguardia ha incorporato i componenti più recenti nella tecnologia dei giradischi a trazione diretta. Prima dell’uso leggere attentamente tutte le istruzioni. 4. Collocare il TAPPETINO DI NEOPRENE - NEOPRENE MAT (4) sul PIATTO PORTADISCO - PLATTER (2). INSTALLAZIONE CARTUCCIA: (VEDERE FIG.
7. Dopo aver regolato il bilanciamento zero (0) orizzontale, girare in senso antiorario il CONTRAPPESO - COUNTERWEIGHT (8) che è stato bilanciato finché sull’ANELLO DI PRESSIONE DELLA PUNTINA STYLUS PRESSURE RING (11) appare il valore della pressione consigliata dal fabbricante allineata con la linea centrale dell’asta del BRACCIO - TONE ARM (6). ARRESTO DELLA RIPRODUZIONE: 1. Spingendo la LEVETTA ALZABRACCIO - CUE LEVER (16) su “UP” il BRACCIO - TONE ARM (6) si alzerà e si arresterà la riproduzione. 2.
REGOLAZIONE DELL’ELEVAZIONE DEL BRACCIO: 1. Se la distanza pre-regolata con cui la LEVETTA ALZABRACCIO - CUE LEVER (16) solleva la puntina dalla superficie del disco è inadeguata, può essere regolata girando la VITE DI REGOLAZIONE DELL’ELEVAZIONE DEL BRACCIO - ARM-LIFT HEIGHT ADJUSTMENT SCREW (26) mentre simultaneamente si spinge in giù il BRACCIO - TONE ARM (6). La rotazione in senso orario della vite diminuirà la distanza mentre una rotazione in senso anti-orario l’accrescerà.
In the USA: If you experience problems with this unit, call 1-732-738-9003 for Gemini Customer Service. Do not attempt to return this equipment to your dealer. Parts of the design of this product may be protected by worldwide patents. Information in this manual is subject to change without notice and does not represent a commitment on the part of the vendor. Gemini Sound Products Corp.