OPERATIONS MANUAL BEDIENUNGSHANDBUCH MANUAL DEL OPERADOR MANUEL D’INSTRUCTIONS SA-600II DIRECT-DRIVE MANUAL TURNTABLE HANDDREHSCHEIBE MIT DIREKTANTRIEB GIRADISCOS MANUAL DE ACCIONAMIENTO DIRECTO TABLE TOURNANTE MANUELLE À ENTRAÎNEMENT DIRECT MULTI LANGUAGE INSTRUCTIONS: English...............................................................................................................Page 3 Deutsch...........................................................................................................
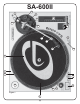
SA-600II 12 8 16 21 9 11 10 20 18 6 7 5 19 4 1 2 15 17 13 22 Figure 1 3 (2) 23 14
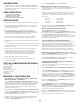
Figure 2 Figure 3 (3)
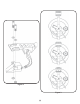
INTRODUCTION: CARTRIDGE INSTALLATION: (SEE FIG. 2) Because all cartridges have their own designs, please refer to your particular cartridge’s instructions to insure proper installation. Congratulations on purchasing a Gemini SA-600II turntable. This state of the art turntable includes the latest features. Prior to use, we suggest that you carefully read all the instructions. 1. Connect the lead wires to the cartridge terminals. For your convenience, the terminals of most cartridges are color coded.
ADJUSTING THE ANTI-SKATING CONTROL: 2. Be sure that the 45 SPEED SELECTOR (15) button is pushed and the 45 speed indicator is illuminated. Set the ANTI-SKATING CONTROL (12) to the same value as the stylus pressure. TARGET LIGHT: NOTE: IF YOUR TURNTABLE CAME WITH A CN-25 CARTRIDGE, IT HAS A RECOMMENED TRACKING FORCE OF 3.0 GRAMS AND CAN HAVE RANGE FROM 2.5-3.5 GRAMS. 1. Push the TARGET LIGHT SWITCH (18) firmly and the TARGET LIGHT (19) will illuminate the stylus tip. 2.
EINLEITUNG: 4. Den GUMMITELLER - RUBBER MAT (4) auf den PLATTER (2) legen. Wir gratulieren Ihnen zum Kauf eines Gemini SA-600II Plattenspielers. Dieses hochentwickelte erstklassige Gerät enthält die neuesten Leistungsmerkmale. Vor Anwendung dieses Plattenspielers bitte alle Anweisungen sorgfältig durchlesen. EINBAU DES TONABNEHMERS: (SIEHE ABBILDUNG 2) Weil alle Tonabnehmer individuell ausgeführt sind, siehe jeweilige Anweisungen für Tonabnehmer, um richtigen Einbau sicherzustellen. 1.
. Nach dem horizontalen NULLPUNKTABGLEICH das abgeglichene COUNTERWEIGHT (8) gegen den Uhrzeigersinn drehen, bis der vom Tonabnehmerhersteller empfohlene Auflagedruck auf dem STYLUS PRESSURE RING (11) erscheint, wo er mit der Mittellinie des TONE ARM (6) zusammentrifft. REGULIERUNG DER ANTISKATING-VORRICHTUNG: SPIELUNTERBRECHUNG: 1. Durch das Schieben den CUE LEVER (16) in die “UP”- Position wird der TONE ARM (6) angehoben und unterbricht das Spielen. 2.
INTRODUCCIÓN: 4. Coloque la RUBBER MAT (4) sobre el PLATTER (2). Felicitaciones por su compra de un tocadiscos Gemini SA-600II. Este tocadiscos de la más avanzada tecnología está dotado de características ultramodernas. Antes de usarlo, le recomendamos leer cuidadosamente todas las instrucciones. INSTALACIÓN DEL CARTUCHO: (VÉASE LA FIG. 2) Debido a que todos los cartuchos son de diseño distinto, sírvase referirse a las instrucciones de su cartucho específico, para garantizar la instalación correcta.
7. Después de ajustar el equilibrio cero (0) horizontal, gire el CONTRAPESO - COUNTERWEIGHT (8) equilibrado hacia la izquierda hasta que aparezca en el STYLUS PRESSURE RING (11) la presión de aguja recomendada del fabricante del cartucho en el punto donde coincide con la línea central del eje posterior del BRAZO DE FONOCAPTOR. AJUSTE DEL CONTROL ANTIDESLIZANTE: INTERRUPCIÓN DE LA REPRODUCCIÓN: 1.
INTRODUCTION: 3. Après avoir retiré tout l’emballage, positionnez soignneusement le PLATTER (2) sur l’axe central de la TURNTABLE BASE (1). Nos félicitations à l’occasion de votre achat cette table-tournante Gemini SA-600II. Ce table-tournante très moderne inclut les caractéristiques technologiques les plus récentes. Avant de l’employer, lisez attentivement toutes les instructions. 4. Placez la FEUTRINE EN CAOUTCHOUC - NEOPRENE MAT (4) sur le PLATEAU DE LECTURE - PLATTER (2).
6. Faites flotter le BRAS DE LECTURE de nouveau pour vous assurer de l’équilibre zéro horizontal (0). Si l’équilibre zéro n’est pas maintenu, répétez les étapes 3-5 du contrepoids. 10.Maintenant, vous avez le choix de mettre l’appareil hors tension en tournant POWER (13) sur la position “OFF” (hors tension) ou d’arrêter le PLATTER (2) en appuyant sur le START STOP (14) pour activer le frein électronique. 7.
In the USA: If you experience problems with this unit, call 1-732-738-9003 for Gemini Customer Service. Do not attempt to return this equipment to your dealer. Parts of the design of this product may be protected by worldwide patents. Information in this manual is subject to change without notice and does not represent a commitment on the part of the vendor. Gemini Sound Products Corp.