OPERATIONS MANUAL Bedienungsanleltung Manual de funcionamiento Manual de fonctionnement Manual del utente XL-100 BELT-DRIVE SEMI-AUTOMATIC TURNTABLE HALBAUTOMATISCHER PLATTENSPIELER MIT RIEMENANTRIEB GIRADISCOS SEMIAUTOMATICO ACCIONADO POR CORREA TABLE TOURNANTE SEMI-AUTOMATIQUE ENTRAINEE PAR COURROIE GIRADISCHI SEMIAUTOMATICO A COMANDO PER CINGHIA MULTI LANGUAGE INSTRUCTIONS English...........................................................................Page 3 Deutsch.................................
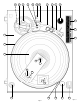
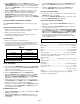
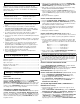
9 12 13 11 10 14 21 7 8 6 19 15 20 1 16 2 5 4C 4 4B 4A 3 22 23 Page 2 24 17 18 Figure 1
Figure 3A Figure 2 Figure 3B Page 3
Introduction Congratulations on purchasing a Gemini XL-100 turntable. This state of the art turntable includes the latest features. Prior to use, we suggest that you carefully read all the instructions. Features • ±6% Pitch control • Strobe illuminator • Soft-touch start/stop switch • Cartridge included Precautions 1. Read all operating instructions before using this equipment. 1.
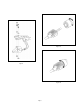
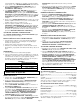
. With the TONE ARM (7) locked on the ARM REST (11), hold the COUNTERWEIGHT (9) steady with one hand while rotating the STYLUS PRESSURE RING (12) until the numeral “0” on the ring aligns with the center line on the TONE ARM rear shaft. The horizontal zero (0) balance should be completed. 6. Refloat the TONE ARM to ensure horizontal zero (0) balance. If zero balance has not been maintained, repeat counterweight steps 3 - 5. 3.
WIE MAN DEN PLATTENTELLERRIEMEN ANBRINGT: Einleitung Der RIEMEN - TURNTABLE BELT (4A) wird am unteren Ende des PLATTENTELLER - PLATTER (2) und der MOTORWELLE - MOTOR SPINDLE (4B) befestigt geliefert, kann sich manchmal aber beim Versand lösen. Den PLATTENTELLER drehen und durch die Löcher im Plattentellerchassis blicken, um nachzuprüfen, ob der Riemen angebracht ist. Wenn der Riemen nicht fest um das Plattentellerchassis und die MOTORWELLE - MOTOR SPINDLE (4B) angelegt ist, muß er neu angelegt werden.
2. Das BALANCEGEWICHT - COUNTERWEIGHT (9) gering im Gegenuhrzeigersinn ziehen, um es auf den hinteren Teil des TONARMS - TONE ARM (7) zu schrauben. Bedienungsanweisungen GRUNDBETRIEB: HORIZONTALER NULLPUNKTABGLEICH UND REGULIERUNG DES AUFLAGEDRUCKS: 1. Die Platte auf den GUMMITELLER - RUBBER MAT (5) legen, die auf dem PLATTENTELLER - PLATTER (2) sitzt. 1. Ohne die Nadelspitze zu berühren, entfernen Sie den Nadelschutz (falls Ihr Tonabnehmer einen abnehmbaren Nadelschutz hat). 2.
Spezifikationen PLATTENSPIELER: Typ....................................Halbautomatischer Plattenspieler mit Riemenantrieb Antriebsmethode...........................................................................Riemenantrieb Motor...............................................................................DC Gleichstrommotor Drehzahl...........................................................................33 1/3 oder 45 U/min Tonhöhenschwankungen..........................................................
1. Primero, coloque un destornillador en el centro de la ARANDELA DE SEGURIDAD - LOCKING WASHER (4C) alrededor del EJE CENTRAL CENTER SPINDLE (4) y quite la arandela cuidadosamente. Introducción Felicitaciones por su compra de un tocadiscos Gemini XL-100. Este tocadiscos de la más avanzada tecnología está dotado de características ultramodernas. Antes de usarlo, le recomendamos leer cuidadosamente todas las instrucciones. 2.
esté horizontalmente equilibrado. Ese equilibrio es fácil de determinar; espere el punto en que el BRAZO DE FONOCAPTOR “flote” libremente. 4. Coloque el BRAZO DE FONOCAPTOR - TONE ARM (7) sobre el DESCANSILLO - ARM REST (11) y asegurelo en posición con el SUJETABRAZO - ARM CLAMP (10). 5.
ATTACHER LA COURROIE DE LA PLATINE VINYLE: Introduction La COURROIE DE LA PLATINE VINYLE - TURNTABLE BELT (4A) est généralement attachée au PLATEAU - PLATTER (2) et à L’ARBRE MOTEUR - MOTOR SPINDLE (4B) mais parfois elle peut se détacher durant le transport. Faites tourner le PLATEAU - PLATTER (2) et regardez à travers les trous dans le plateau pour voir si la courroie est détachée.
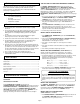
TABLEAU A INSTALLATION DU CONTREPOIDS: (VOIR LES FIGURES 3A ET 3B) CONNECTEURS DE SORTIE 1. Glissez le CONTREPOIDS - COUNTERWEIGHT (9) sur l’extrémité arrière du BRAS DE LECTURE - TONE ARM (7), la jauge de l’aiguille numérotée étant tournée vers l’avant. 2. Tournez le CONTREPOIDS - COUNTERWEIGHT (9) légèrement dans le sens antihoraire pour le visser sur l'extrémité arrière du BRAS DE LECTURE - TONE ARM (7).
3. Le PLATEAU - PLATTER (2) est équipé d’une BANDE INDICATRICE RPM - STROBE RPM INDICATOR STRIP (23) et l’INTERRUPTEUR DE MISE SOUS TENSION - POWER (17) incorpore des LUMIERES STROBOSCOPIQUES - STROBE ILLUMINATOR (24). Lorsque le PLATEAU - PLATTER (2) tourne, les LUMIERES allumeront la BANDE INDICATRICE RPM. La rangée de points inférieure apparaîtra comme étant stationnaire lorsque la vitesse du plateau est exactement 33 t/mn50 Hz (230V) .
i fori che la cinghia non si sia staccata. Se non è avvolta strettamente attorno al piatto e all’ALBERO DEL MOTORE, è necessario riattaccarla. Introduzione 1. Prima di tutto staccare delicatamente la RONDELLA DI SICUREZZA LOCKING WASHER (4C) con la punta di un cacciavite inserita al centro della rondella stessa e attorno all’ASSE CENTRALE - CENTER SPINDLE (4). Complimenti per l’acquisto di questo giradischi Gemini XL-100. Questo giradischi d’avanguardia ha incorporato i componenti più recenti.
3. Spostando in senso antiorario il CONTRAPPESO - COUNTERWEIGHT (9) il BRACCIO - TONE ARM (7) si abbasserà e in senso orario si avrà un movimento opposto. Girare in senso orario o antiorario il CONTRAPPESO fino ad avere il bilanciamento orizzontale del BRACCIO. Questo può essere facilmente evidenziato osservando il punto in cui il BRACCIO “fluttua” liberamente. 4. Posizionare il BRACCIO - TONE ARM (7) sul PORTABRACCIO - ARM REST (11) e bloccarlo in posizione con il FERMA-BRACCIO - ARM CLAMP (10). 5.
In the USA: If you experience problems with this unit, call 1-732-738-9003 for Gemini Customer Service. Do not attempt to return this equipment to your dealer. Parts of the design of this product may be protected by worldwide patents. Information in this manual is subject to change without notice and does not represent a commitment on the part of the vendor. Gemini Sound Products Corp.