GEMINI XL-500 DIRECT DRIVE MANUAL TURNTABLE OPERATIONS MANUAL Multi Language Instructions English..................................................Page 3-5 Deutsch.................................................Page 6-8 Español.................................................Page 9-11 Francais...............................................Page 12-14 Italiano.................................................
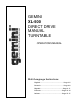
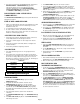
Figure 1 11 15 9 20 5 6 10 14 7 4 8 19 17 1 18 3 16 2 Page 1 21 22 12 13
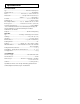
Figure 3A Figure 2 Figure 3B Page 2
White Introduction Congratulations on purchasing a Gemini XL-500 turntable. This state of the art turntable includes the latest features. Prior to use, we suggest that you carefully read all the instructions. Channel (L-)...................Left Channel - Red (R+)....................Right Channel + (R-).................Right Channel - Green + 2. Mount the cartridge in the HEADSHELL (4) and tighten it with the screws included with the cartridge. Features • • • • (L+).................
UNIT PLACEMENT: TARGET LIGHT: 1. Place unit on a flat, vibration free surface. Use the turntable feet to horizontally stabilize the unit. 1. Push the TARGET LIGHT SWITCH (17) firmly and the TARGET LIGHT (18) will raise into position and illuminate the stylus tip. 2. Try to place the unit as far away from the speakers as possible. 2. To lower the TARGET LIGHT, push down on it until it locks in the casing. 3. Keep the unit away from direct exposure to the sun, heat, moisture or dirt. 4.
Specifications TURNTABLE SECTION: Type......................................Direct Drive Manual Turntable Drive Method................................................................Direct Drive Motor.....................................................................Brushless DC Motor Platter......................................Aluminum Diecast 11 ½” (292 mm) Dia. Weight............................................2 lbs. (0.9 Kg) Speed.......................................................................
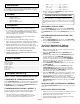
EINBAU DES TONABNEHMERS: (SIEHE ABBILDUNG 2) Einleitung Wir gratulieren Ihnen zum Kauf eines Gemini XL-500 Plattenspielers. Dieses hochentwickelte erstklassige Gerät enthält die neuesten Leistungsmerkmale. Vor Anwendung dieses Plattenspielers bitte alle Anweisungen sorgfältig durchlesen. Weil alle Tonabnehmer individuell ausgeführt sind, siehe jeweilige Anweisungen für Tonabnehmer, um richtigen Einbau sicherzustellen. 1. Die Zuleitungsdrähte an den Tonabnehmerklemmen anschlieen.
7. Nach dem horizontalen NULLPUNKTABGLEICH das abgeglichene BALANCEGEWICHT - COUNTERWEIGHT (7) gegen den Uhrzeigersinn drehen, bis der vom Tonabnehmerhersteller empfohlene Auflagedruck auf dem AUFLAGEDRUCKRING STYLUS PRESSURE RING (10) erscheint, wo er mit der Mittellinie des TONARMS - TONE ARM (5) zusammentrifft. 7. Den CUEING-HEBEL (15) in die “UP”-Position schieben. 8. Den Tonarm über die gewünschte Rille auf der Platte positionieren, und den CUEING-HEBEL in die “DOWN”-Position schieben.
Spezifikationen PLATTENSPIELER: Typ.............................................................Manueller Plattenspieler Antriebsmethode..........................................................Direktantrieb Motor.......................................Bürstenloser Gleichstrommotor Plattenteller......................................Druckgu 292 mm Durchmesser Gewicht.............................0,9 Kg (2 lbs.) Drehzahl...........................................................
INSTALACIÓN DEL CARTUCHO: (VÉASE LA FIG. 2) Introducción Felicitaciones por su compra de un tocadiscos Gemini XL-500. Este tocadiscos de la más avanzada tecnología está dotado de características ultramodernas. Antes de usarlo, le recomendamos leer cuidadosamente todas las instrucciones. Debido a que todos los cartuchos son de diseño distinto, sírvase referirse a las instrucciones de su cartucho específico, para garantizar la instalación correcta. 1.
7. Después de ajustar el equilibrio cero (0) horizontal, gire el CONTRAPESO - COUNTERWEIGHT (7) equilibrado hacia la izquierda hasta que aparezca en el ARO DE PRESIÓN DE AGUJA STYLUS PRESSURE RING (10) la presión de aguja recomendada del fabricante del cartucho en el punto donde coincide con la línea central del eje posterior del BRAZO DE FONOCAPTOR - TONE ARM (5). AJUSTE DEL CONTROL ANTIDESLIZANTE: 6. Oprima el BOTÓN DE ARRANQUE/PARADA (13). El PLATO (2) del tocadisco empezará a girar. 7.
Especificaciones SECCIÓN DE TOCADISCO: Tipo..................................Tocadisco manual de transmisión directa Método de transmisión.......................................Transmisión directa Motor.........................................................Motor sin escobillas Plato......................Troquelado de aluminio, 11p” (332mm) de diám. Peso...................................2 lbs. (0.9 Kg) Velocidad..............................................................
INSTALLATION DE LA CARTOUCHE: (VOIR LA FIGURE 2) Introduction Nos félicitations à l’occasion de votre achat cette table-tournante Gemini XL-500. Ce table-tournante très moderne inclut les caractéristiques technologiques les plus récentes. Avant de l’employer, lisez attentivement toutes les instructions. Etant donné que toutes les cartouches ont leurs propres particularités, consultez les instructions de votre cartouche pour vous assurer d’une bonne installation. 1.
7. Après le réglage de l’équilibre zéro (0) horizontal, tournez le CONTREPOIDS - COUNTERWEIGHT (7) équilibré dans le sens inverse des aguilles d’une montre jusqu’à ce que la pression de l’aiguille recommandée par le fabricant de la cellule de lecture apparaisse sur la BAGUE DE PRESSION DE L’AIGUILLE STYLUS PRESSURE RING (10) là où elle rencontre la ligne médiane de l’arbre arrière du BRAS DE LECTURE - TONE ARM (5). REGLAGE DE LA COMMANDE ANTIDERAPAGE: 5.
Specifications PARTIE DU TABLE-TOURNANTE: Type...........Table-tournante manuel à transmission directe Méthode de transmission...............................Transmission directe Moteur...................................................Moteur sans balais Plateau......................................Moulé par injection, en aluminium, de 332 mm (11,5 pouces) de diamètre Poids........................ 0,9 kg (2 livres) Vitesse:................................................................
INSTALLAZIONE CARTUCCIA: (VEDERE FIG. 2) Introduzione Complimenti per l’acquisto di questo giradischi Gemini XL-500. Questo giradischi d’avanguardia ha incorporato i componenti più recenti. Prima dell’uso leggere attentamente queste istruzioni per poter utilizzare il giradischi in modo corretto.
PUNTINA - STYLUS PRESSURE RING (10) appare il valore della pressione consigliata dal fabbricante allineata con la linea centrale dell’asta del BRACCIO - TONE ARM (5). 10. Se si desidera si può spegnere l’alimentazione portando l’INTERRUTTORE (12) su “OFF” o fermare il PIATTO PORTADISCO (2) spingendo il PULSANTE START/STOP (13) usando l’arresto elettronico. REGOLAZIONE DEL CONTROLLO ANTISKATING: ARRESTO DELLA RIPRODUZIONE: 1.
Specifiche Tecniche GIRADISCHI: Tipo...............................................................Manuale, Trazione diretta Sistema di trasmissione...........................................Trazione diretta Motore...........................................................Motore brushless Piattoportadisco...........................Alluminio pressofuso 292 mm Dia. Peso..............................0.9 kg Velocità...................................................
Parts of the design of this product may be protected by worldwide patents. Information in this manual is subject to change without notice and does not represent a commitment on the part of the vendor. Gemini Sound Products Corp. shall not be liable for any loss or damage whatsoever arising from the use of information or any error contained in this manual.